How to Use Kubernetes to Quickly Deploy Neo4j Clusters

Developer Relations Engineer
6 min read

As part of our work on the Neo4j Developer Relations team, we are interested in integrating Neo4j with other technologies and frameworks, ensuring that developers can always use Neo4j with their favorite technologies.
One of the technologies that we’ve seen gain a lot of traction over the last year or so is Kubernetes, an open-source system for automating deployment, scaling and management of containerized applications.

Neo4j and Kubernetes
Kubernetes was originally designed by Google and donated to the Cloud Native Computing Foundation.
At the time of writing there have been over 1,300 contributors to the project.
Neo4j on Kubernetes
Neo4j 3.1 introduced Causal Clustering – a brand-new architecture using the state-of-the-art Raft protocol – that enables support for ultra-large clusters and a wider range of cluster topologies for data center and cloud. Causal Clustering is safer, more intelligent, more scalable and built for the future.

A Neo4j Causal Cluster
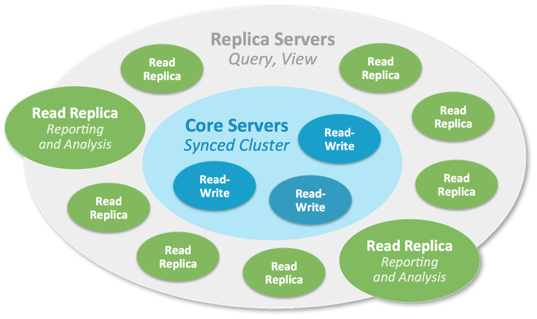
A Neo4j causal cluster is composed of servers playing two different roles: Core and Read replica.
Core Servers
Core Servers‘ main responsibility is to safeguard data. The Core Servers do so by replicating all transactions using the Raft protocol.
In Kubernetes we will deploy and scale core servers using StatefulSets.
We use a stateful set because we want to have a stable and unique network identifier for each of our core servers.
Read Replicas
Read Replicas‘ main responsibility is to scale out graph workloads (Cypher queries, procedures, and so on). Read Replicas act like caches for the data that the Core Servers safeguard, but they are not simple key-value caches. In fact Read Replicas are fully-fledged Neo4j databases capable of fulfilling arbitrary (read-only) graph queries and procedures.

In Kubernetes we will deploy and scale read replicas using deployments.
We’ve created a set of Kubernetes templates in the kubernetes-neo4j repository so if you just want to get up and running head over there and try them out.
If you haven’t got a Kubernetes cluster running you can create a single node cluster locally using minikube.
$ minikube start --memory 8192
Once that’s done we can then deploy a Neo4j cluster by executing the following command:
$ kubectl apply -f cores
service "neo4j" configured
statefulset "neo4j-core" created
We can check that Neo4j is up and running by checking the logs of our pods until we see the following line:
$ kubectl logs -l "app=neo4j"
...
2017-09-13 09:41:39.562+0000 INFO  Remote interface available at
https://neo4j-core-2.neo4j.default.svc.cluster.local:7474/
We can query the topology of the Neo4j cluster by running the following command:
$ kubectl exec neo4j-core-0 -- bin/cypher-shell --format verbose
"CALL dbms.cluster.overview() YIELD id, role RETURN id, role"
+-----------------------------------------------------+
| id                                     | role       |
+-----------------------------------------------------+
| "719fa587-68e4-4194-bc61-8a35476a0af5" | "LEADER"   |
| "bb057924-f304-4f6d-b726-b6368c8ac0f1" | "FOLLOWER" |
| "f84e7e0d-de6c-480e-8981-dad114de08cf" | "FOLLOWER" |
+-----------------------------------------------------+
Note that security is disabled on these servers for demo purposes. If we’re using this in production we wouldn’t want to leave servers unprotected.
Now let’s add some read replicas.
We can do so by running the following command:
$ kubectl apply -f read-replicas
deployment "neo4j-replica" created
Now let’s see what the topology looks like:
$ kubectl exec neo4j-core-0 -- bin/cypher-shell --format verbose
"CALL dbms.cluster.overview() YIELD id, role RETURN id, role"
+---------------------------------------------------------+
| id                                     | role           |
+---------------------------------------------------------+
| "719fa587-68e4-4194-bc61-8a35476a0af5" | "LEADER"       |
| "bb057924-f304-4f6d-b726-b6368c8ac0f1" | "FOLLOWER"     |
| "f84e7e0d-de6c-480e-8981-dad114de08cf" | "FOLLOWER"     |
| "8952d105-97a5-416b-9f61-b56ba44f3c02" | "READ_REPLICA" |
+---------------------------------------------------------+
We can scale cores or read replicas but we’ll look at how to do that in the section.
When we first created the Kubernetes templates I wrote a blog post about it and in the comments Yandry Pozo suggested that we should create a Helm package for Neo4j.
11 months later…
Neo4j on Helm
Helm is a tool that streamlines installing and managing Kubernetes applications.
You can think of it as an App Store for Kubernetes.
Helm has two parts: a client (helm) and a server (tiller).

Tiller runs inside of your Kubernetes cluster, and manages releases (installations) of your charts.
Helm runs on your laptop, CI/CD, or wherever you want it to run.
In early September the Neo4j Helm package was merged into the charts incubator, which means that if you’re running Helm on your Kubernetes cluster you can easily deploy a Neo4j cluster.
Once we’ve downloaded the Helm client we can install it on our Kubernetes cluster by running the following command:
$ helm init &&
  kubectl rollout status -w deployment/tiller-deploy --namespace=kube-system
The first command installs Helm on the Kubernetes cluster and the second blocks until it’s been deployed.
We can check that it’s installed by running the following command:
$ kubectl get deployments -l 'app=helm' --all-namespaces
NAMESPACE     NAME            DESIRED   CURRENT   UP-TO-DATE   AVAILABLE   AGE
kube-system   tiller-deploy   1         1         1            1           1m
We’re now ready to install Neo4j!
Let’s check that the Neo4j chart is there:
$ helm search neo4j
NAME                   VERSION        DESCRIPTION
incubator/neo4j        0.3.0          Neo4j is the world's leading graph database
stable/neo4j           0.3.1          Neo4j is the world's leading graph database
Looks good.
Now we can deploy our Neo4j cluster.
$ helm install stable/neo4j --name neo-helm --wait --set authEnabled=false
This will deploy a cluster with 3 core servers and no read replicas.
Again, note that we have auth disabled for demo purposes.
If we want to add read replicas we can scale the deployment using the following command:
$ kubectl scale deployment neo-helm-neo4j-replica  --replicas=3
deployment "neo-helm-neo4j-replica" scaled
We can check that’s worked by running the same procedure that we used above:
$ kubectl exec neo-helm-neo4j-core-0 -- bin/cypher-shell --format verbose
"CALL dbms.cluster.overview() YIELD id, role RETURN id, role"
+---------------------------------------------------------+
| id                                     | role           |
+---------------------------------------------------------+
| "32e6b76d-4f52-4aaa-ad3b-11bc4a3a5db6" | "LEADER"       |
| "1070d088-cc5f-411d-9e64-f5669198f5b2" | "FOLLOWER"     |
| "e2b0ef4c-6caf-4621-ab30-ba659e0f79a1" | "FOLLOWER"     |
| "f79dd7e7-18e7-4d82-939a-1bf09f8c0f42" | "READ_REPLICA" |
| "b8f4620c-4232-498e-b39f-8d57a512fa0e" | "READ_REPLICA" |
| "74c9cb59-f400-4621-ac54-994333f0278f" | "READ_REPLICA" |
+---------------------------------------------------------+
Finally, let’s put some data in our cluster by running the following command:
$ kubectl exec neo-helm-neo4j-core-0 -- bin/cypher-shell
"UNWIND range(0, 1000) AS id CREATE (:Person {id: id}) RETURN COUNT(*)"

COUNT(*)
1001
And we can check that it reached the other cluster members as well:
$ kubectl exec neo-helm-neo4j-core-2 -- bin/cypher-shell
"MATCH (:Person) RETURN COUNT(*)"
COUNT(*)
1001
$ kubectl exec neo-helm-neo4j-replica-3056392186-q0cr9 -- bin/cypher-shell
"MATCH (:Person) RETURN COUNT(*)"
COUNT(*)
1001
All good!
Feedback
Please go, give it a try and follow the steps above.
We would love to hear what you think about Neo4j and Kubernetes working together.
- How does it work for you?
- Did you run into any issues?
- Do you have suggestions for improvements?
Email us devrel@neo4j.com or raise an issue on the kubernetes-neo4j GitHub repository.


