Neo4j Doc Manager
The Neo4j Doc Manger project facilitates real time data synchronization from MongoDB to Neo4j.
Neo4j Doc Manager
1. Our Goal
1.1. What is Neo4j Doc Manager?
It is a tool that enables you to migrate documents from MongoDB to a Neo4j property graph structure. You just run it in background and the information that is in MongoDB will be imported to a graph.
1.2. A little longer explanation
Neo4j is an OLTP graph database which excels at querying data relationships, which is a weakness of other NoSQL and SQL solutions. We created the Neo4j Doc Manager for Mongo Connector to allow MongoDB developers to store JSON data in Mongo while querying the relationships between the data using Neo4j. We call this polyglot persistence - using the database best suited for the type of data and querying your application requires.
MongoDB stores data as JSON-like documents, while Neo4j stores data as property graphs. In order to enable graph-based querying of MongoDB data, we need to determine how to map between these two different data structures. Our initial goal was to implement a default mapping plan, covering the most well-known cases. We wanted to follow convention instead of requiring configuration. We collected some generic MongoDB Document structures based on community feedback and structured the mapping based on them. It’s important to note that we are open to further suggestions and improvements.

This project is based upon the Mongo Connector. It provides a simple protocol to transfer data from MongoDB to another database. While Mongo publishes Doc Manager implementations for other databases, they did not provide an implementation for Neo4j. You can grab more detailed information about mongo-connector in the official Project Wiki.
The Mongo Connector requires creating a MongoDB replica set. An OplogThread thread then will listen to all CUD actions occurring in MongoDB. The mongo-connector provides an interface to collect the events caught by the OplogThread. The communication interface is implemented into a structure called DocManager, which can properly receive and handle Mongo documents and information about the database and its collections.
By extending the DocManager class, we have created a Configuration that interacts with Neo4j. Some methods are required to be implemented to keep Mongo Connector protocol consistent. The next section describes in detail how neo4j_doc_manager handles each of these methods.
Detailed documentation for the DocManager superclass and its protocol can be found here
2. About Neo4j DocManager
2.1. Setup
2.1.1. Install neo4j-doc-manager
The preferred method of installation is with the pip package manager:
pip install neo4j-doc-managerAlternate installation
You can install neo4j-doc-manager from Github source:
First, install the project dependencies:
pip install -r requirements.txtNow install neo4j_doc_manager by cloning this repository and setting the PYTHONPATH to it’s local directory:
git clone https://github.com/neo4j-contrib/neo4j_doc_manager.git
cd neo4j_doc_manager
export PYTHONPATH=.
2.1.2. Start Neo4j and Mongo
Ensure that you have a Neo4j instance up and running.
If you have authentication enabled for Neo4j, be sure to set NEO4J_AUTH environment variable, containing your username and password.
export NEO4J_AUTH=<user>:<password>Ensure that mongo is running a replica set. To initiate a replica set start mongo with:
mongod --replSet myDevReplSetThen open mongo-shell and run:
rs.initiate()Please refer to Mongo Connector FAQ for more information.
2.1.3. Start the Neo4j Doc Manager service
To start the service, run the following command:
mongo-connector -m localhost:27017 -t http://localhost:7474/db/data -d neo4j_doc_manager-
-m provides Mongo endpoint
-
-t provides Neo4j endpoint. Be sure to specify the protocol (http).
-
-d specifies Neo4j Doc Manager.
2.2. Methods
2.2.1. Constructor
By invoking Neo4j Doc Manager initialisation command with proper parameters ( mongo-connector -m [mongo_url] -t [neo4j_server_url] -d neo4j_doc_manager ), the Neo4jDocManager constructor is called.
Constructor receives the following arguments:
(self, url, auto_commit_interval=DEFAULT_COMMIT_INTERVAL,
                 unique_key='_id', chunk_size=DEFAULT_MAX_BULK, **kwargs)
url corresponds the address where a Neo4j server instance is running.
unique_key corresponds to the identifier refers to the unique key that is being used in Mongo. Default value is _id .
Authentication
If you have authentication enabled for Neo4j, be sure to set NEO4J_AUTH environment variable, containing your username and password.
export NEO4J_AUTH=<user>:<password>If authentication is not enabled on Neo4j, no action is required. To disable authentication on Neo4j, go to Neo4j install directory, and then edit conf/neo4j-server.properties :
dbms.security.auth_enabled=false2.2.2. Upsert
Upsert describes the method that creates new nodes and relationships given a Mongo Document. The method signature is described as below:
upsert(self, doc, namespace, timestamp):Basically we translate every element of a collection into a new node. Since the elements can be composite, we have adopted some patterns to properly convert each document into a group of nodes and relationships:
-
Each new node will be receive Document Label
-
Also the document type (the referred collection from the incoming document) will also be inserted as a node label
-
Document id will be propagated to the node. That means node will have the same '_id' that Mongo Document has.
-
If the document contains the elements below, they will recursively be transformed into new nodes as well
-
a nested document
-
an array of documents
-
-
All the other types of data into the document will be translated into node properties.
In terms of relationships, every time we find composite documents, we will establish a relationship between the root document and the nested document.
To clarify our scenario, let’s imagine an empty MongoDB instance. Let’s also consider an empty instance of Neo4j.
Simple case
We then run the following statement into mongo, to insert a talk into a collection of talks:
db.talks.insert( { "session": { "title": "12 Years of Spring: An Open Source Journey", "abstract": "Spring emerged as a core open source project in early 2003 and evolved to a broad portfolio of open source projects up until 2015." }, "topics": ["keynote", "spring"], "room": "Auditorium", "timeslot": "Wed 29th, 09:30-10:30", "speaker": { "name": "Juergen Hoeller", "bio": "Juergen Hoeller is co-founder of the Spring Framework open source project.", "twitter": "https://twitter.com/springjuergen", "picture": "http://www.springio.net/wp-content/uploads/2014/11/juergen_hoeller-220x220.jpeg" } } );This will insert the following document into Mongo:
{
  "session": {
    "title": "12 Years of Spring: An Open Source Journey",
    "abstract": "Spring emerged as a core open source project in early 2003 and evolved to a broad portfolio of open source projects up until 2015."
  },
  "topics":  ["keynote", "spring"],
  "room": "Auditorium",
  "timeslot": "Wed 29th, 09:30-10:30",
  "speaker": {
    "name": "Juergen Hoeller",
    "bio": "Juergen Hoeller is co-founder of the Spring Framework open source project.",
    "twitter": "https://twitter.com/springjuergen",
    "picture": "http://www.springio.net/wp-content/uploads/2014/11/juergen_hoeller-220x220.jpeg"
  }
}
This will be reflected as follows into Neo4j:
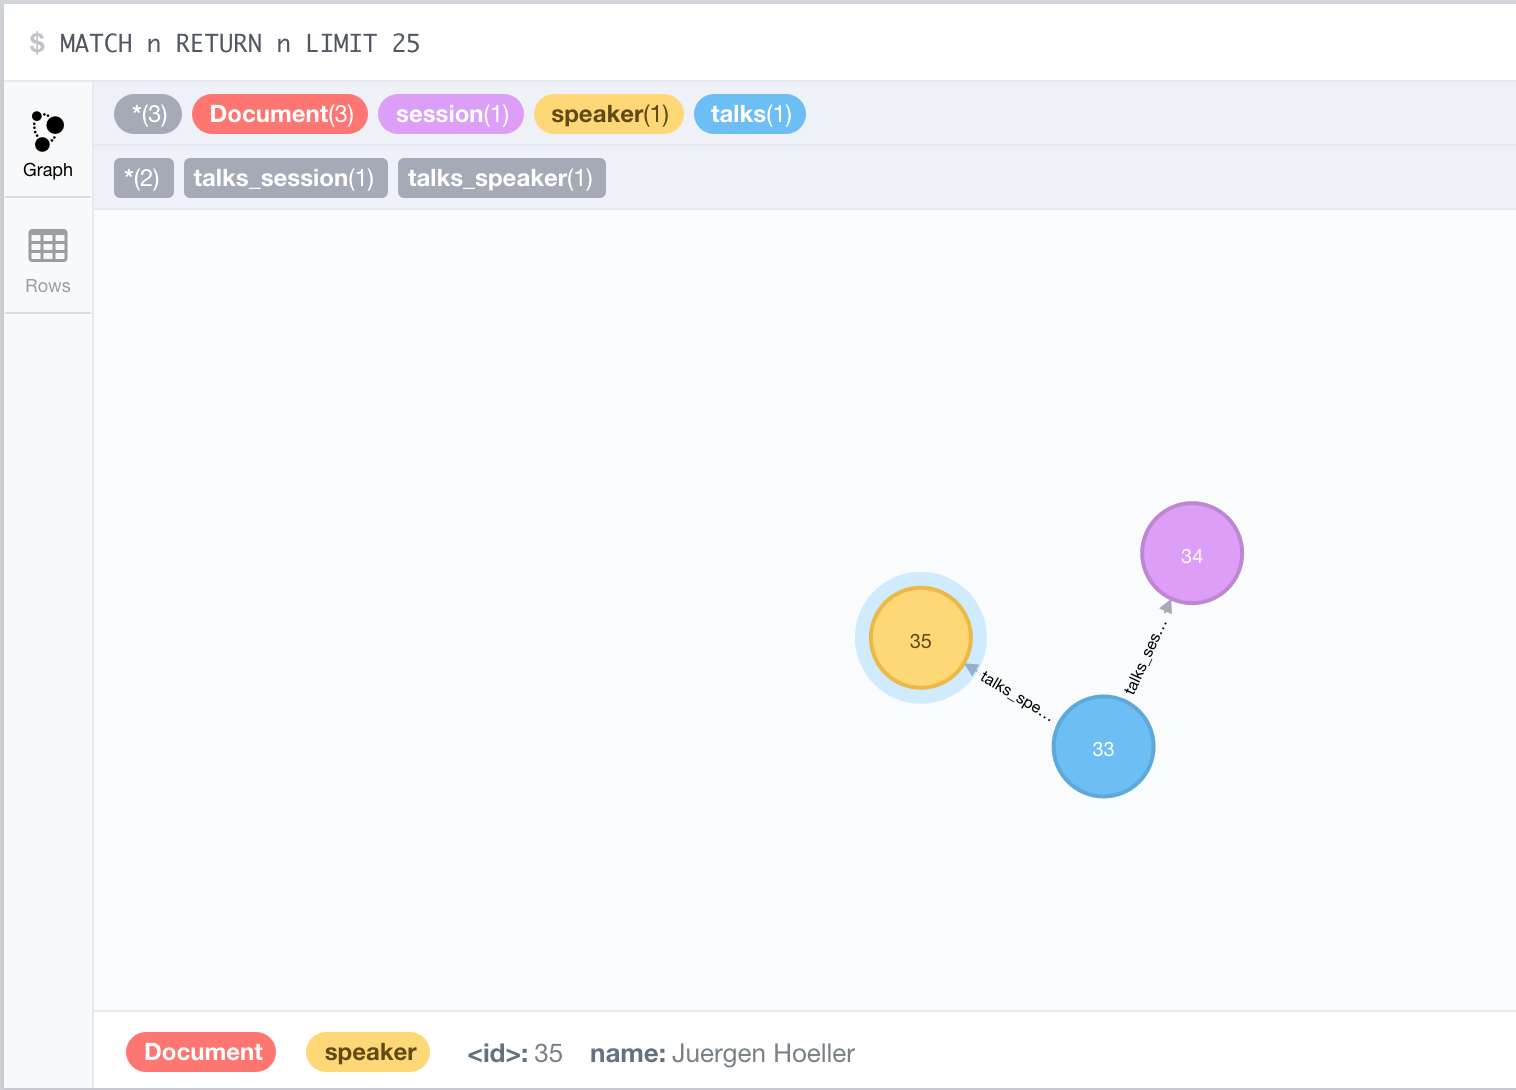
Check the detailed generated graph:

Created nodes:
-
Document:talks - talks is the root node, coming from Mongo Document Collection, with an id that also comes from MongoDB. Non nested Documents are converted into regular properties, such as "room", "topics" and "timeslot" (a common String array).
-
Document:session - Nested Document. Inner key/values are converted into Node properties. Note that the id incoming from root talks collection is propagated to this Node. Also, note that this node is labelled as its direct document key, in this case, session.
-
Document:speaker - also nested Document.
Also, for every created node, a property names _ts, representing the timestamp of the creation in MongoBD, is added to the node.
Created Relationships:
-
A relationship that connects talks and session nodes, called talks_session,
-
A relationship that connects talks and speaker nodes, called talks_speaker.
The node chain is preserved. For example, imagine that you insert the following document in MongoDB:
db.talks.insert( { "session": { "title": "12 Years of Spring: An Open Source Journey", "abstract": "Spring emerged as a core open source project in early 2003 and evolved to a broad portfolio of open source projects up until 2015.", "conference": { "city": "London" } }, "topics": ["keynote", "spring"], "room": "Auditorium", "timeslot": "Wed 29th, 09:30-10:30", "speaker": { "name": "Juergen Hoeller", "bio": "Juergen Hoeller is co-founder of the Spring Framework open source project.", "twitter": "https://twitter.com/springjuergen", "picture": "http://www.springio.net/wp-content/uploads/2014/11/juergen_hoeller-220x220.jpeg" } } );{
"_id" : ObjectId("560dd583cf74773fae3fd001"),
"session" : {
"title" : "12 Years of Spring: An Open Source Journey",
"abstract" : "Spring emerged as a core open source project in early 2003 and evolved to a broad portfolio of open source projects up until 2015.",
"conference" : {
"city" : "London"
}
},
"topics" : [
"keynote",
"spring"
],
"room" : "Auditorium",
"timeslot" : "Wed 29th, 09:30-10:30",
"speaker" : {
"name" : "Juergen Hoeller",
"bio" : "Juergen Hoeller is co-founder of the Spring Framework open source project.",
"twitter" : "https://twitter.com/springjuergen",
"picture" : "http://www.springio.net/wp-content/uploads/2014/11/juergen_hoeller-220x220.jpeg"
}
}In Neo4j, we will have:

Created nodes:
-
Document:talks - talks is the root node, coming from Mongo Document Collection, with an id that also comes from MongoDB. Non nested Documents are converted into regular properties, such as "room", "topics" and "timeslot" (a common String array).
-
Document:session - Nested Document. Inner key/values are converted into Node properties. Note that the id incoming from root talks collection is propagated to this Node. Also, note that this node is labelled as its direct document key, in this case, session.
-
Document:speaker - also nested Document.
-
Document:conference - a Node that is nested to session.
Also, for every created node, a property names _ts, representing the timestamp of the creation in MongoBD, is added to the node.
Created Relationships:
-
A relationship that connects talks and session nodes, called talks_session,
-
A relationship that connects talks and speaker nodes, called talks_speaker.
-
A relationship that connects session and conference nodes, called session_conference.
Case containing a JSON Array
Now let’s insert the following data. Note the nested JSON array represented by tracks:
db.talks.insert( { "session": { "title": "12 Years of Spring: An Open Source Journey", "abstract": "Spring emerged as a core open source project in early 2003 and evolved to a broad portfolio of open source projects up until 2015." }, "topics": ["keynote", "spring"], "tracks": [{ "main":"Java" }, { "second":"Languages" }], "room": "Auditorium", "timeslot": "Wed 29th, 09:30-10:30", "speaker": { "name": "Juergen Hoeller", "bio": "Juergen Hoeller is co-founder of the Spring Framework open source project.", "twitter": "https://twitter.com/springjuergen", "picture": "http://www.springio.net/wp-content/uploads/2014/11/juergen_hoeller-220x220.jpeg" } } );{
"session": {
"title": "12 Years of Spring: An Open Source Journey",
"abstract": "Spring emerged as a core open source project in early 2003 and evolved to a broad portfolio of open source projects up until 2015."
},
"topics": ["keynote", "spring"],
"tracks": [{ "main":"Java" }, { "second":"Languages" }],
"room": "Auditorium",
"timeslot": "Wed 29th, 09:30-10:30",
"speaker": {
"name": "Juergen Hoeller",
"bio": "Juergen Hoeller is co-founder of the Spring Framework open source project.",
"twitter": "https://twitter.com/springjuergen",
"picture": "http://www.springio.net/wp-content/uploads/2014/11/juergen_hoeller-220x220.jpeg"
}
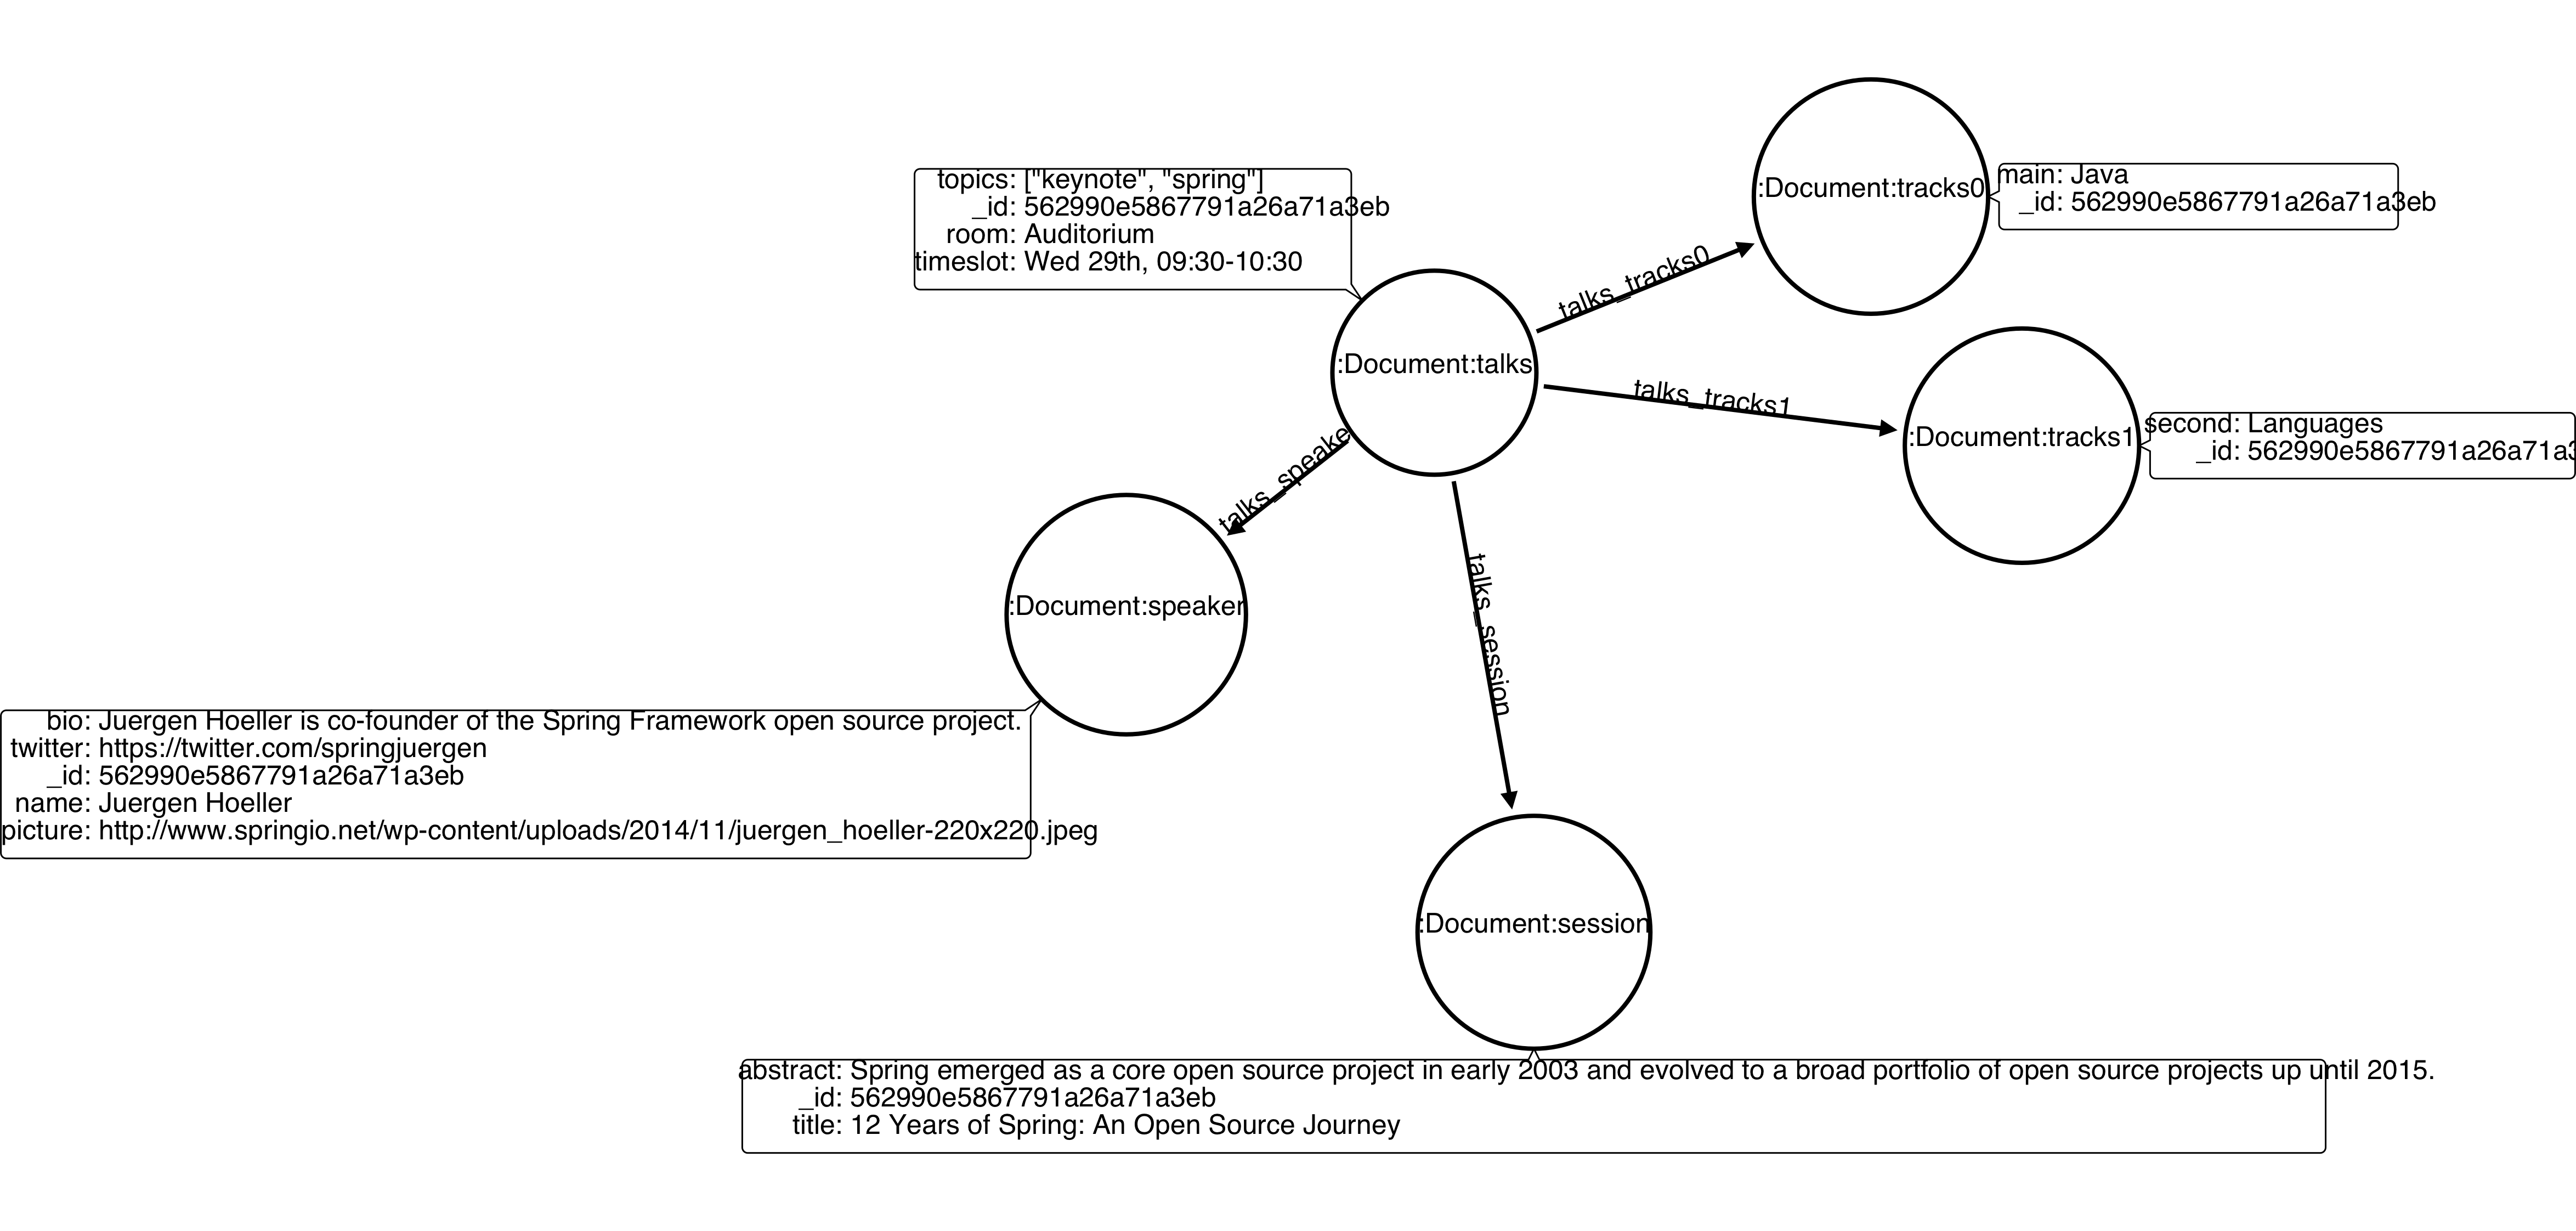
}The above document will be translated into Neo4j as follows:

Created nodes:
-
Document:talks - talks is the root node, coming from Mongo Document Collection, with an id that also comes from MongoDB. Non nested Documents are converted into regular properties, such as "room", "topics" and "timeslot" (a common String array).
-
Document:tracks0 - A node that represents the first JSON of tracks array [at index 0]. It contains the propagated talks id, plus the properties of the nested document.
-
Document:tracks1 - A node that represents the second JSON of tracks array [at index 1]. It contains the propagated talks id, plus the properties of the nested document.
-
Document:session - Nested Document. Inner key/values are converted into Node properties. Note that the id incoming from root talks collection is propagated to this Node. Also, note that this node is labelled as its direct document key, in this case, session.
-
Document:speaker - also nested Document.
Created Relationships:
-
A relationship that connects talks and session nodes, called talks_session,
-
A relationship that connects talks and speaker nodes, called talks_speaker.
-
A relationship that connects talks and the first element of tracks array (tracks0), called talks_tracks0
-
A relationship that connects talks and the second element of tracks array (tracks1), called talks_tracks1
Case containing Mongo documents joined by an _id reference
Let’s imagine now an explicit _id reference between two documents, such as:
db.places.insert({"_id": "32434ab234324", "name": "The cool place", "url": "cool.example.net" }){
"_id": "32434ab234324",
"name": "The cool place",
"url": "cool.example.net"
}db.people.insert({ "name": "Michael", "places_id": "32434ab234324", "url": "neo4j.com/Michael" }){
"name": "Michael",
"places_id": "32434ab234324",
"url": "neo4j.com/Michael"
}Note that two documents were inserted, and people references place explicitly by id. Neo4j Doc Manager will map every field that ends with _id into an explicit relationship. First, we run a MERGE to see if the respective node exists. In the above example, we insert a _place_, and then a people. When inserting the people type, the connector will identify an explicit id relationship, through places\_id , and will try to find the respective node. If it does exist (and it should), a relationship between the two nodes will be created.
Created nodes:
-
Document:places - Simple root node, with the properties name and url and an _id.
-
Document:people - Another node, that comes from an different upsert method call. It creates another simple node, with the properties name and url.
Created Relationships:
-
A relationship that connects people and places nodes is created due to the property places_id on people node. It is called people_places.
2.2.3. Bulk Upsert
If you already have data inserted on your MongoDB, the first time you run Neo4j DocManager the bulk_upsert method will be called. It acts as a normal upsert, described in previous section, but all the database actions will be batched in a single transaction.
This will avoid a massive commit into Neo4j if the current Mongo database already has several documents. This will also avoid inconsistencies on an initial import.
Keep in mind that batch_upsert tends to have better performance if you are importing a huge amount of data. The key to have this method called is the absence of a file called oplog.timestamp. If this file is not present, the document import will happen via bulk_upsert.
This can be useful if you call a mongoimport commmand that will bring up a huge amount of data. For this scenario, you could manually remove the oplog.timestamp, which is automatically created the first time you call mongo-connector command. This file usually lives on the root of your neo4j-doc-manager Python Package project.
Of course you do not have to remove the file. bulk_upsert is not mandatory, but it can help you to achieve better performance on situations where you have many documents to bring to Neo4j.
bulk_upsert has a maximum chunk size of 1000 transactions. That means any transaction block on Neo4j will have more than 1000 nested statements.
2.2.4. Update
Update describes the method that will update information into a document, by modifying an existing property or adding a new one; to a single document or multiple ones. The behaviour varies according to the instruction passed to Mongo.
$set
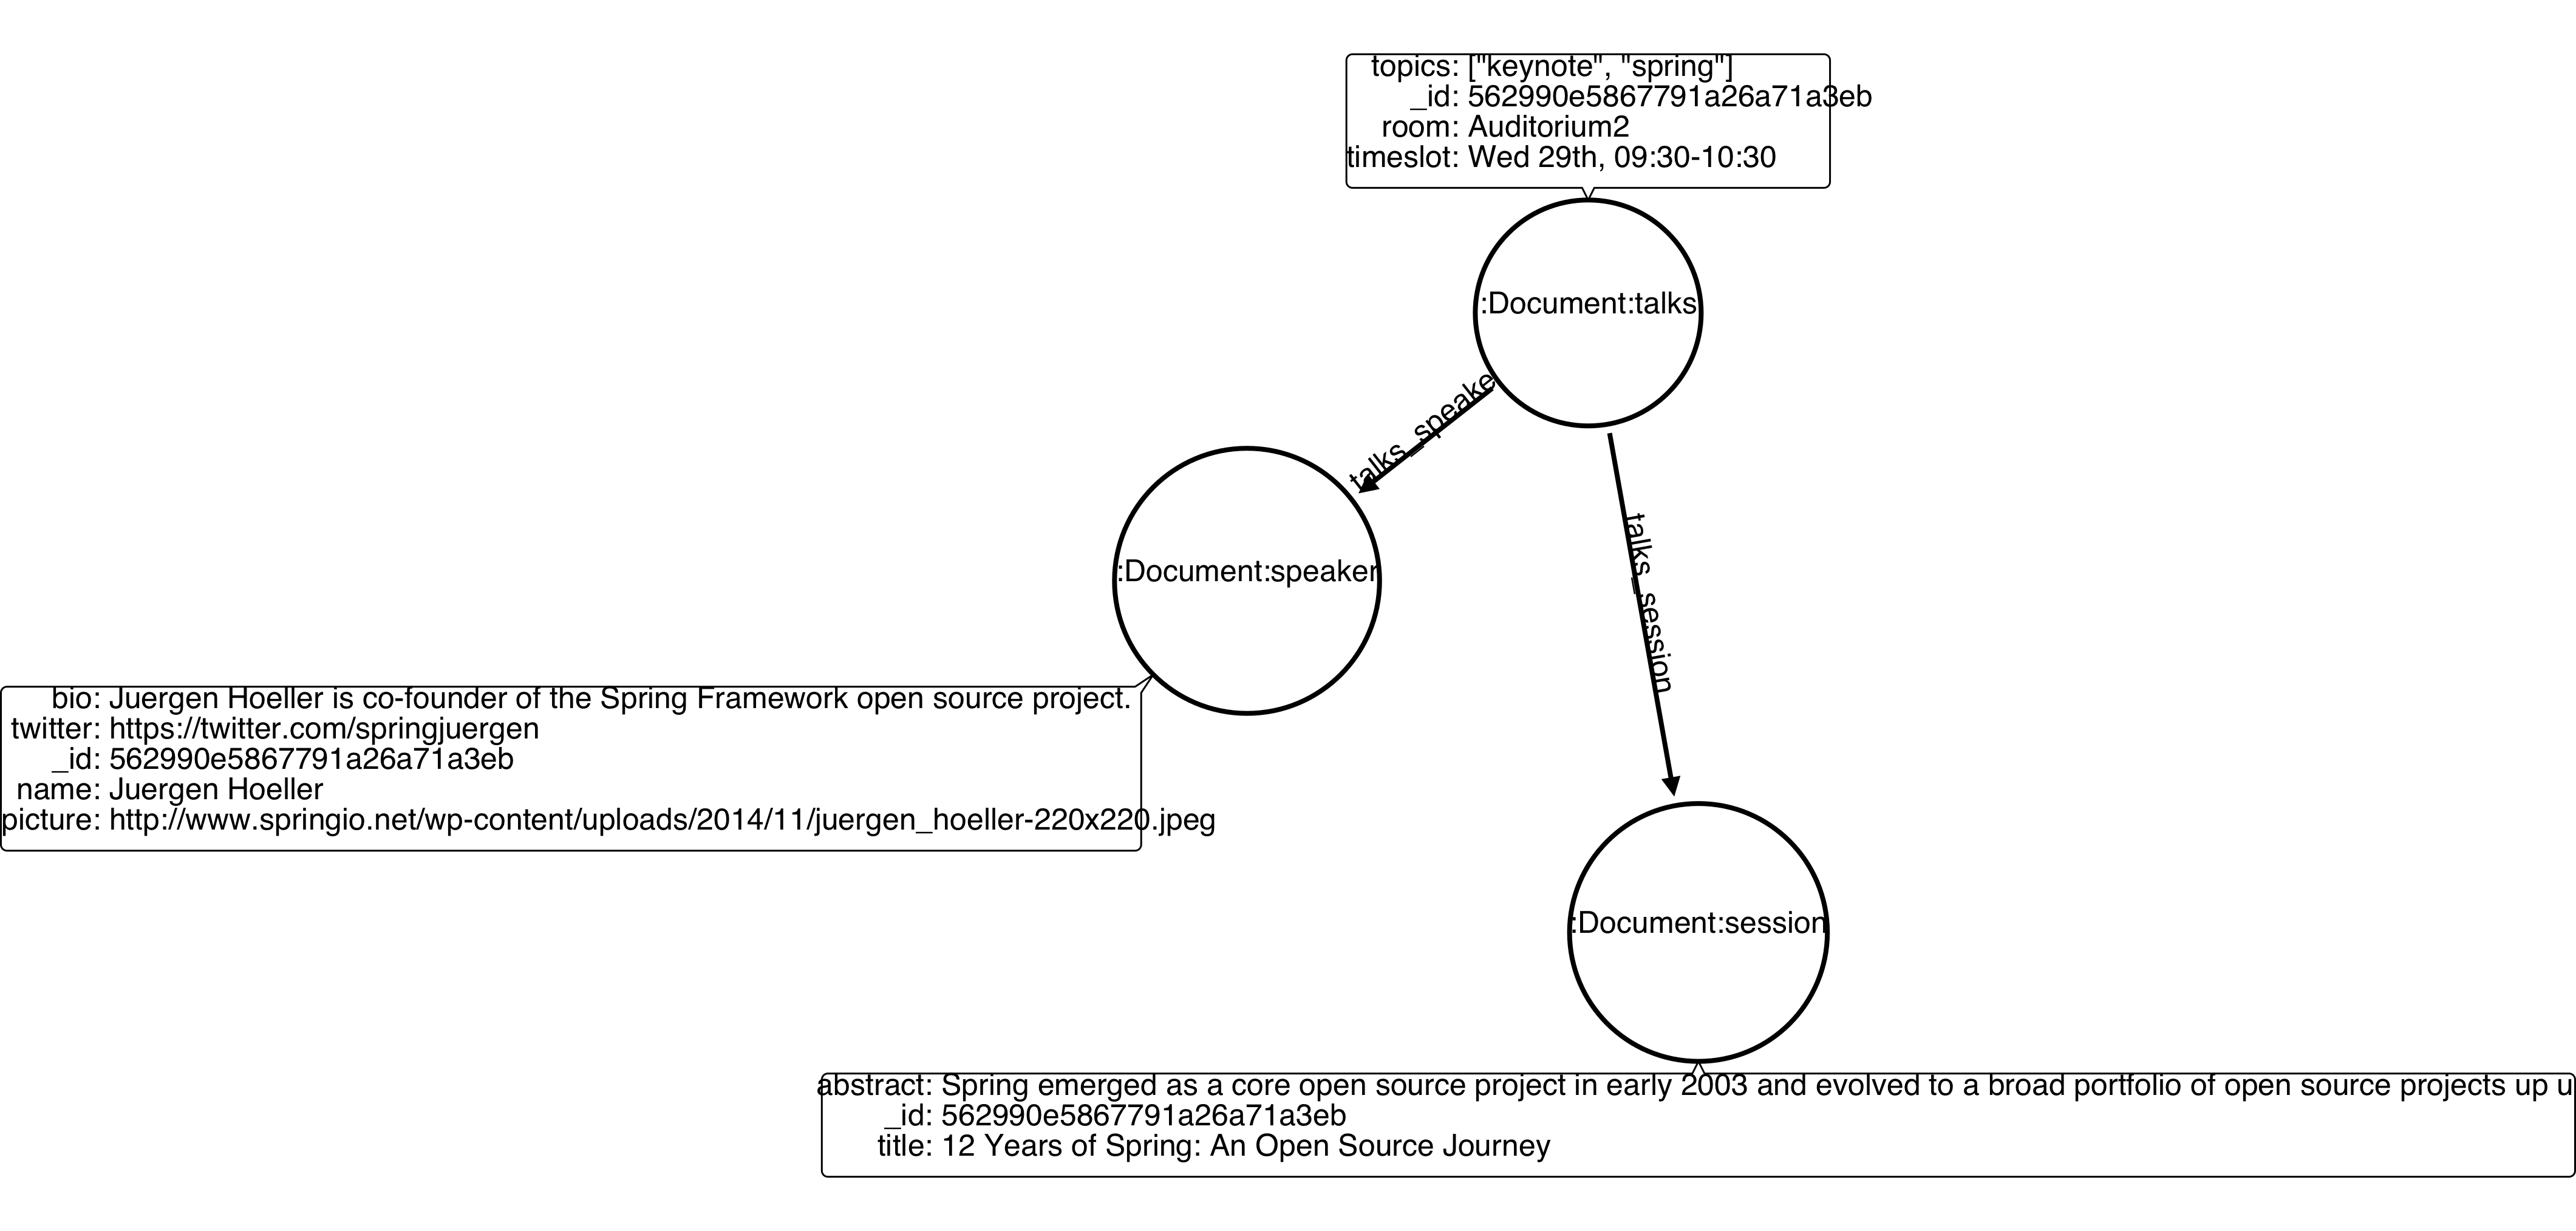
$set clause updates a single document. For example, imagine we have inserted the talks previously described into Upsert section, and now we want to update the room, which is Auditorium, to Auditorium2. We have to run the following instruction:
db.talks.update({ "room": "Auditorium"}, { $set: { "room": "Auditorium2"} })This instruction will get the first document in Mongo that matches with the specified criteria and generate an update method call into Neo4j Doc Manager. Considering we have a document previously inserted into Mongo by the Upsert example, we will have a single update.
Updated Nodes
-
The node with room: "Auditorium" now will have the property room with the value of "Auditorium2".
Compare both graphs:
Before the update

After the update
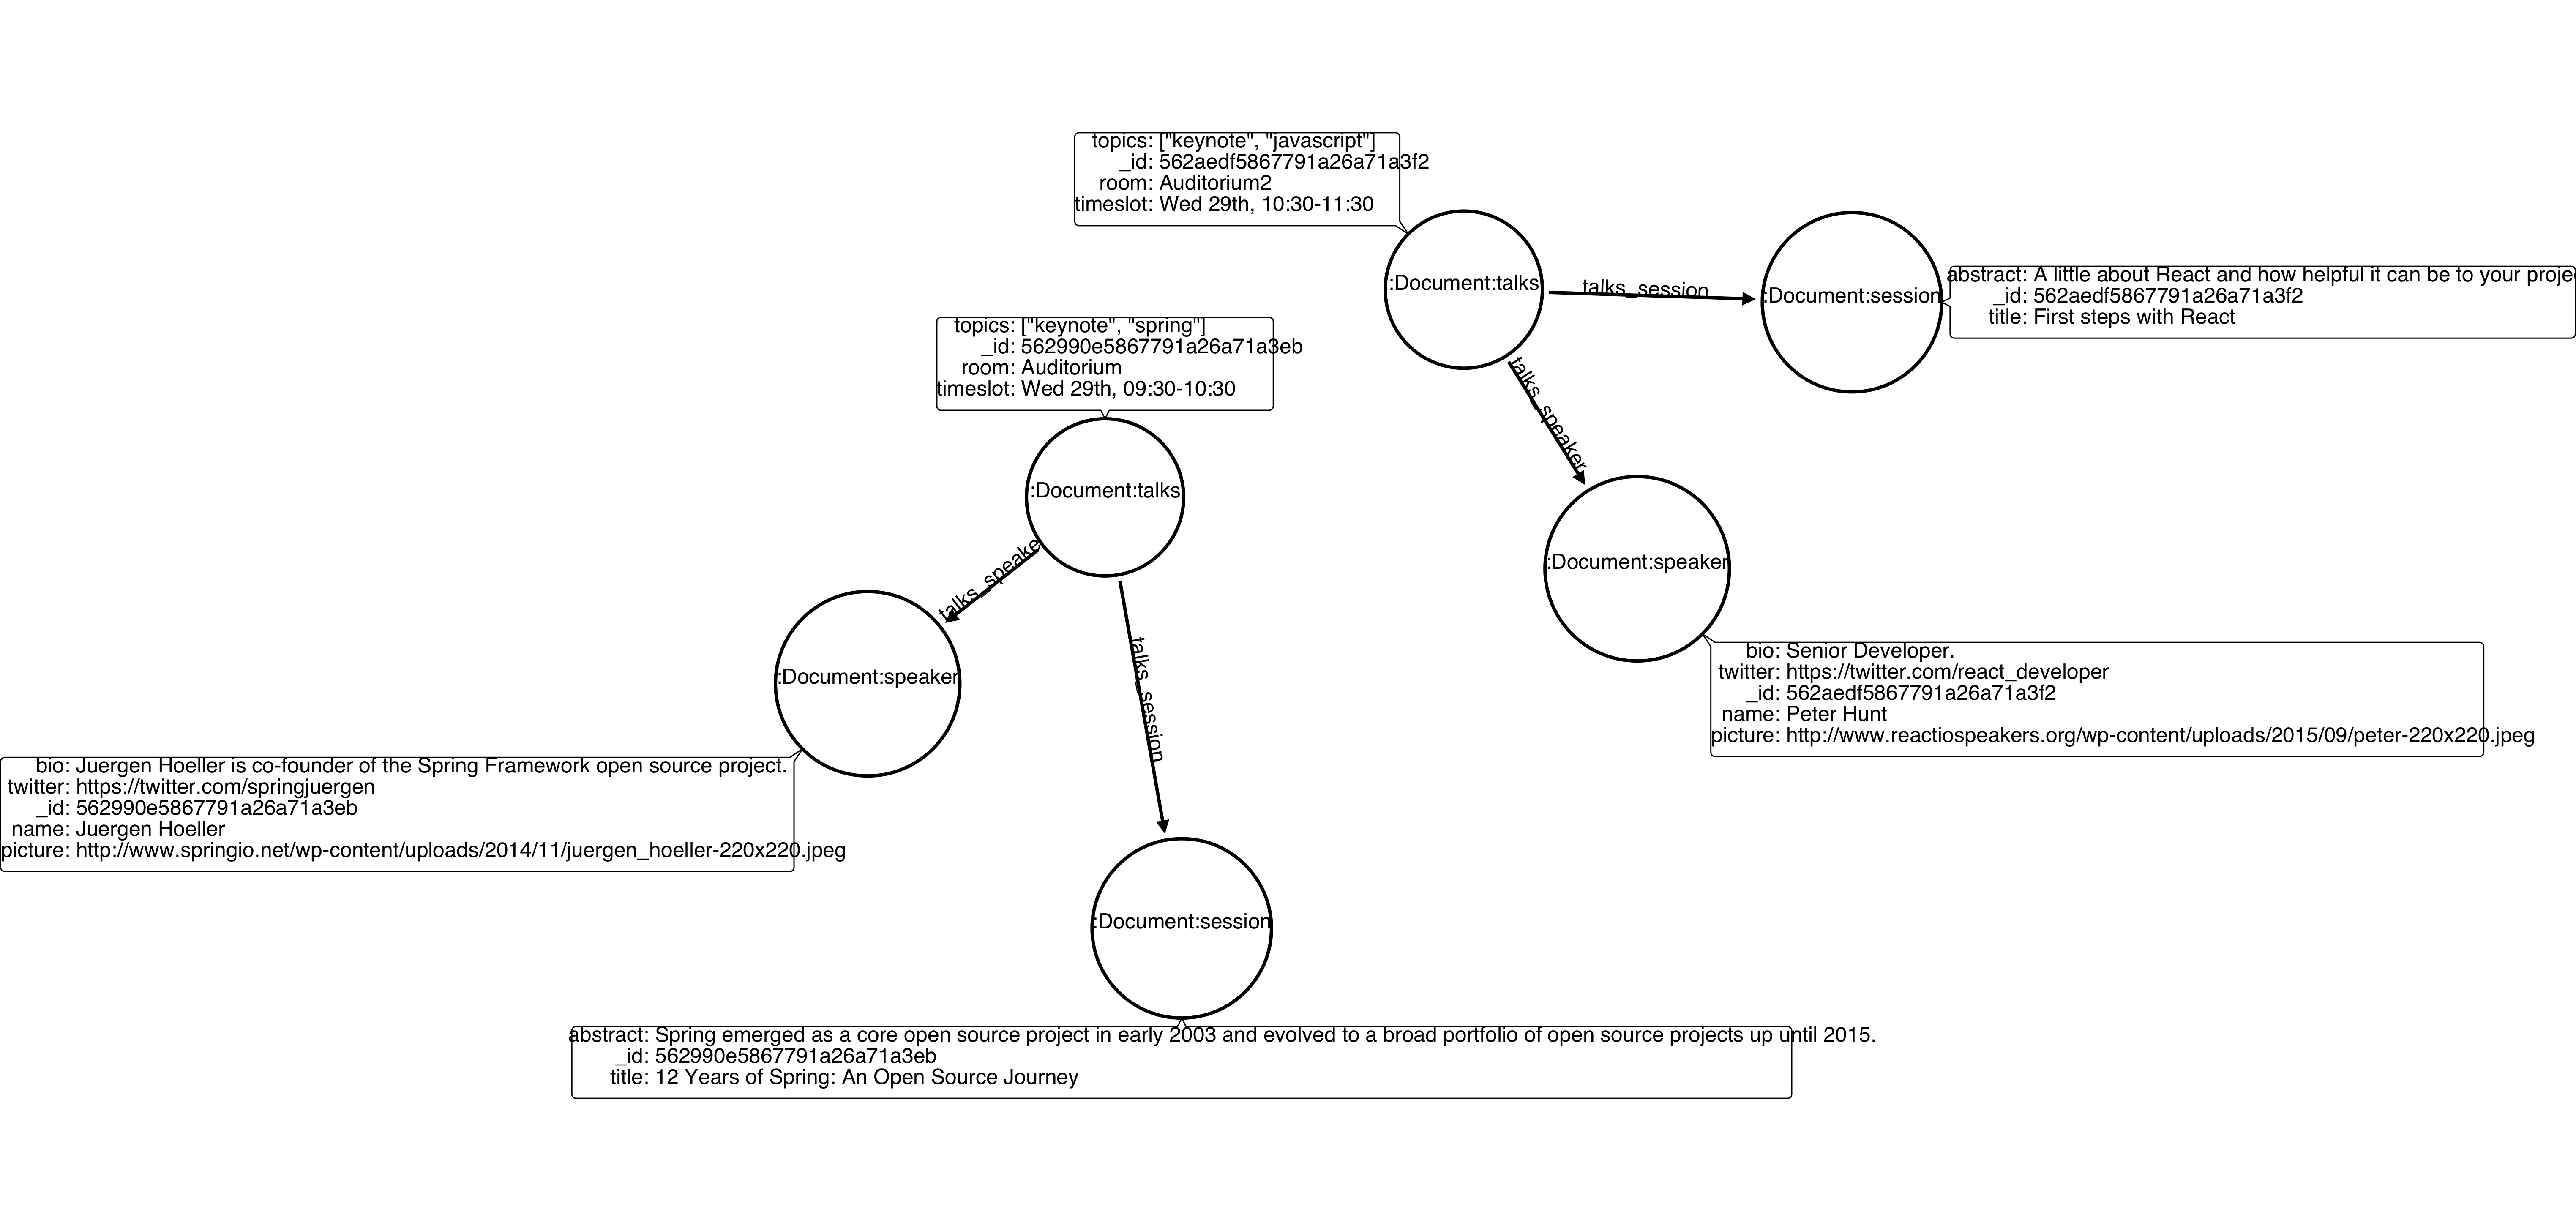
Let’s assume we have inserted another talk in Mongo:
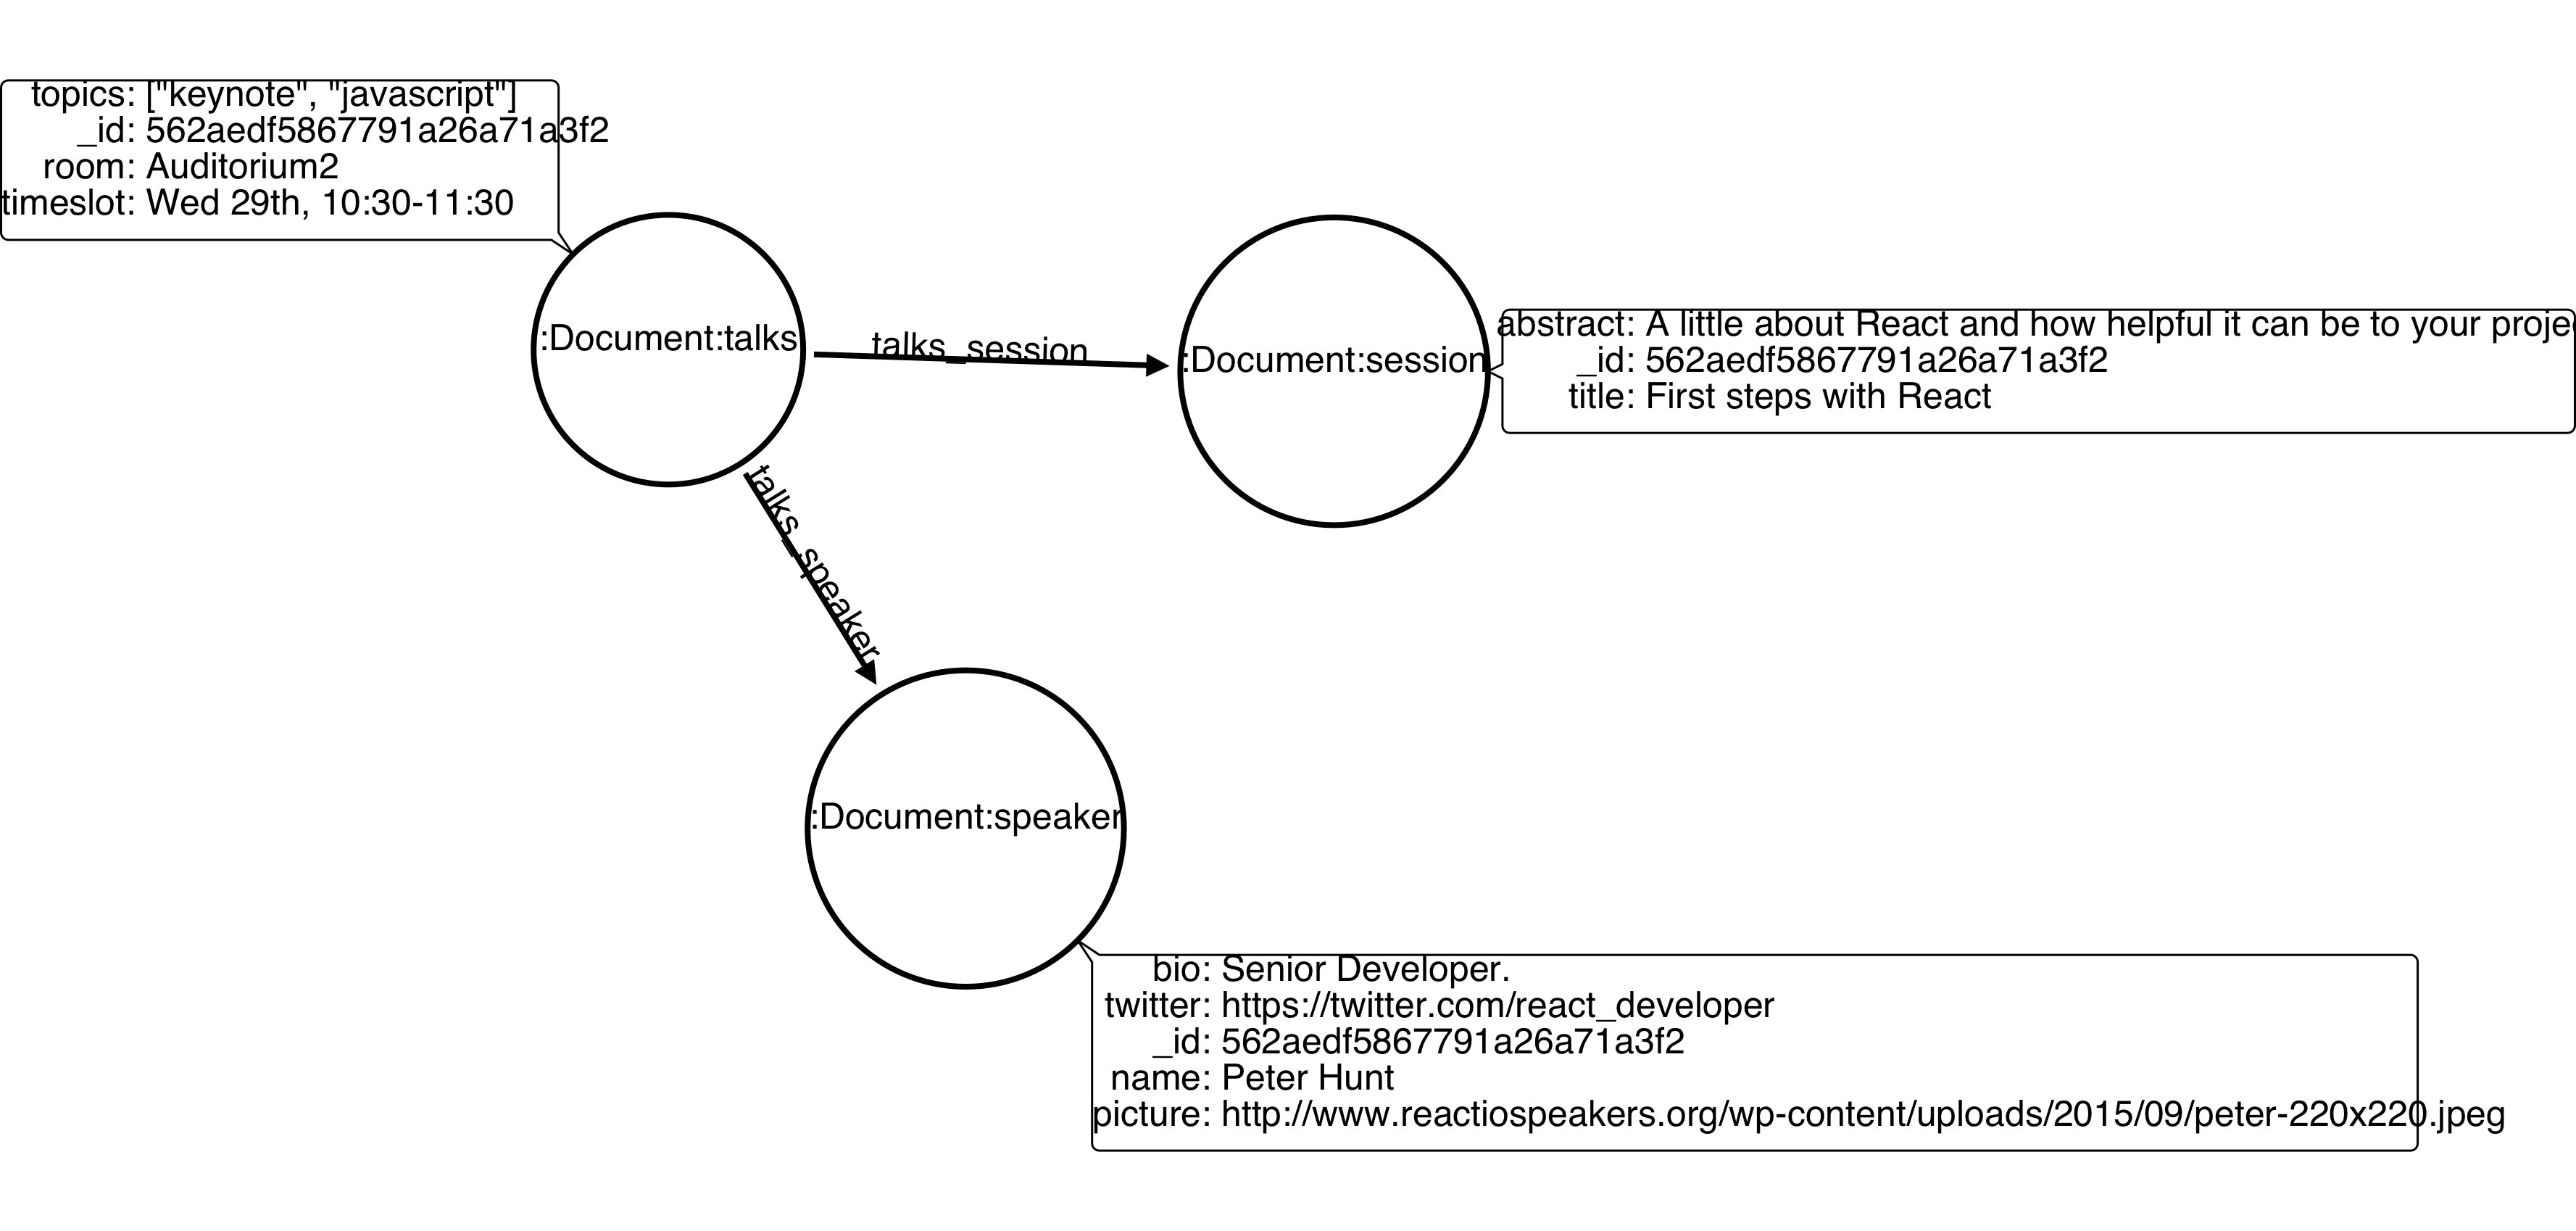
db.talks.insert( { "session": { "title": "First steps with React", "abstract": "A little about React and how helpful it can be to your projects." }, "topics": ["keynote", "javascript"], "room": "Auditorium2", "timeslot": "Wed 29th, 10:30-11:30", "speaker": { "name": "Peter Hunt", "bio": "Senior Developer.", "twitter": "https://twitter.com/react_developer", "picture": "http://www.reactiospeakers.org/wp-content/uploads/2015/09/peter-220x220.jpeg" } } );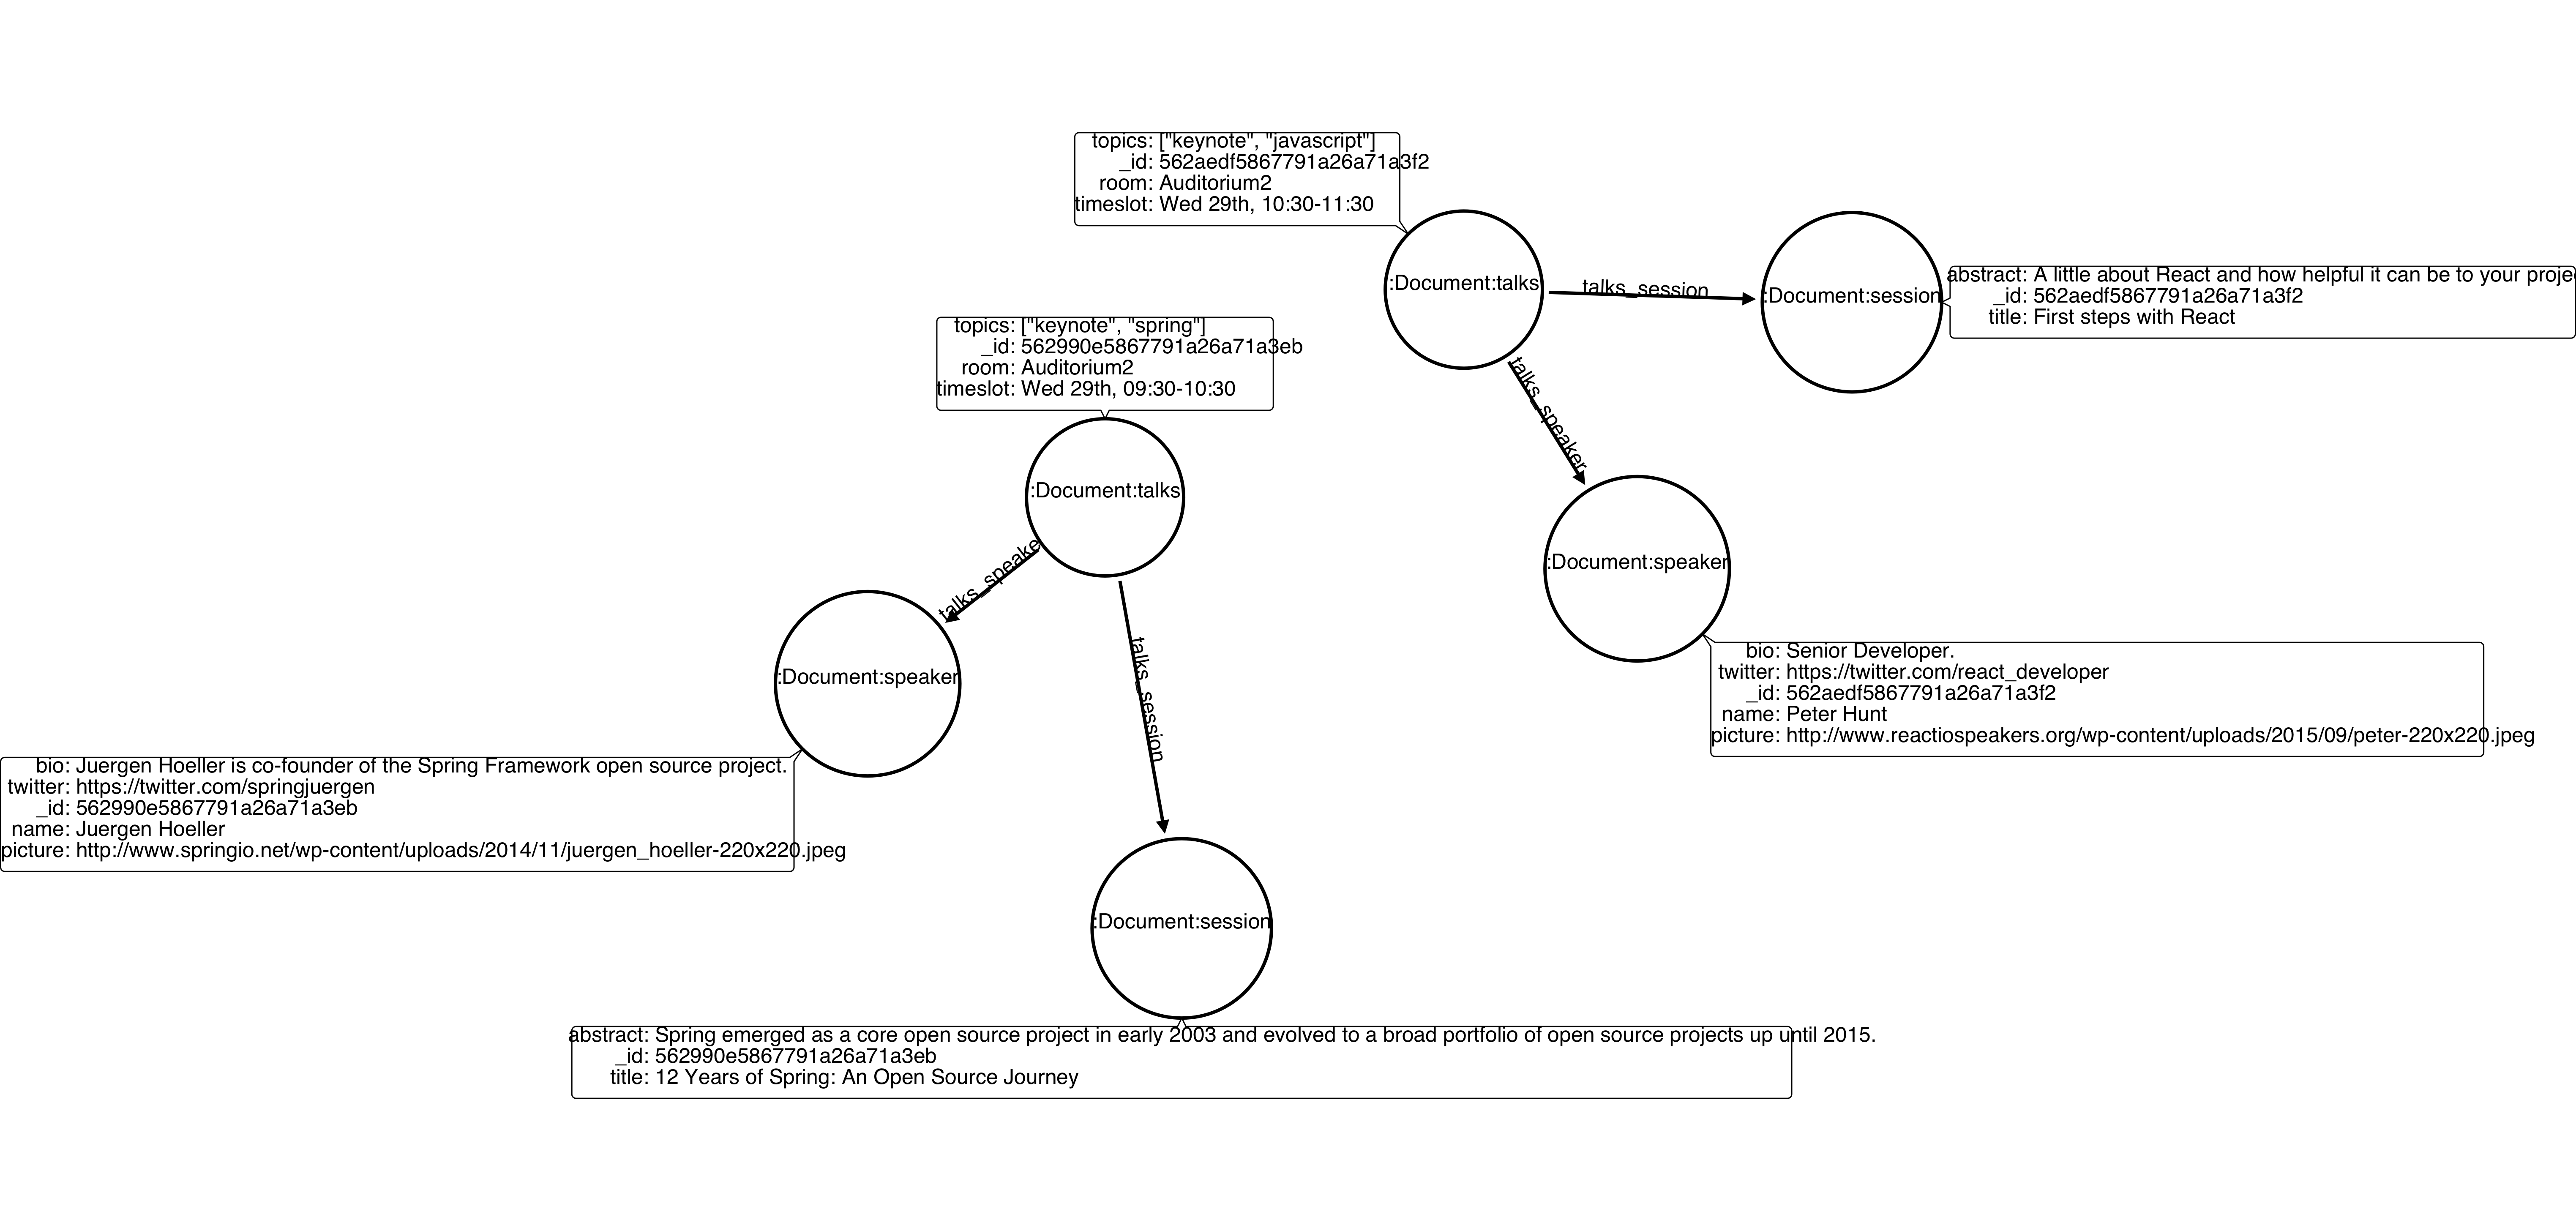
Note that both talks should be held at Auditorium2. If we run the following command:
db.talks.update({ "room": "Auditorium2"}, { $set: { "room": "Auditorium"} })Only the first document found by Mongo will be updated, as shown on the image below.
If we want to change all documents, we must use multi parameter, described in the following section.
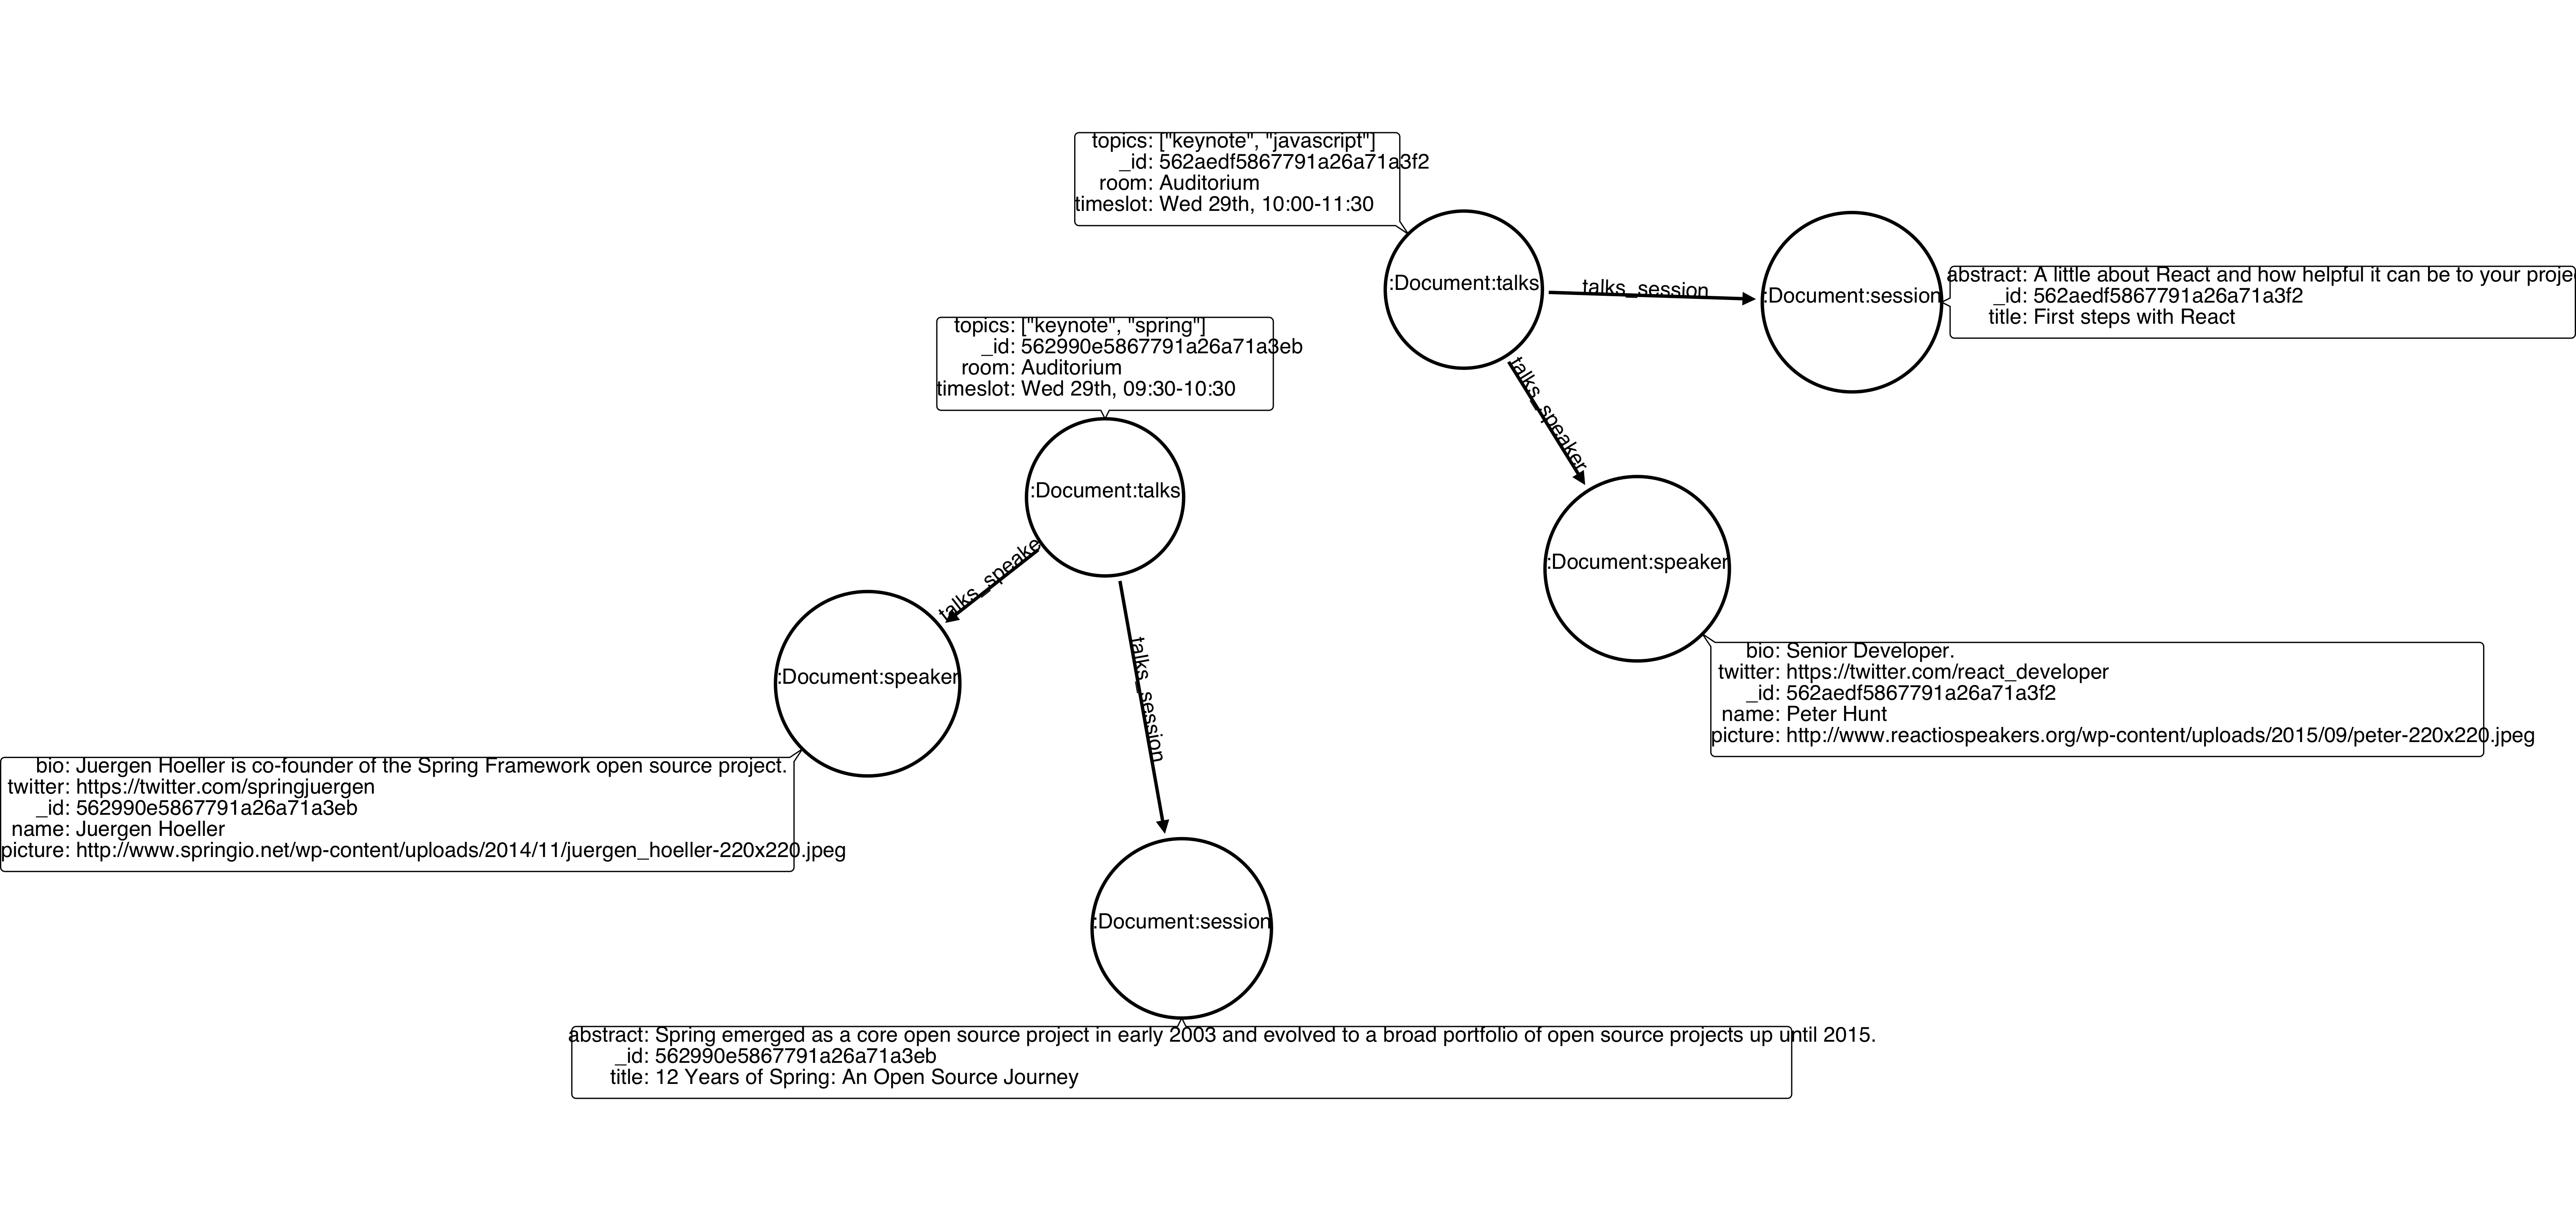
Many properties can be changed with a single update clause. For example, if we run
db.talks.update({ "room": "Auditorium2"}, { $set: { "room": "Auditorium", "timeslot": "Wed 29th, 10:00-11:30" } })We will have both properties, room and timeslot, updated into the graph.
$unset
$unset clause updates a single document by removing a property on a document. For example, imagine we have inserted the talks previously described into Upsert section, and now we want to remove the timeslot property for the talk that has its room as Auditorium. We have to run the following instruction:
db.talks.update({ room: "Auditorium" }, { $unset: { timeslot:"" } });Compare both graphs:
Before the update

After the update
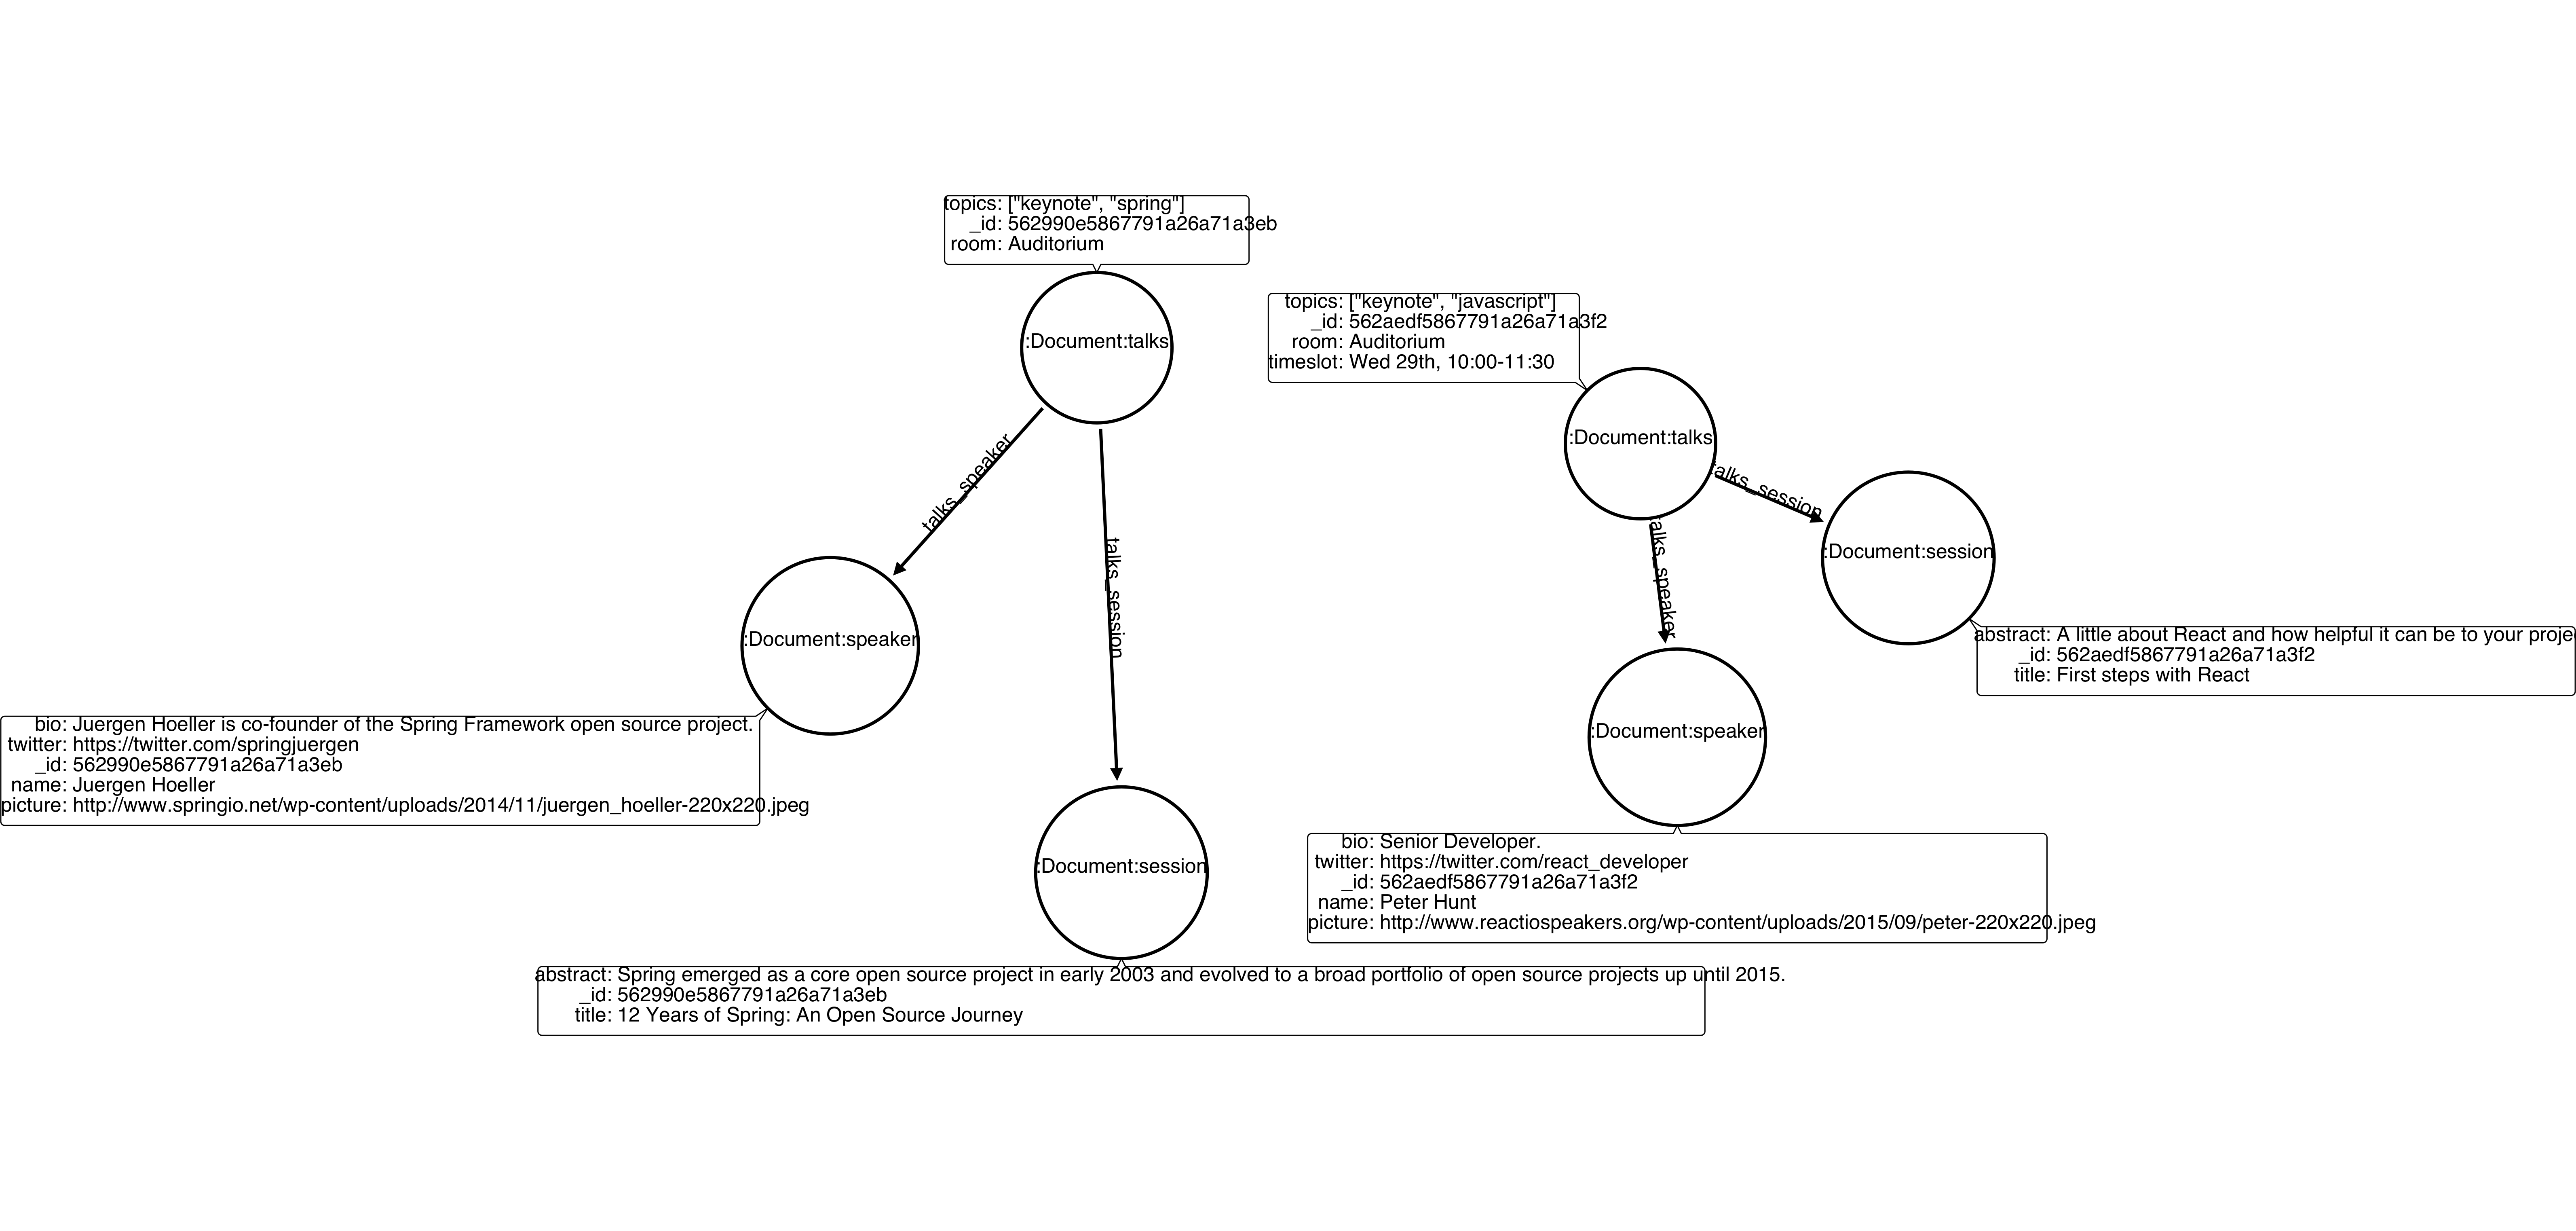
This instruction will get the first document in Mongo that matches with the specified criteria and generate an update method call into Neo4j Doc Manager. Considering we have a document previously inserted into Mongo by the Upsert example, we will have a single update, removing the property (notice on the node on the left side of the image).
Updated Nodes by removing a property
-
The node with room: "Auditorium" now will have the property timeslot removed from it.
Only the first document found by Mongo will be updated and have timeslot property removed. If we want to change all documents, we must use multi parameter, described in the following section.
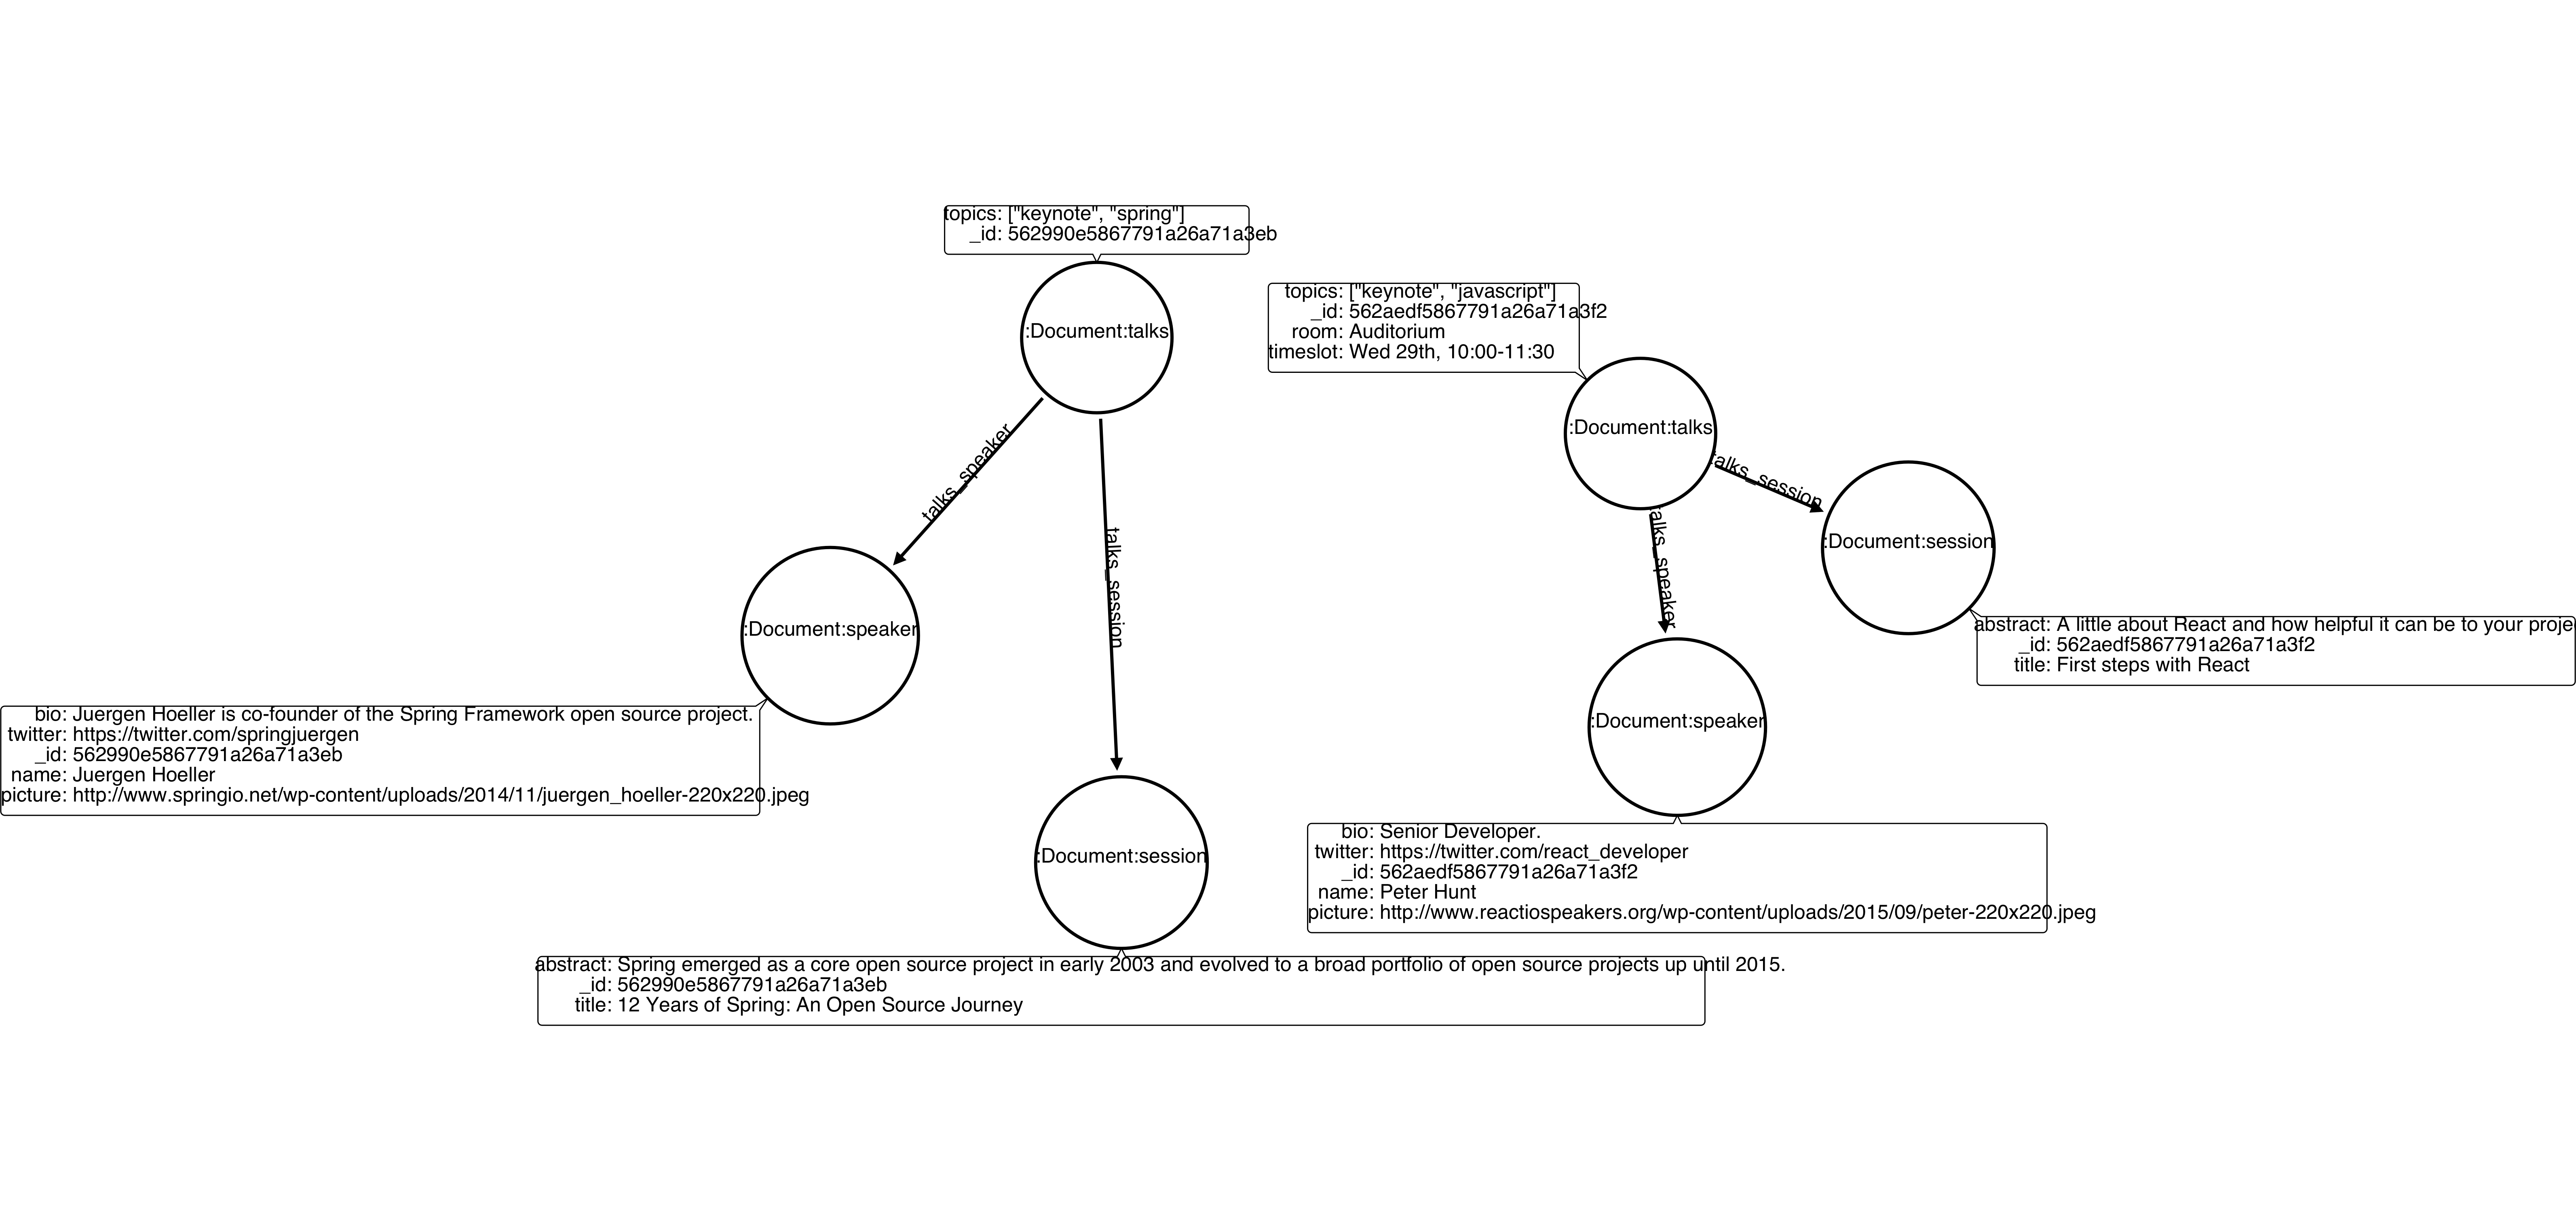
Many properties can be changed with a single update clause. For example, if we run
db.talks.update({ "room": "Auditorium"}, { $unset: { "room": "", "timeslot": "" } })We will have both properties, room and timeslot, removed of the node into the graph.
$unset can also remove connected nodes and relationships. Assuming our default talks example:

If we run:
db.talks.update({ room: "Auditorium" }, { $unset: { session:"" } });In Neo4j it will cause a removal of the node with the label session for the room with the property Auditorium and also the removal os the relationship connecting talks and session.
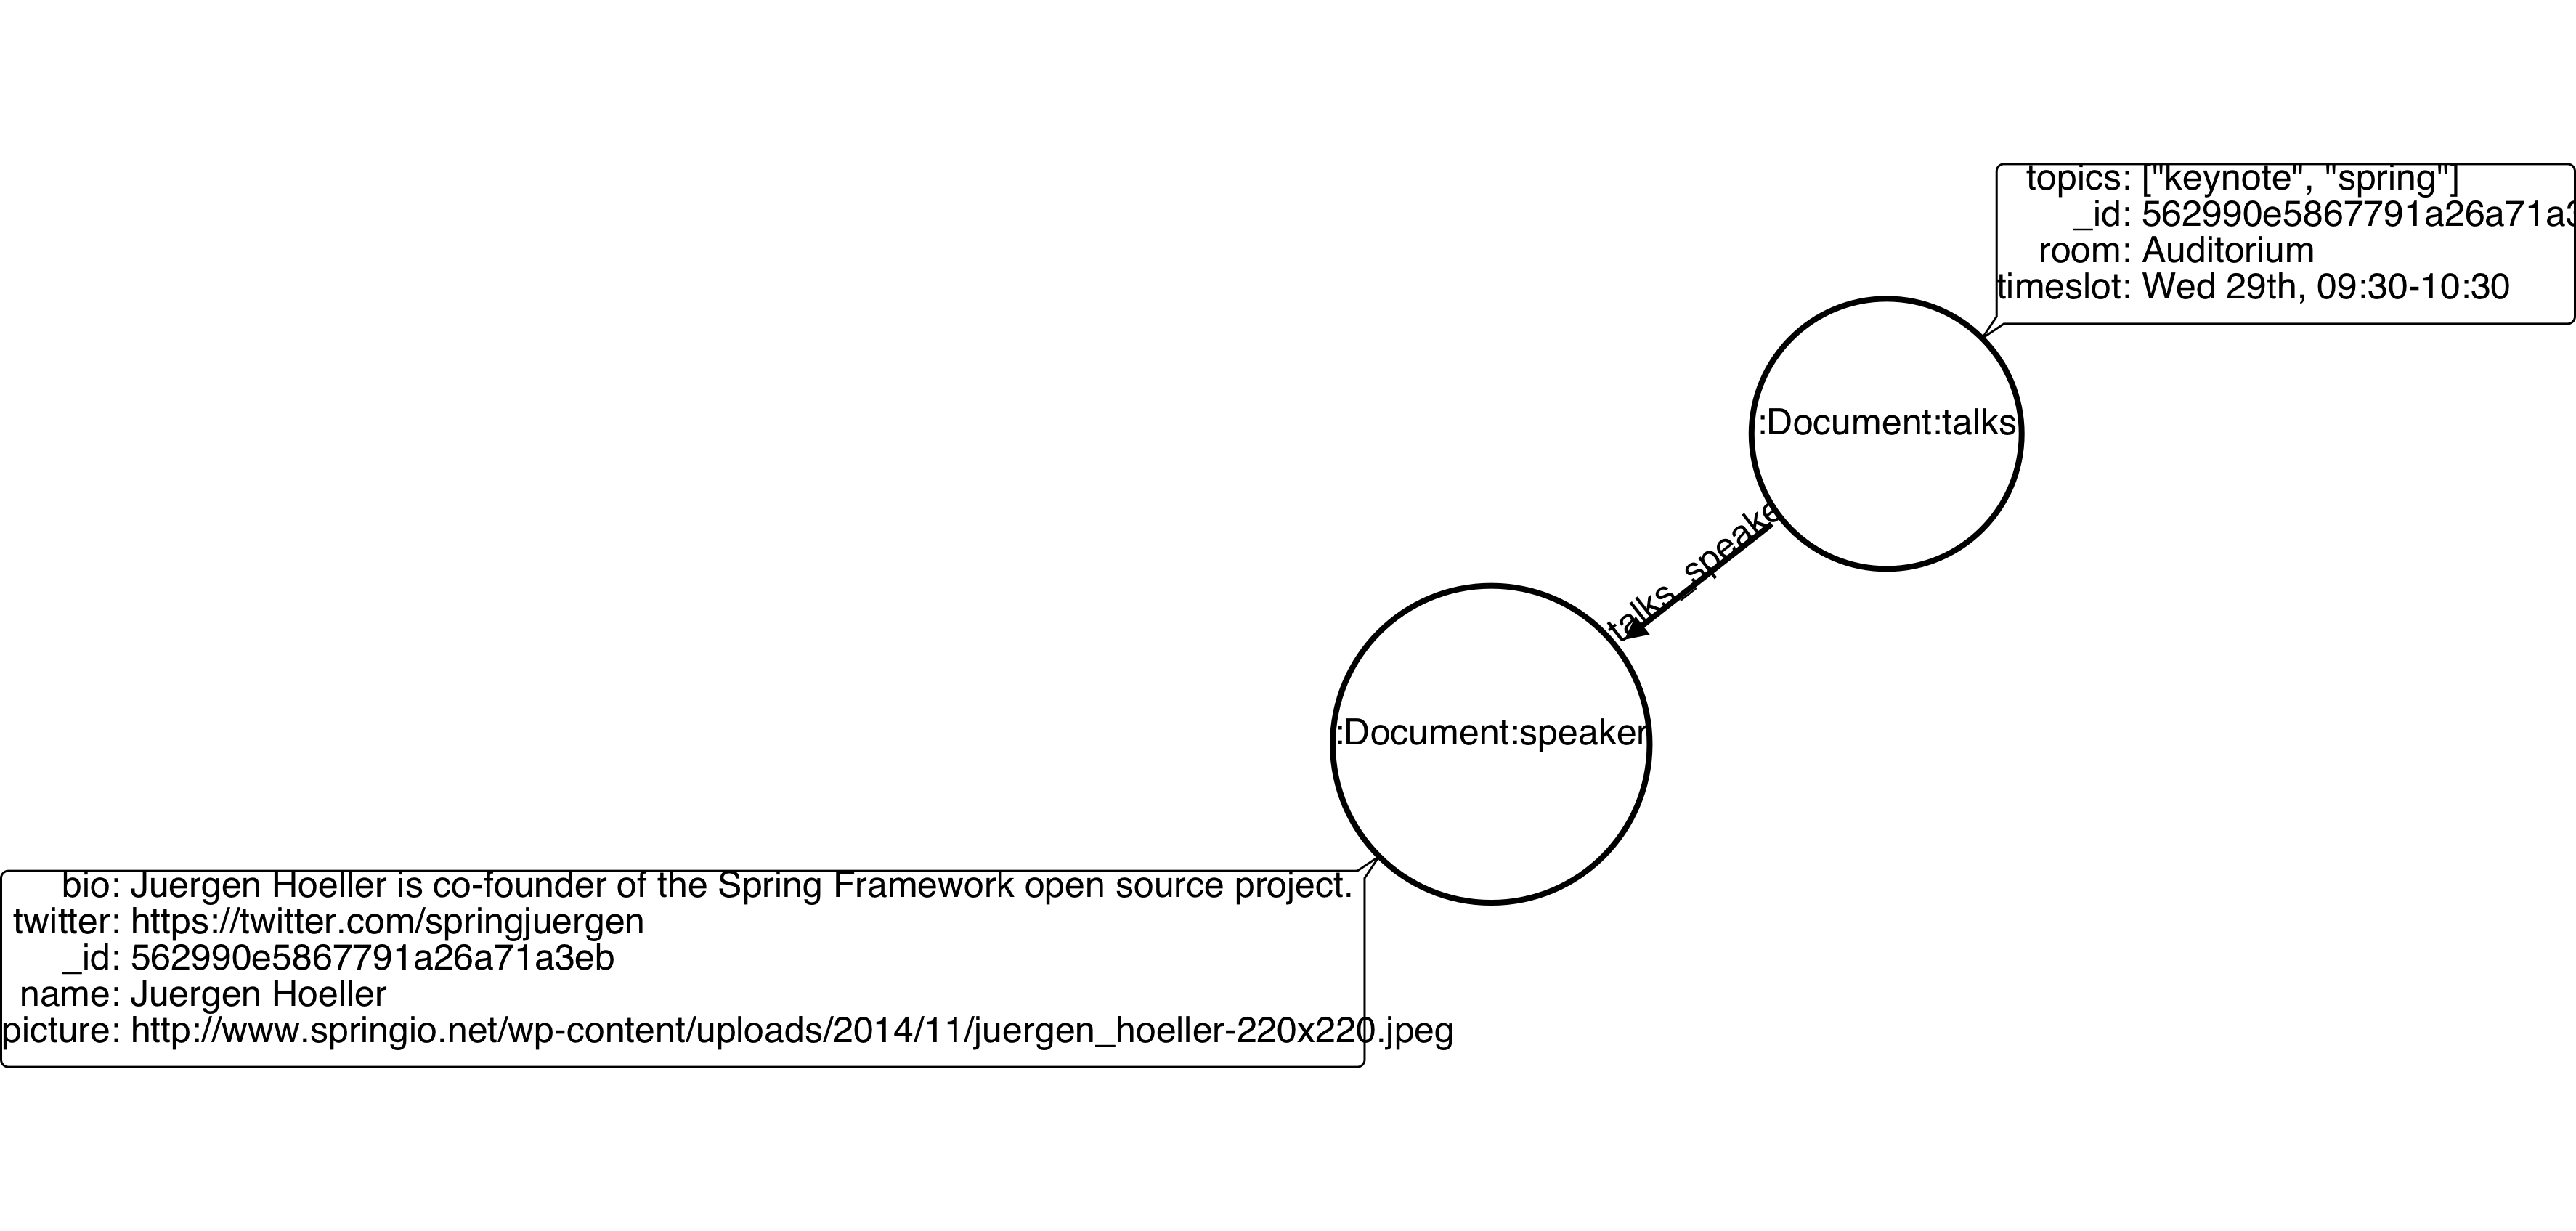
Updating without $set or $unset (document replacement)
It is also possible to update a document by specifying the entire change desired on it. For example, imagine we have inserted the talks previously described into Upsert section.

Now we want to update the document to select the one whose room will be Auditorium and clear all the root data and have only a property called level, which value will be intermediate. We have to run the following instruction:
db.talks.update({ room: "Auditorium" }, { level: "Intermediate" } );This instruction will get the first document in Mongo that matches with the specified criteria and generate an update method call into Neo4j Doc Manager. Considering we have a document previously inserted into Mongo by the Upsert example, we will have a single update.
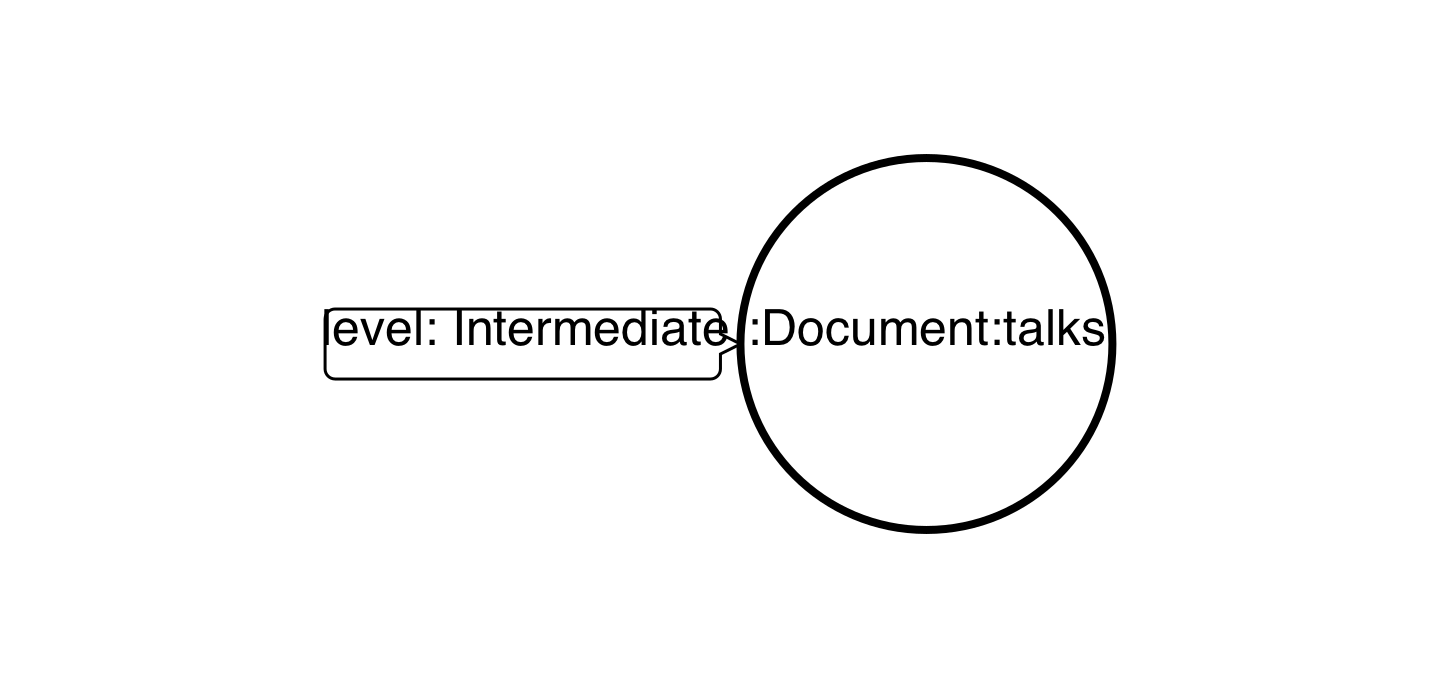
Updated Nodes
-
The node with room: "Auditorium" now will have all it’s properties removed and only level property will be created and will remain. So we will have d:Documents:talks with its _id and a level.
Updated Relationships
-
By running the previous statement, all the connected nodes and relationships will be removed. We will end up with a single node, without any relationship.
Note: Calling an update clause without $set or $unset will lead to property overriding, not concatenating with the existing ones.
It is also possible to run an update clause that contains a nested document as an argument. Imagine our default talks example:

Then we run:
db.talks.update({ room: "Auditorium" }, { conference: { name: "GraphConnect", city: "London" } });This instruction will remove all the properties from the talks node (but it will still being the root node). A new node, with the label conference, will be created. Also, a relationship between talks and conference will be made:
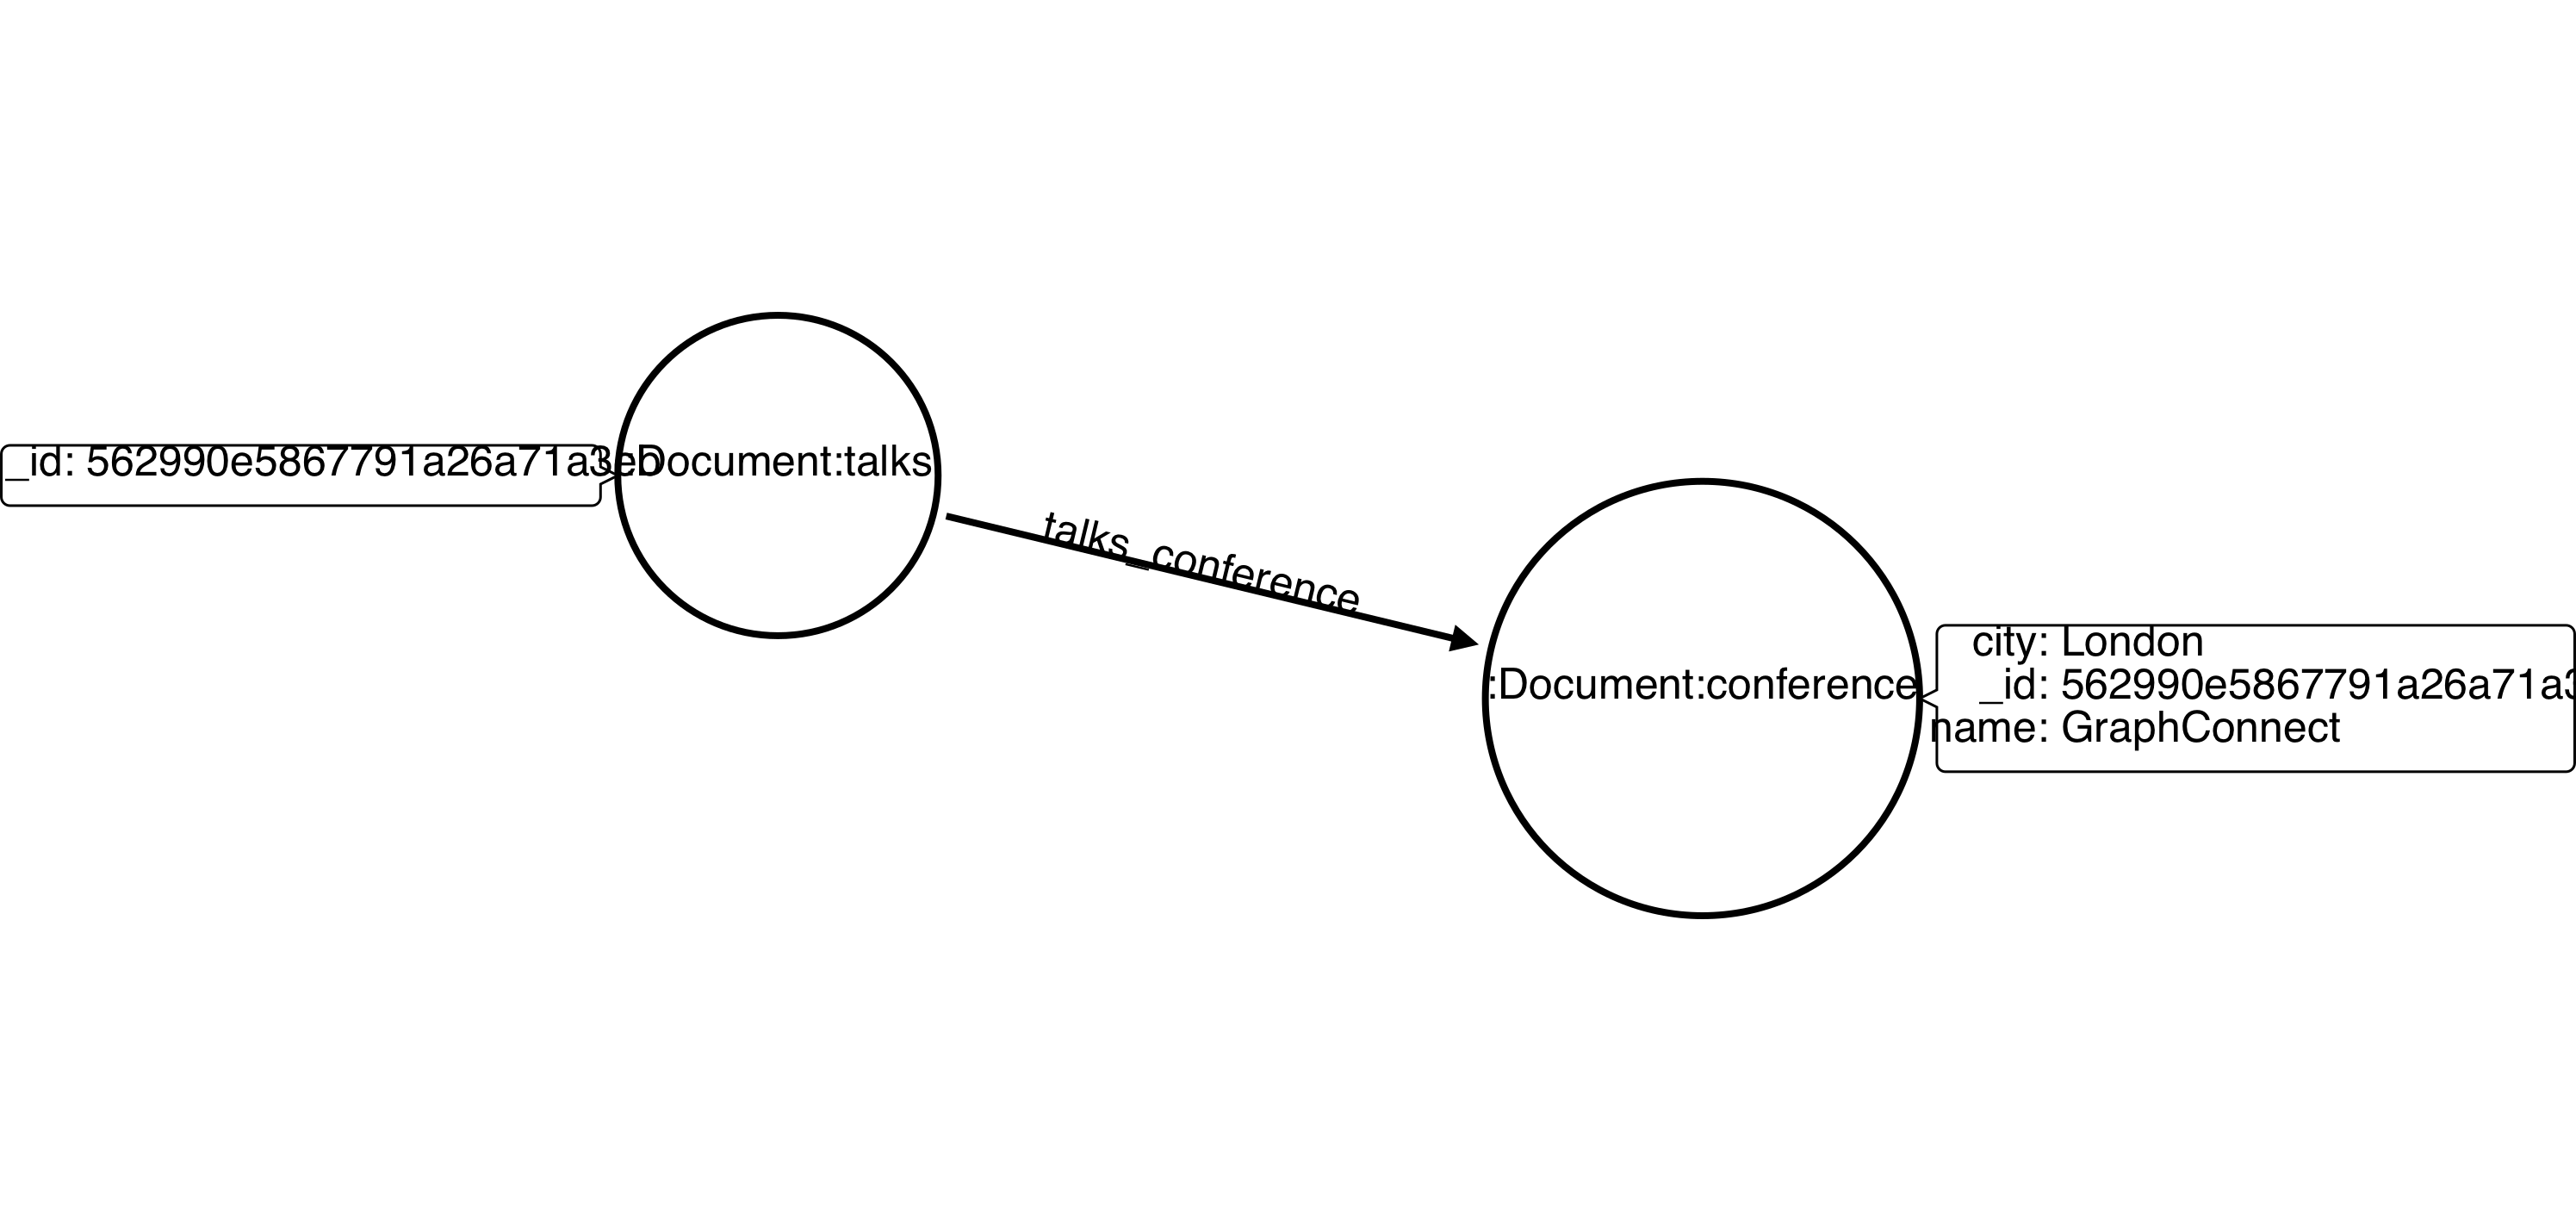
Updated Nodes
-
The node with room: "Auditorium" now will have all it’s properties removed. So we will have d:Documents:talks with its _id only, with any remaining property. All the connected nodes (session and speaker) and its properties will be removed.
-
A new node, Document::conference, will be created, with the properties name and city.
Updated Relationships
-
By running the previous statement, all the connected nodes and relationships will be removed from the original talks node. A new relationship between talks and conference will be made.
We can also run a composite update clause where we create a new node and also update the root node:
db.talks.update({ room: "Auditorium" }, { conference: { name: "GraphConnect", city: "London" }, level: "intermediate" });This instruction will remove all the properties from the talks node (but it will still be the root node). It will also create a level property on talks, with intermediate value. A new node, with the label conference, will be created. Also, a relationship between talks and conference will be made:
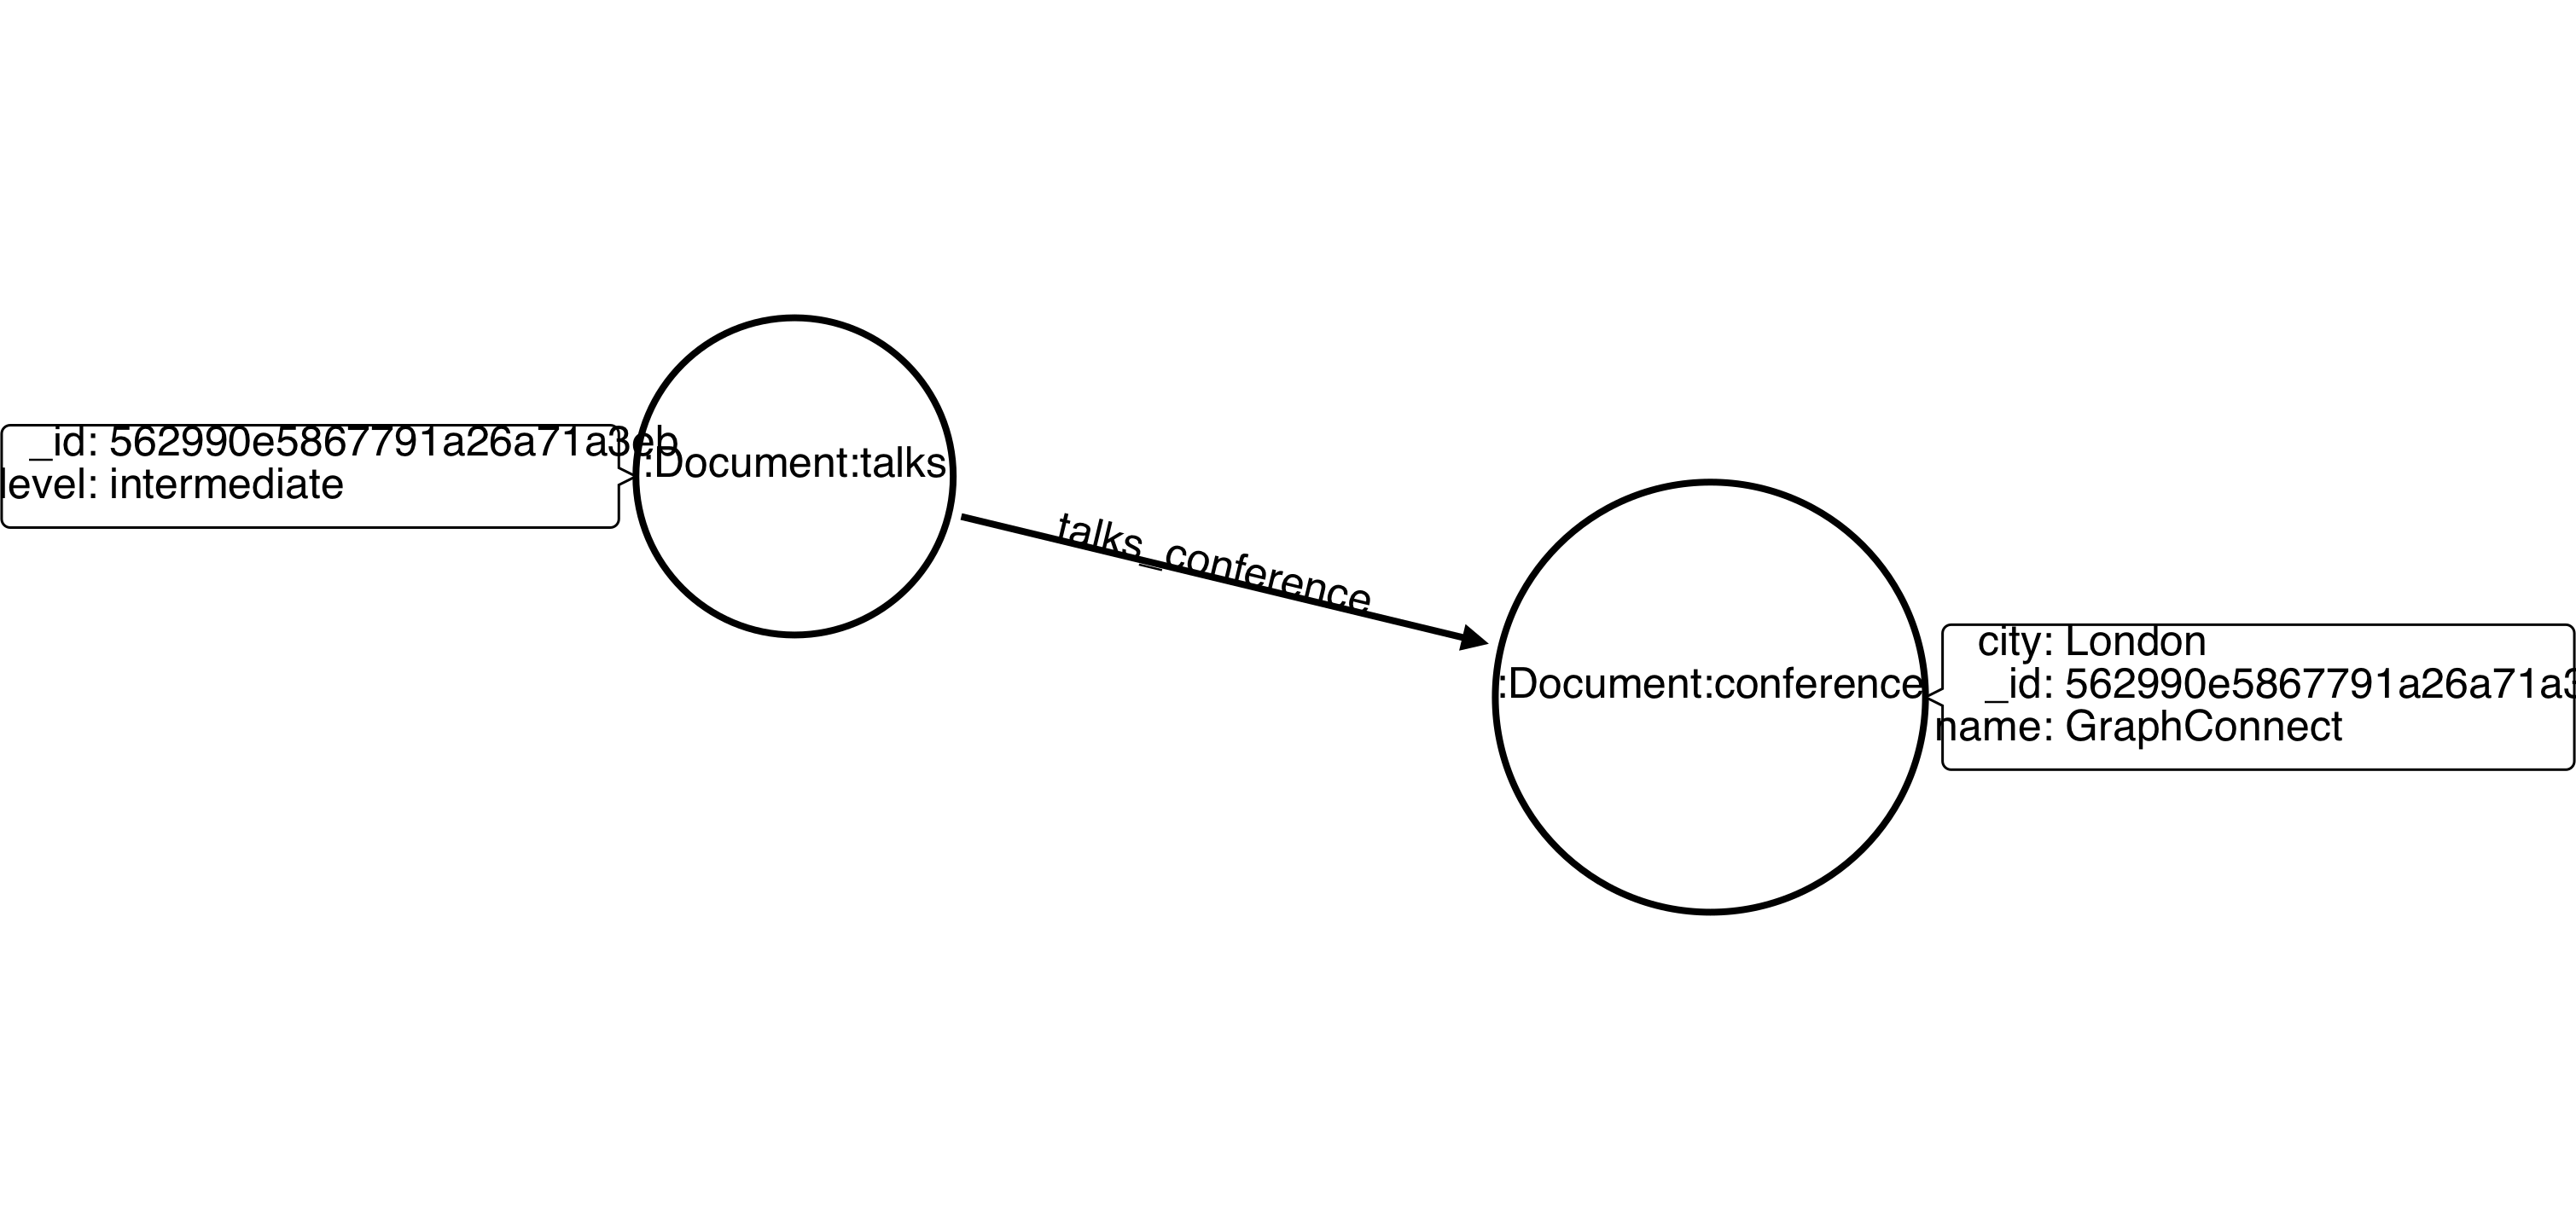
Updated Nodes
-
The node with room: "Auditorium" now will have all its properties removed. So we will have d:Documents:talks with its _id and a new property, level. All the connected nodes (session and speaker) and its properties will be removed.
-
A new node, Document::conference, will be created, with the properties name and city.
Updated Relationships
-
By running the previous statement, all the connected nodes and relationships will be removed from the original talks node. A new relationship between talks and conference will be made.
multi
We can update all the documents that match to a following criteria. Following the example above, to update all document rooms to Auditorium, we should run:
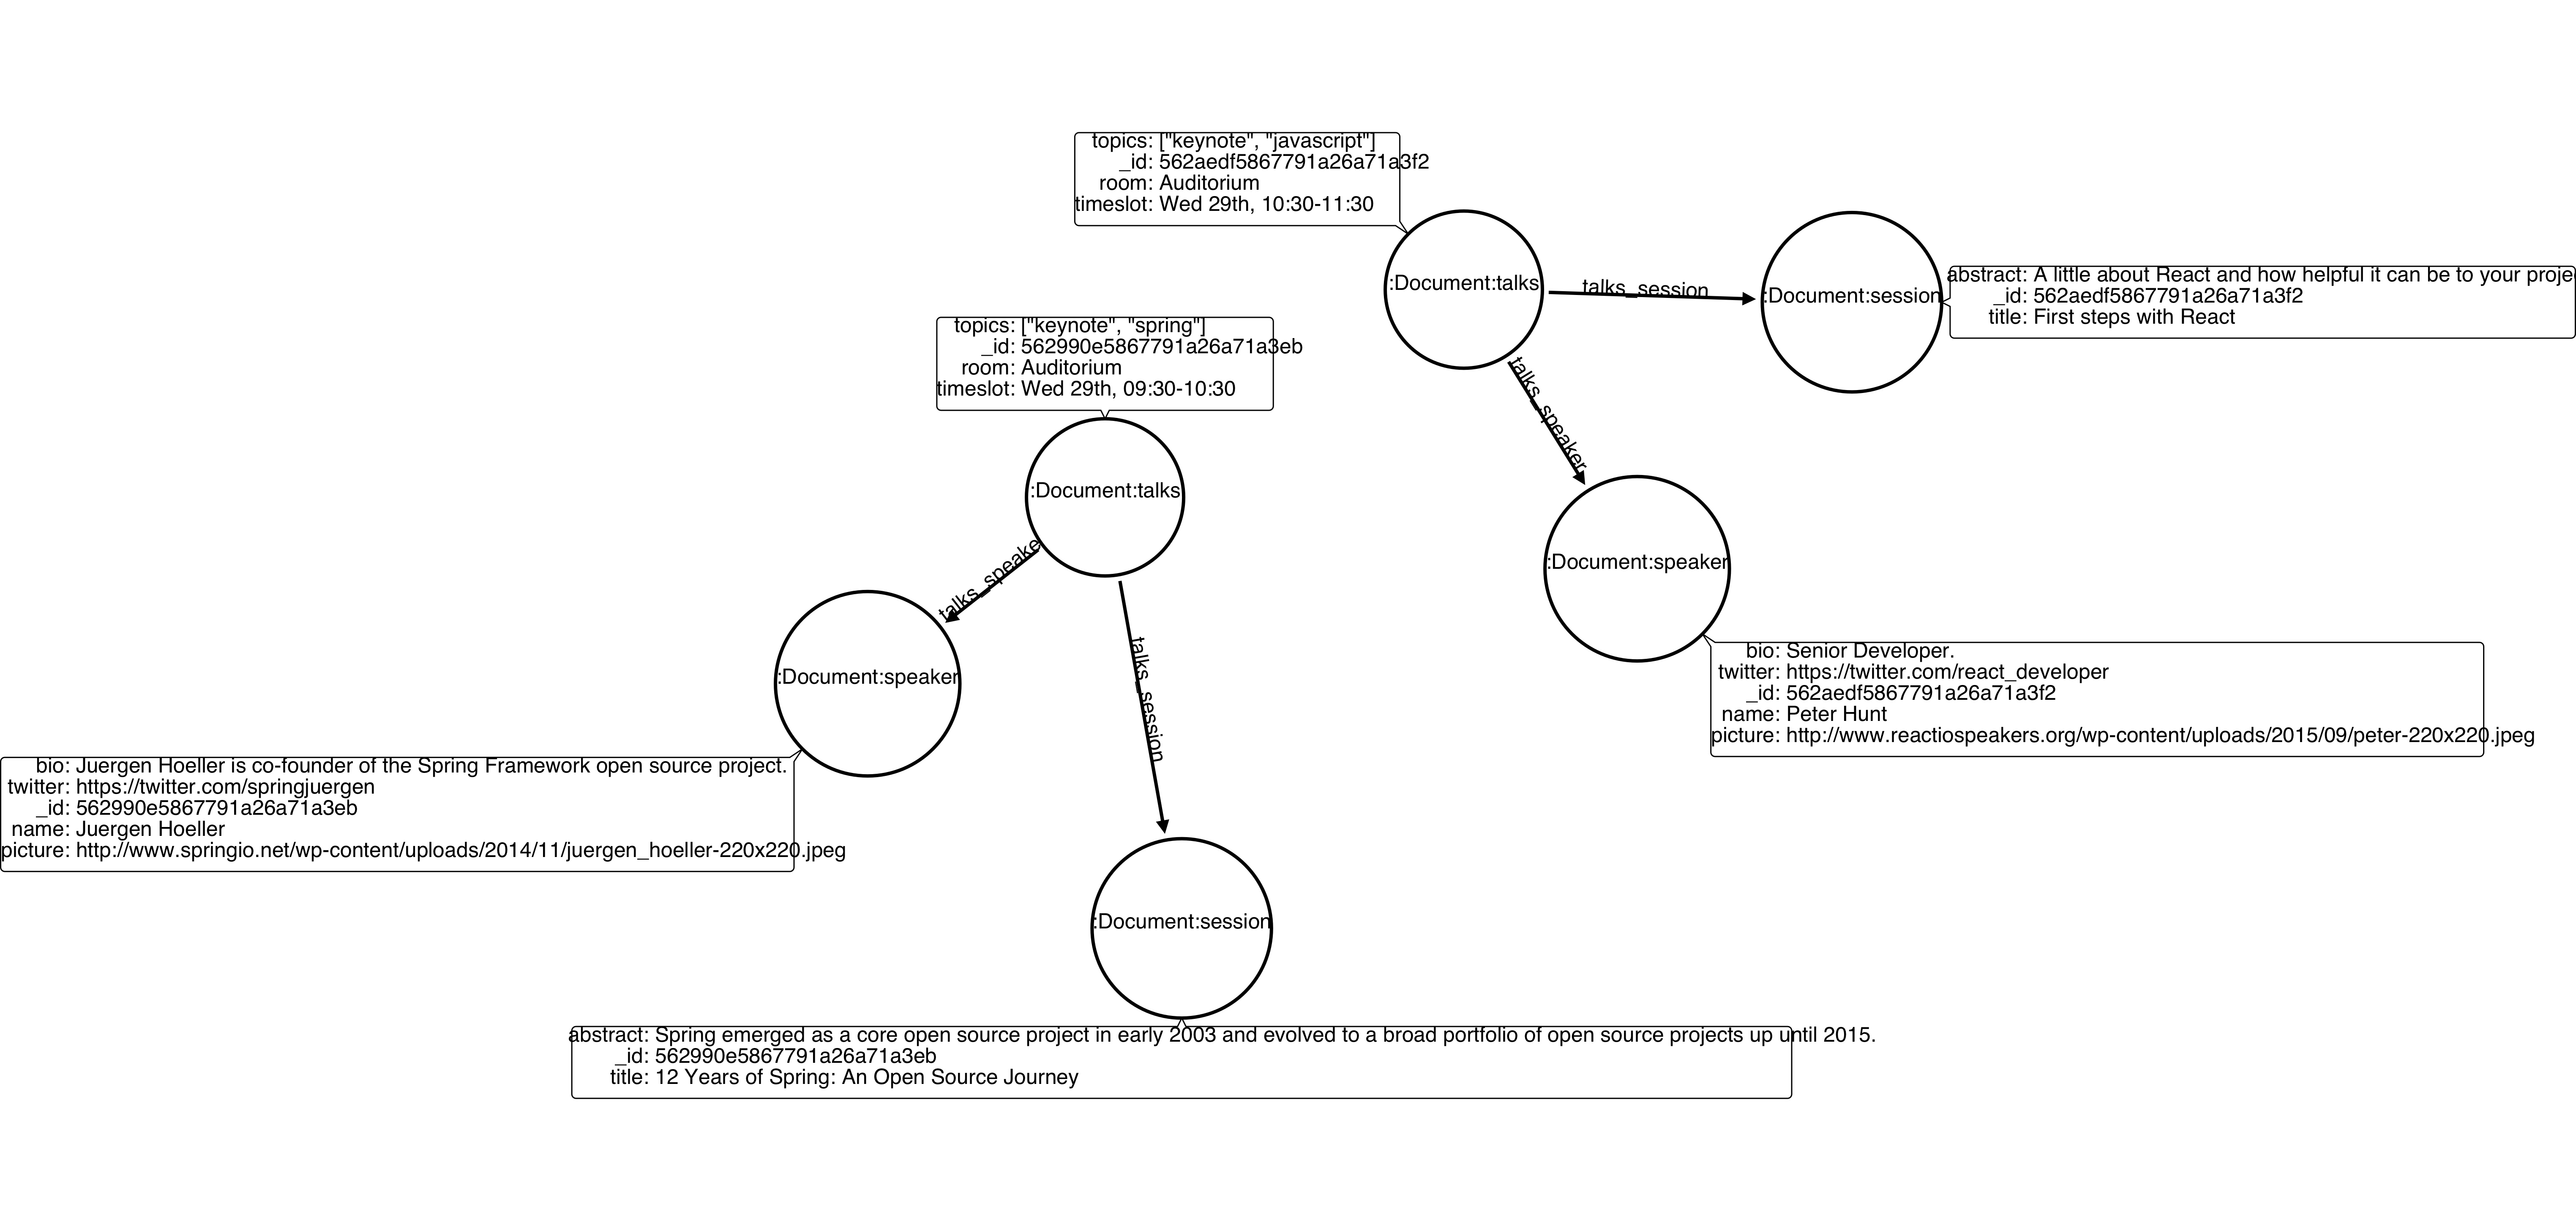
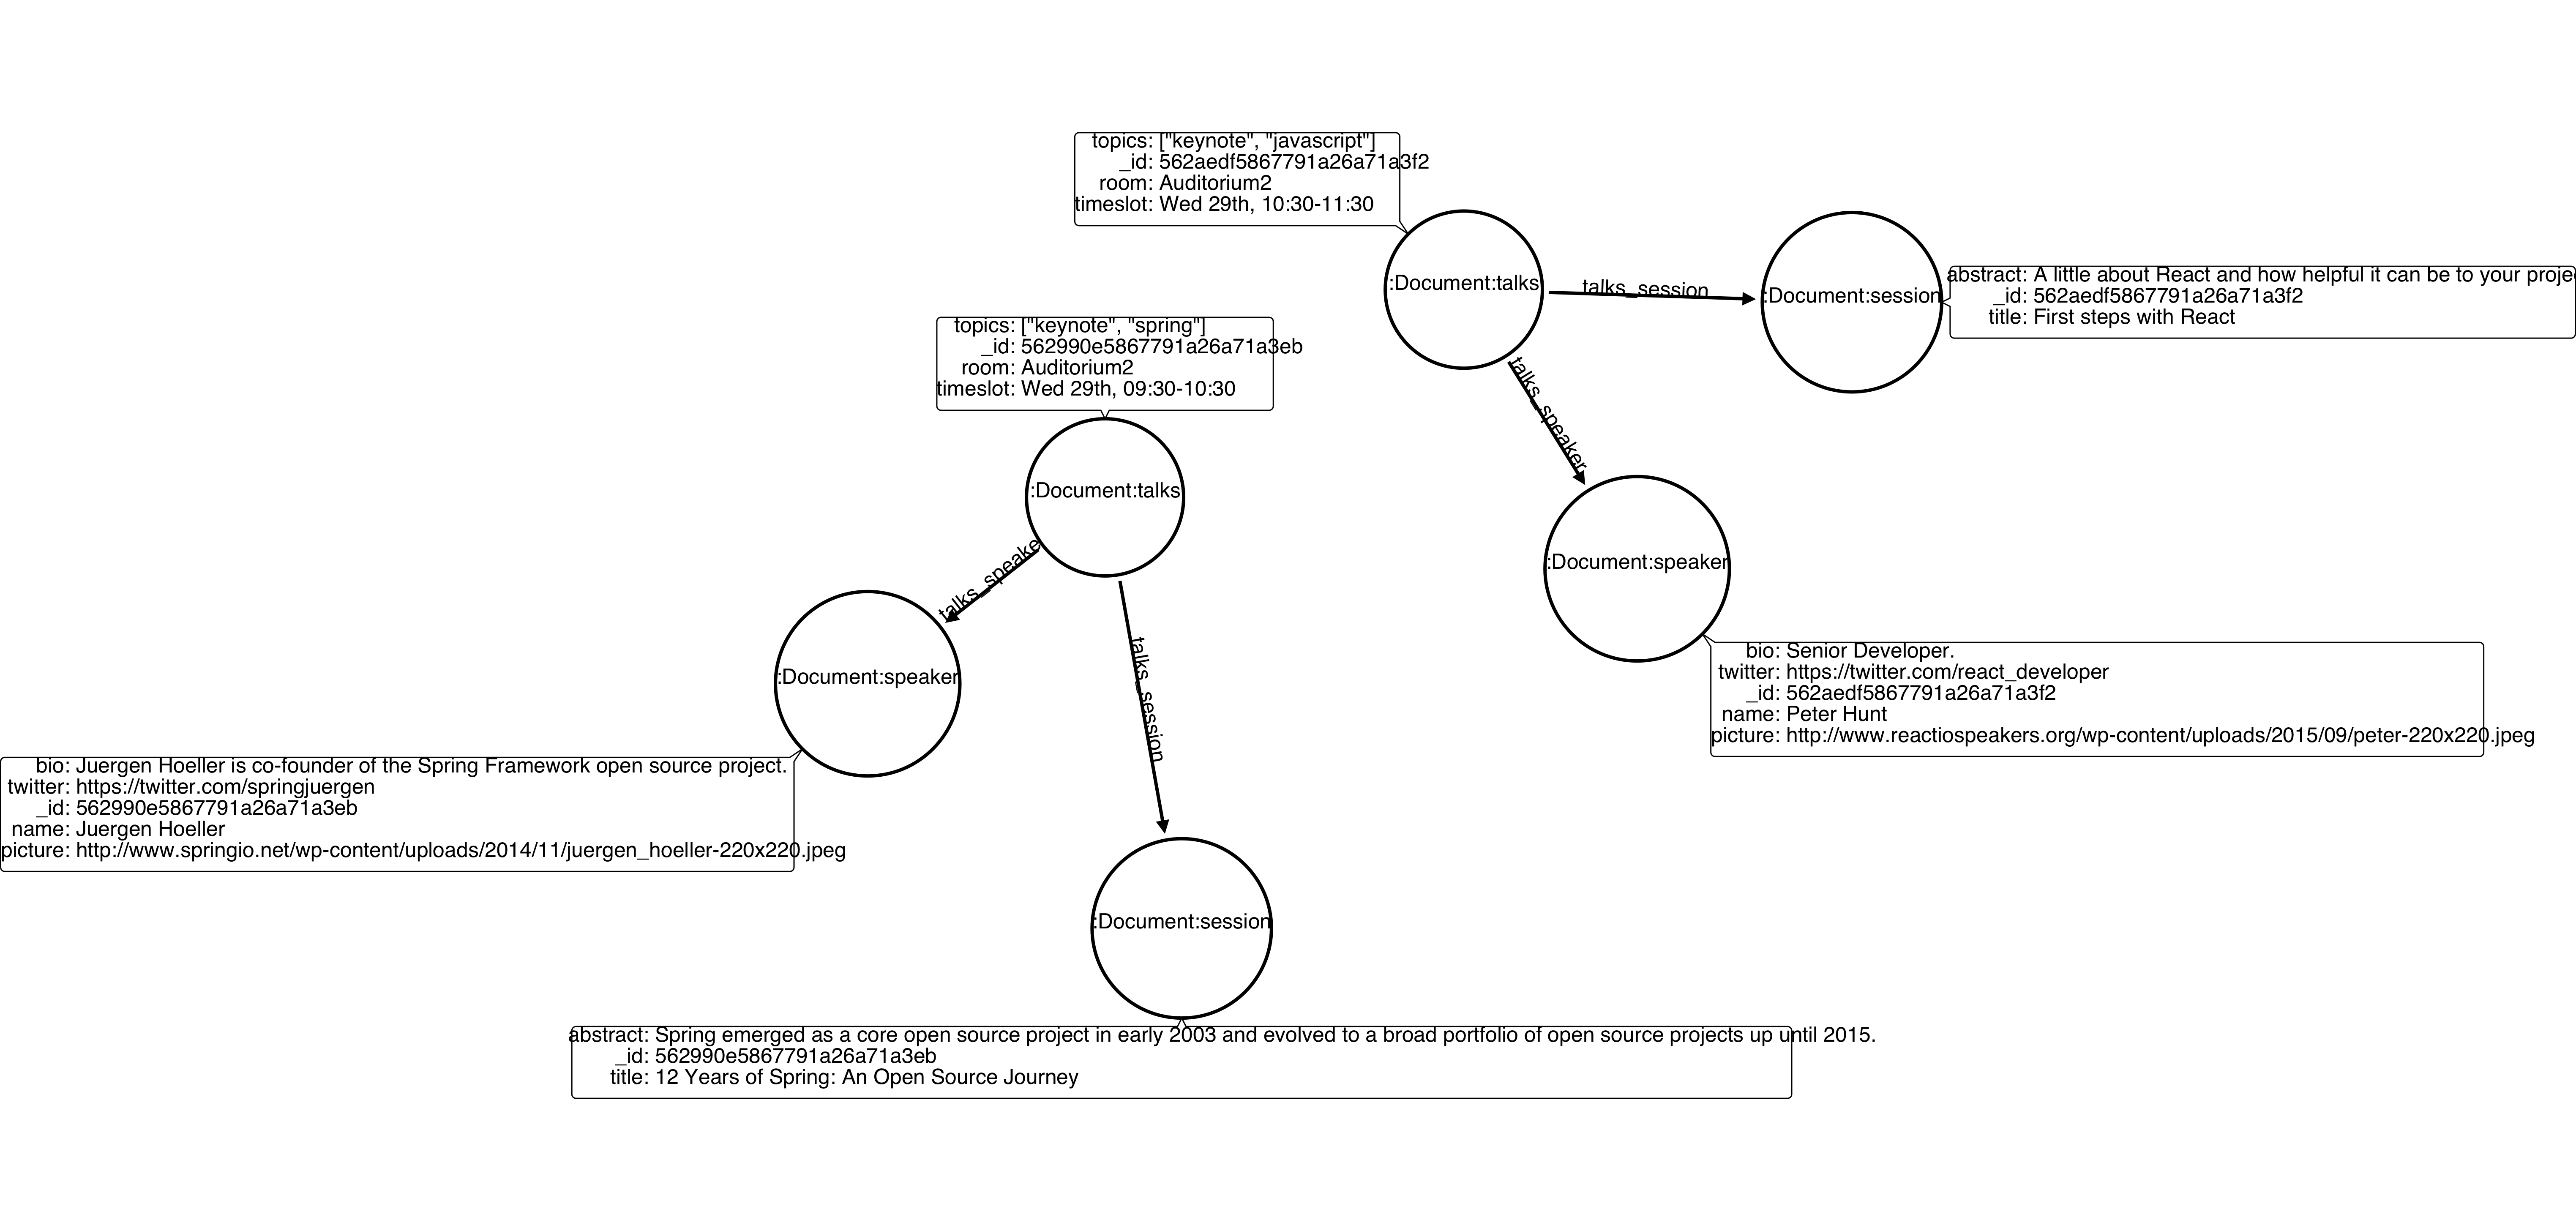
db.talks.update({ "room": "Auditorium"}, { $set: { "room": "Auditorium2"} }, { multi: true } )multi: true will update all documents that match the specified clauses. This behaviour will also be reflected into Neo4j - all Nodes will be updated. So, if before the clause we had:
Before the update:
After the update:
Nodes
-
Two nodes with room setted to Auditorium2
After running the update clause with multi parameter, we end up with:
Updated Nodes
-
The two nodes now have room setted for Auditorium.
Inserting new properties
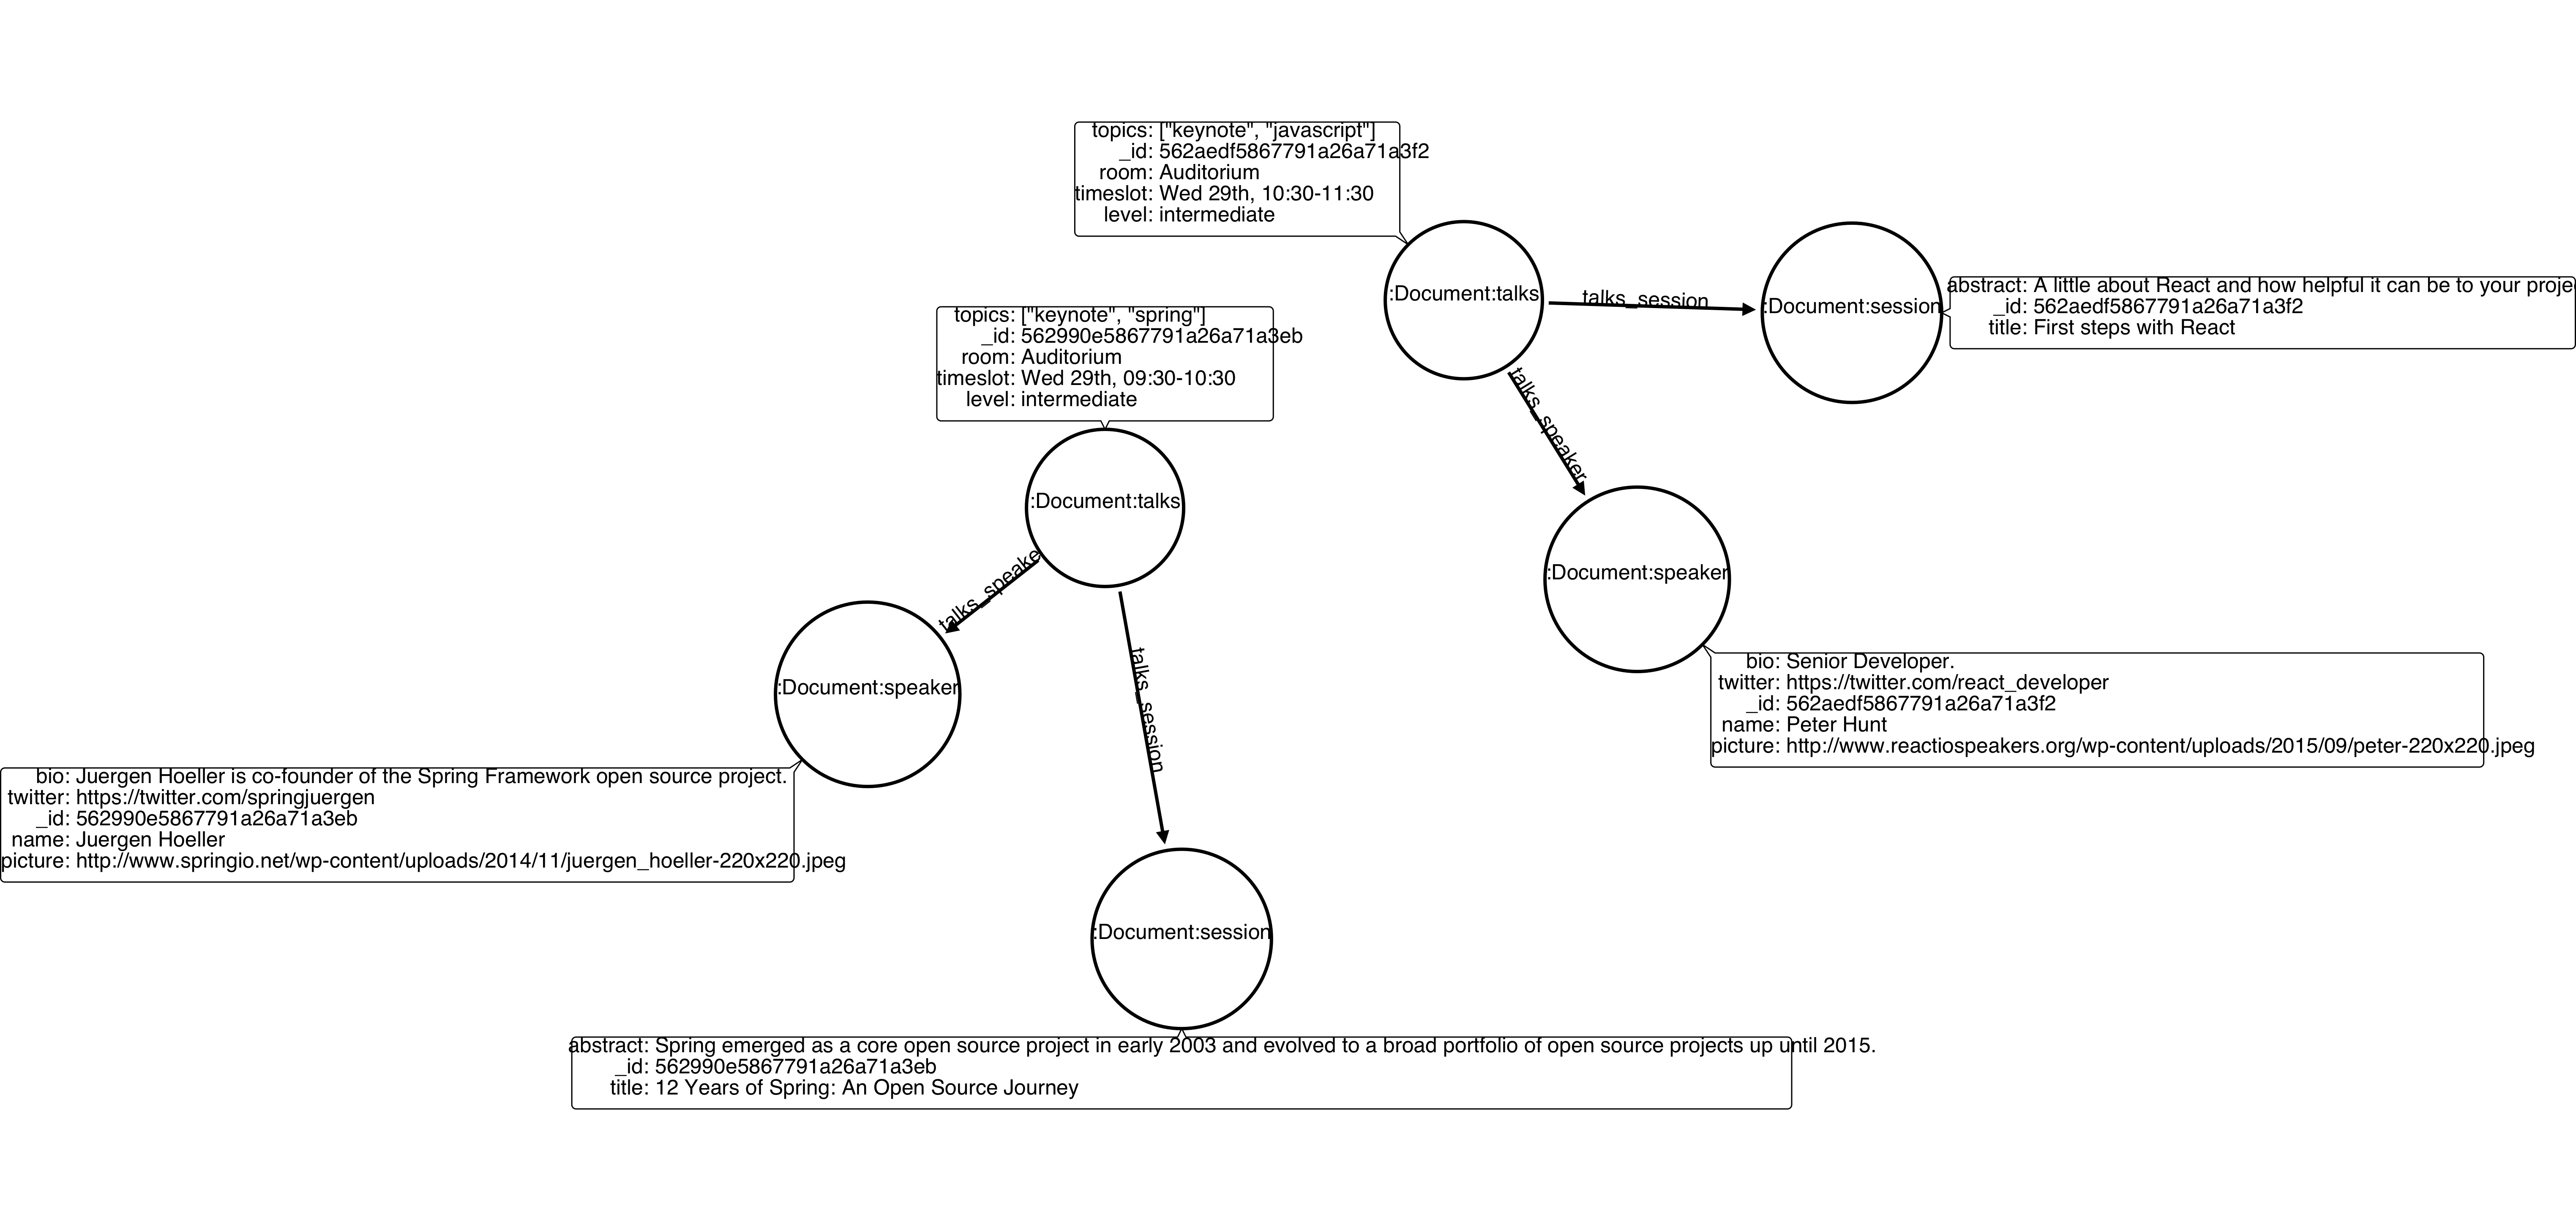
Update clauses also can be used for inserting new properties into documents. This will result in a new property for a node. Let’s assume the talks previously inserted. Let’s set a level property for all the talks that will happen into Auditorium room, pointing that they require an intermediate level. Before running the update clause, we have the following into Neo4j graph:
-
Two nodes labelled as Document:talks without a level property.
db.talks.update({ "room": "Auditorium"}, { $set: { "level": "intermediate"} }, { multi: true })After running the update clause, we have:
-
The same two nodes labelled as Document:talks, now with a level property, containing "intermediate" as its value.
Creating new documents by an update action
Let’s assume the graph below:

If the update clause does not match any document, by default a new document is not created. However, if you pass the parameter {upsert: true}, a new document is created. For example, assume we run the following clause:
db.talks.update({ "room": "Auditorium4"}, { $set: { "session": { "title": "Introduction to Neo4j", "abstract": "First steps with Neo4j, basic configuration and data modelling." }, "topics": ["keynote", "databases"], "room": "Auditorium4", "timeslot": "Wed 29th, 13:30-14:30", "speaker": { "name": "Michael Hunger", "bio": "Senior Developer.", "twitter": "https://twitter.com/neo4j" } } })At the moment we do not have any document that matches with room Auditorium4. If we do not specify anything, nothing is done to Mongo or Neo4j and we end up with a graph identical to the initial one:

However, if we specify the upsert as a true parameter,
db.talks.update({ "room": "Auditorium4"}, { $set: { "session": { "title": "Introduction to Neo4j", "abstract": "First steps with Neo4j, basic configuration and data modelling." }, "topics": ["keynote", "databases"], "room": "Auditorium4", "timeslot": "Wed 29th, 13:30-14:30", "speaker": { "name": "Michael Hunger", "bio": "Senior Developer.", "twitter": "https://twitter.com/neo4j" } } }, {upsert: true})a new document will be inserted into Mongo and a new group of nodes and relationships will be inserted into Neo4j. So, after running the above query, we will have:
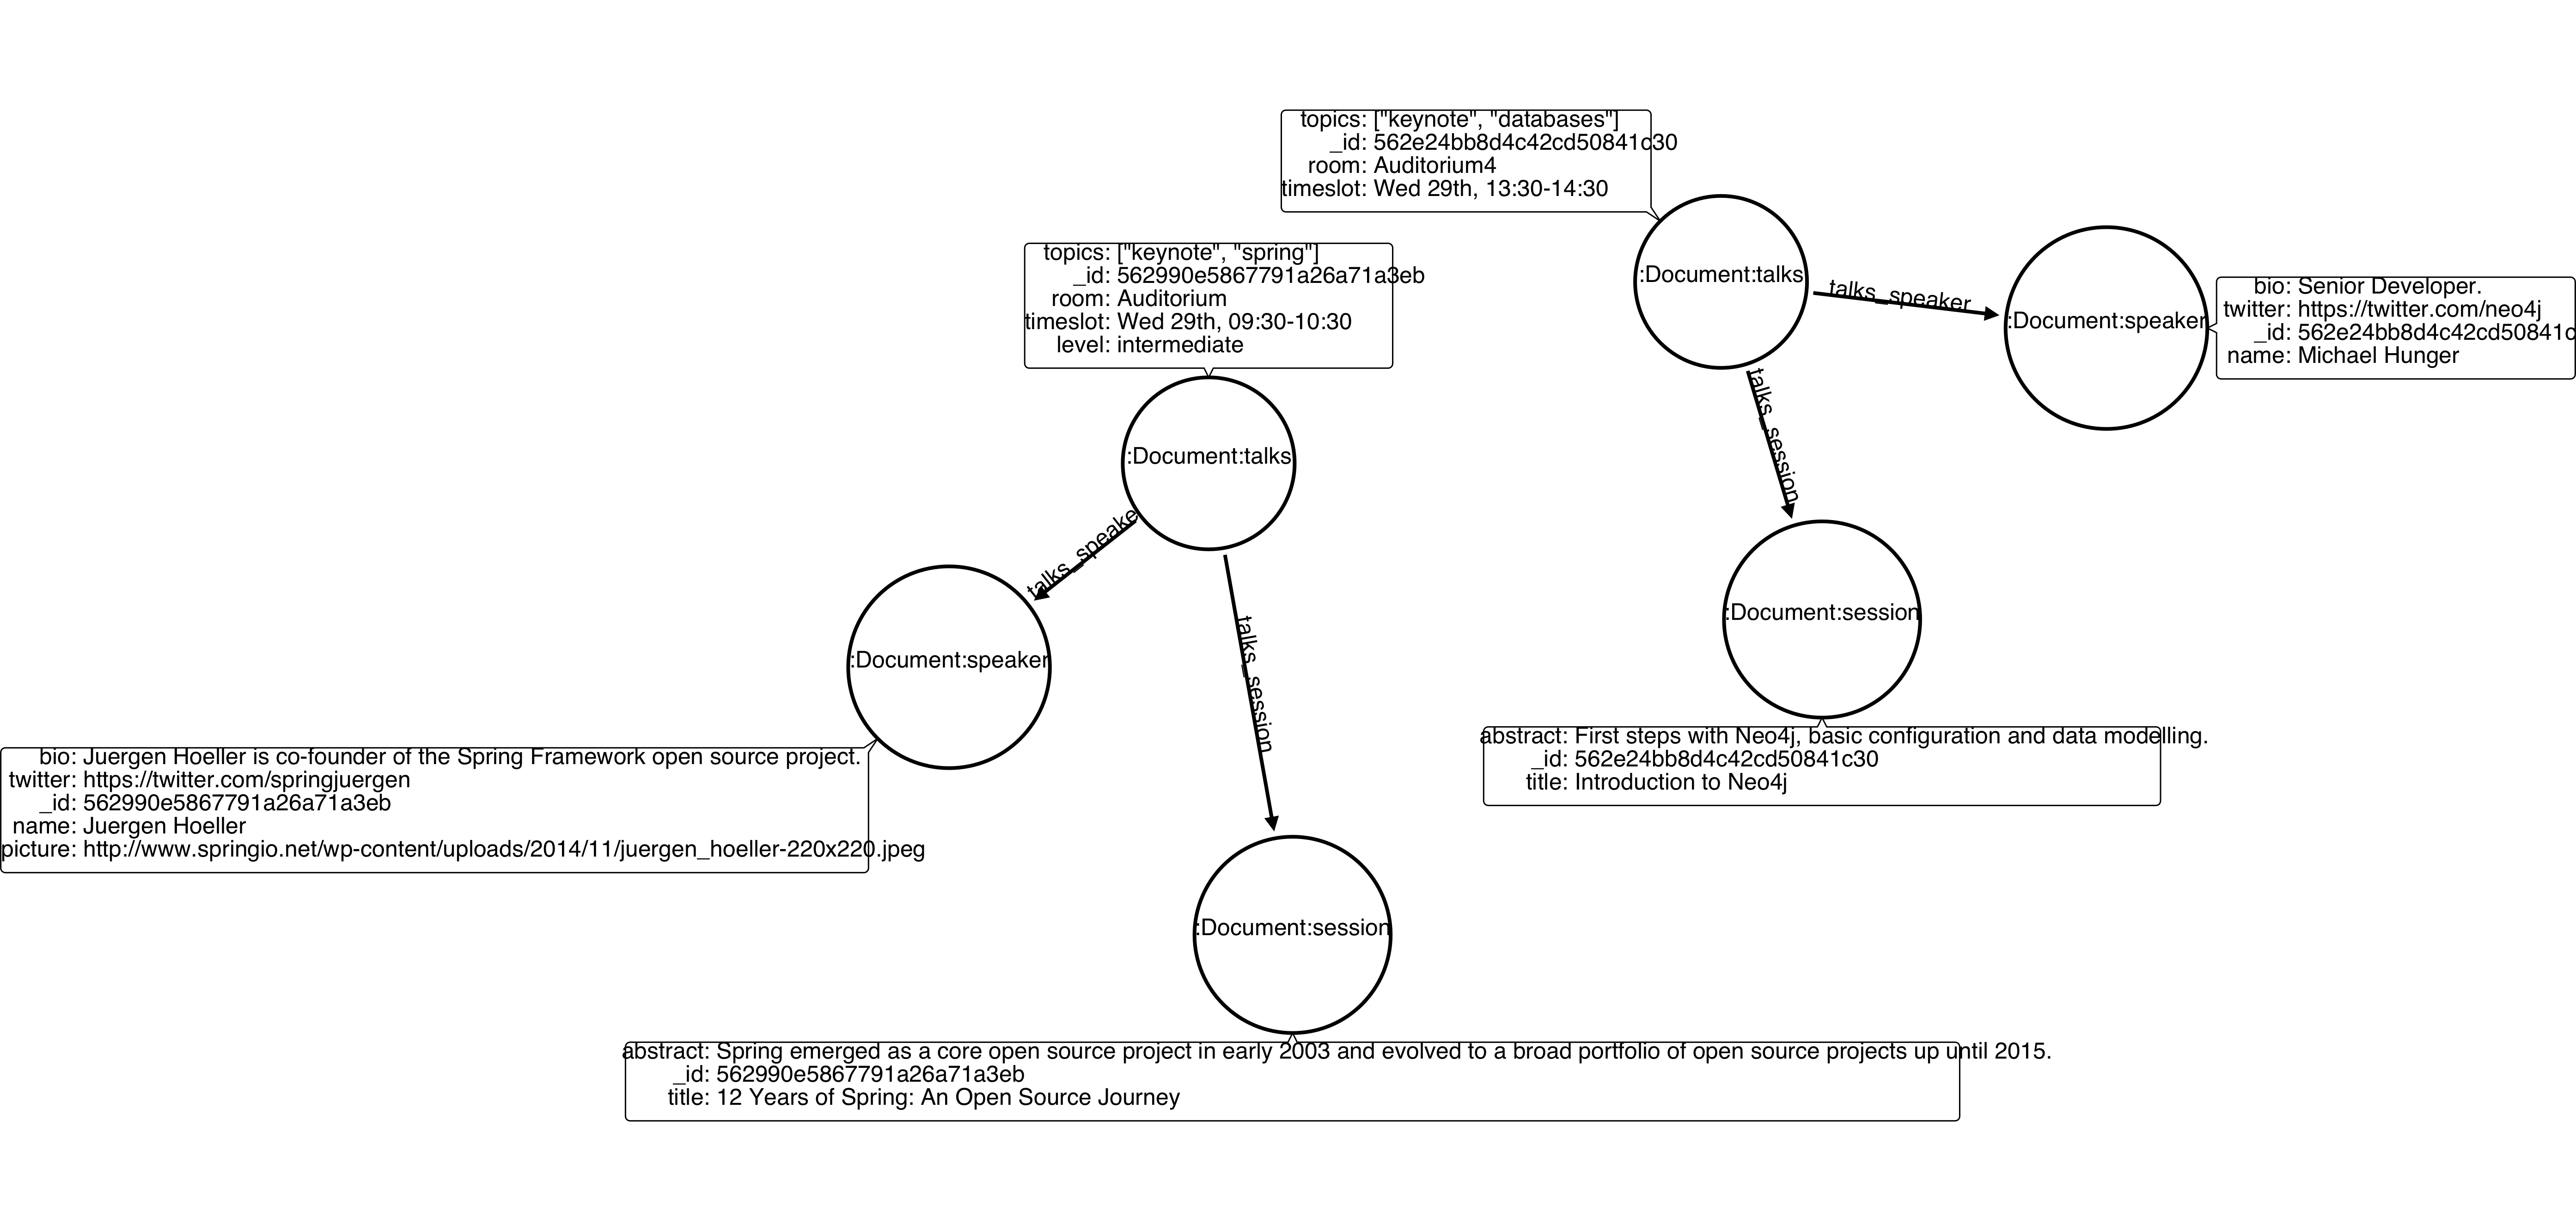
Updated nodes
-
None
Inserted nodes
-
Document:talks - a new node is created, with room setted for Auditorium4 and timeslot as Wed 29th, 13:30-14:30.
-
Document:session - Node created from Nested Document.
-
Document:speaker - also nested Document.
Creating new nodes by an update action
We can also invoke an update action that contains a nested Document. For example, imagine that we have the following document in Mongo, that we have been using in the past examples:
{
  "session": {
    "title": "12 Years of Spring: An Open Source Journey",
    "abstract": "Spring emerged as a core open source project in early 2003 and evolved to a broad portfolio of open source projects up until 2015."
  },
  "topics":  ["keynote", "spring"],
  "tracks": [{ "main":"Java" }, { "second":"Languages" }],
  "room": "Auditorium",
  "timeslot": "Wed 29th, 09:30-10:30",
  "speaker": {
    "name": "Juergen Hoeller",
    "bio": "Juergen Hoeller is co-founder of the Spring Framework open source project.",
    "twitter": "https://twitter.com/springjuergen",
    "picture": "http://www.springio.net/wp-content/uploads/2014/11/juergen_hoeller-220x220.jpeg"
  }
}In Neo4j, we have:

Nodes:
-
Document:talks - talks is the root node, coming from Mongo Document Collection, with an id that also comes from MongoDB. Non nested Documents are converted into regular properties, such as "room", "topics" and "timeslot" (a common String array).
-
Document:session - Nested Document. Inner key/values are converted into Node properties. Note that the id incoming from root talks collection is propagated to this Node. Also, note that this node is labelled as its direct document key, in this case, session.
-
Document:speaker - also nested Document.
Relationships:
-
A relationship that connects talks and session nodes, called talks_session,
-
A relationship that connects talks and speaker nodes, called talks_speaker.
And then we run the following instruction:
db.talks.update({ room: "Auditorium" }, { $set: { conference: { name: "GraphConnect", city: "London" } } });This will cause the following update in Mongo:
{
  "session" : {
    "title" : "12 Years of Spring: An Open Source Journey",
    "abstract" : "Spring emerged as a core open source project in early 2003 and evolved to a broad portfolio of open source projects up until 2015."
  },
  "topics" : [
    "keynote",
    "spring"
  ],
  "room" : "Auditorium",
  "timeslot" : "Wed 29th, 09:30-10:30",
  "speaker" : {
    "name" : "Juergen Hoeller",
    "bio" : "Juergen Hoeller is co-founder of the Spring Framework open source project.",
    "twitter" : "https://twitter.com/springjuergen",
    "picture" : "http://www.springio.net/wp-content/uploads/2014/11/juergen_hoeller-220x220.jpeg"
  },
  "conference" : {
    "name" : "GraphConnect",
    "city" : "London"
  }
}
Note that the nested document conference has been inserted. This will be translated as a new node and a new relationship into Neo4j:
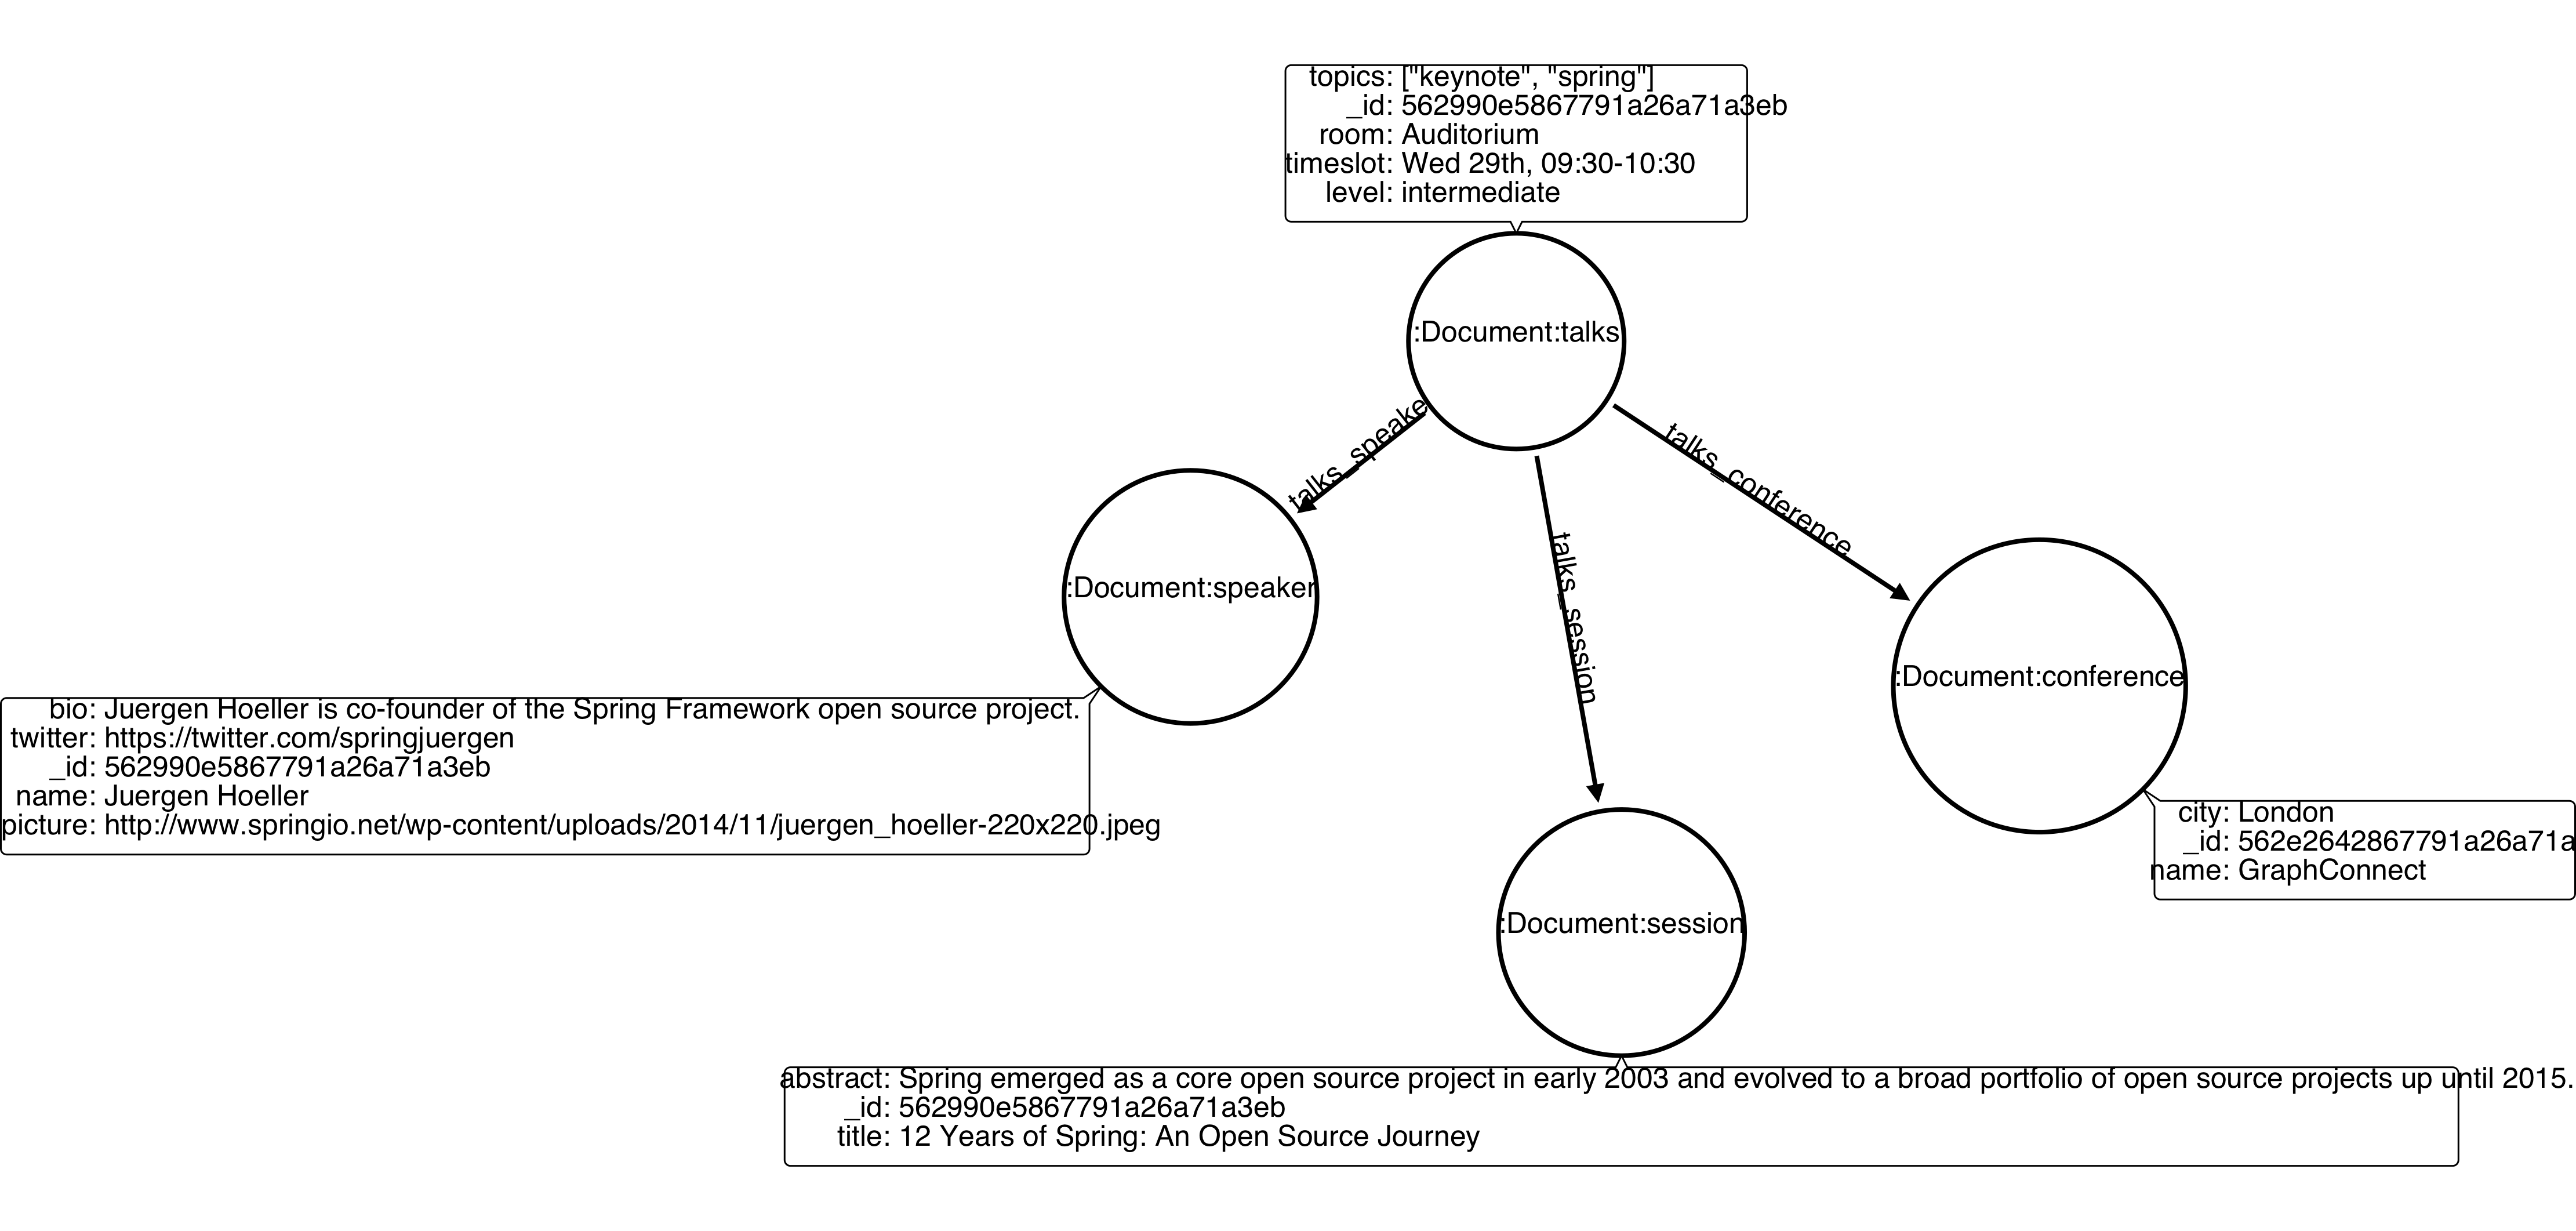
Created by update action Nodes:
-
Document:conference - Simple node with the properties name and city.
Created by update action Relationchips:
-
A relationship that connects talks and conference nodes, called talks_conference
2.2.5. Delete
It is possible to remove documents from MongoDB by calling db.[your_collection].remove()
db.talks.remove({})So let’s imagine that we had two nodes on talks, previously inserted. Each node has relationships and connected nodes:

-
Document:talks - talks is the root node, coming from Mongo Document Collection, with an id that also comes from MongoDB. Non nested Documents are converted into regular properties, such as "room", "topics" and "timeslot" (a common String array).
-
Document:session - Nested Document. Inner key/values are converted into Node properties. Note that the id incoming from root talks collection is propagated to this Node. Also, note that this node is labelled as its direct document key, in this case, session.
-
Document:speaker - also nested Document.
-
A relationship that connects talks and session nodes, called talks_session,
-
A relationship that connects talks and speaker nodes, called talks_speaker.
By calling ```db.talks.remove({})```, we will remove all **talks** and their relationships and connected nodes. We end up with the removal of all elements listed above.
Removing relationships
When a node will be removed, the nodes created from nested documents will also be removed. Also, all the relationships between these nodes will be deleted, to avoid orphans.
Removing nodes with clauses
It is also possible to specify a document parameter that refers to the document that we want to remove. For example, we can run:
db.talks.remove( { room : "Auditorium" }, 1 )This will remove a single document with room marked as Auditorium.
Before the update:

After the update:
The translation will be held the same way for Neo4j - The corresponding Document::talks node will be removed with all his nested information.
2.3. Customising the data to be imported
It is possible to specify which collections should be imported to Neo4j from MongoDB.
When invoking mongo-connector command it is possible to pass -n as an argument and list the collections to be imported following the format
db_name.collection.nameFor example, imagine that we switched to a database called test in Mongo:
use testAnd then we added a document:
db.talks.insert( { "room": "Auditorium", "timeslot": "Wed 29th, 09:30-10:30" } );By calling mongo-connector without -n option, all the namespaces will be imported:
mongo-connector -m localhost:27017 -t http://localhost:7474/db/data -d neo4j_doc_managerBy specifying a namespace, let’s say, main.files:
mongo-connector -m localhost:27017 -t http://localhost:7474/db/data -d neo4j_doc_manager -n main.filesWe would not have the test.talks** collection listed above imported to Neo4j. We can also specify multiple namespaces:
mongo-connector -m localhost:27017 -t http://localhost:7474/db/data -d neo4j_doc_manager -n main.files,another.collection,test.abcIf we insert a namespace that was previously excluded, such as test.talks, then the retroactive documents will be inserted into Neo4j:
mongo-connector -m localhost:27017 -t http://localhost:7474/db/data -d neo4j_doc_manager -n main.files,test.talksWill cause the previous talks document do be imported into Neo4j graph.
2.3.1. Customising fields that will be imported
It is also possible to specify the fields from a document that will be imported to Neo4j. Imagine the same document that we mentioned above:
db.talks.insert( { "room": "Auditorium", "timeslot": "Wed 29th, 09:30-10:30" } );We can filter the fields that will be imported specifying the command line parameter -i. For example, we can import only room field:
mongo-connector -m localhost:27017 -t http://localhost:7474/db/data -d neo4j_doc_manager -i roomFor this example, timeslot would not be imported. It is also possible to specify multiple values:
mongo-connector -m localhost:27017 -t http://localhost:7474/db/data -d neo4j_doc_manager -i room,timeslot,titleIf the specified field does not exist, only the existing ones will be imported. In the example, only room and timeslot will be imported.
It is also possible to combine -i and -n options, such as:
mongo-connector -m localhost:27017 -t http://localhost:7474/db/data -d neo4j_doc_manager -n test.talks -i roomImportant: All nodes will always have the _id property.
Nested Documents
Imagine that we have the following document:
db.talks.insert( { "session": { "title": "12 Years of Spring: An Open Source Journey", "abstract": "Spring emerged as a core open source project in early 2003 and evolved to a broad portfolio of open source projects up until 2015.", "conference": { "city": "London" } }, "topics": ["keynote", "spring"], "room": "Auditorium", "timeslot": "Wed 29th, 09:30-10:30", "speaker": { "name": "Juergen Hoeller", "bio": "Juergen Hoeller is co-founder of the Spring Framework open source project.", "twitter": "https://twitter.com/springjuergen", "picture": "http://www.springio.net/wp-content/uploads/2014/11/juergen_hoeller-220x220.jpeg" } } );You can notice that we have nested documents. We can specify only the root level fields that will be imported. For example:
mongo-connector -m localhost:27017 -t http://localhost:7474/db/data -d neo4j_doc_manager -n test.talks -i room,sessionIn Neo4j, we will have:
Nodes
-
Document:talks, with the _id and the room properties.
-
Document:session, with all the properties (id, title, abstract) and with the inner node,
-
Document:conference, nested node from session, with all its properties (id, city)
Note that the nested node speaker was not imported to Neo4j, nor the root level properties topics and timeslot.
Relationships
-
talks_session
-
session_conference
2.4. Customising the data to be imported via configuration file
It is also possible to configure what data will be imported to Neo4j through a configuration file. By passing a JSON file such as this example during mongo-connetor startup you can set which namespaces will be included. For example, consider the following file, called config.json:
{
  "__comment__": "Configuration options starting with '__' are disabled",
  "__comment__": "To enable them, remove the preceding '__'",

  "mainAddress": "localhost:27017",
  "oplogFile": "oplog.timestamp",
  "noDump": false,
  "batchSize": -1,
  "verbosity": 1,
  "continueOnError": false,

  "namespaces": {
    "include": ["test.talks"]
  },

  "docManagers": [
    {
      "docManager": "neo4j_doc_manager",
      "targetURL": "http://localhost:7474/db/data",
      "args": {
        "clientOptions": {
          "collection": "talks"
        }
      }
    }
  ]
}
Notice that every parameter that starts with __ is ignored.
Take a look into namespaces key. Within the include option, you can specify which namespaces will be imported, such as you do via command line. For this example, if you have data into, let’s say, docs.info, they will not be imported to Neo4j, unless you explicitly inform the namespace:
"include": ["test.talks", "docs.info"]Just a reminder, the default settings, when nothing is specified, is to import everything that you have into MongoDB.
We can also specify the fields via configuration files:
{
  "__comment__": "Configuration options starting with '__' are disabled",
  "__comment__": "To enable them, remove the preceding '__'",

  "mainAddress": "localhost:27017",
  "oplogFile": "oplog.timestamp",
  "noDump": false,
  "batchSize": -1,
  "verbosity": 1,
  "continueOnError": false,

  "fields": ["session", "timeslot", "title"],

  "namespaces": {
    "include": ["test.talks"]
  },

  "docManagers": [
    {
      "docManager": "neo4j_doc_manager",
      "targetURL": "http://localhost:7474/db/data",
      "args": {
        "clientOptions": {
          "collection": "talks"
        }
      }
    }
  ]
}
The same principles that were described in the previous session through command line configuration are applied via configuration file. The key field holds a string array of fields that will be imported.
Just a remainder, you can only specify the fields of the root document and the direct nested documents that will be imported.
2.5. Errors and exceptions
If something bad happens during the import, Neo4j Doc Manager should not stop. An error message should be thrown on the terminal. You can have more details by checking the file mongo-connector.log. It is also possible to increase the log details by initialising mongo-connector with -v option:
mongo-connector -v -m localhost:27017 -t http://localhost:7474/db/data -d neo4j_doc_managerThis activates verbose level. You can have a better explanation about what are the failure points by searching for OperationFailed on mongo-connector.log file.
2.6. Running the tests
If you are willing to contribute with this project (we hope you are!), then you may need to run the tests locally. To do so, you must:
-
install mongo-orchestration repo, by running pip install mongo-orchestration
-
stop any MongoDB instances you might have running.
-
Also stop Mongo Shell.
Move to your project directory and start mongo-orchestration by running mongo-orchestration start. Then simply run the tests with python -m unittest discover.
Just be sure that the ports 27017 and 27018 are not being used. You can verify it with the command lsof :
sudo lsof -i :27017
sudo lsof -i :27018
A MongoDB server mock will need these ports.
Was this page helpful?