Language Buffet: Using Neo4j with GraalVM

Developer Relations Engineer at Neo4j
11 min read
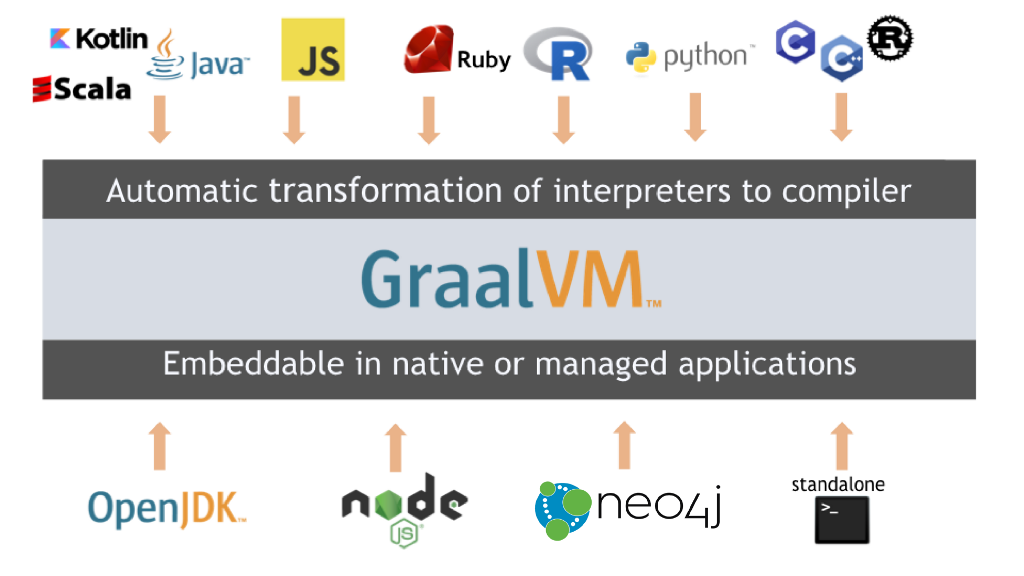
- Polyglot clients — access Neo4j from languages using an official driver (like the Java driver). This allows you to use libraries in the source language for connecting to Neo4j from target languages like Python, Ruby, R, Javascript, LLVM, as well as other GraalVM language implementations.
- Library-sharing — access non-Java libraries to use within programs in other languages. For instance, you could pull in Python’s ratelimit library or Javascript’s colors into a Java program that interacts with Neo4j.
- Polyglot procedures — extend Neo4j and the Cypher query language by writing procedures and functions in any language and packaging them as a Neo4j database plugin. Typically, Neo4j only allows you to write extensions in JVM languages (Java, Kotlin, Scala, Groovy, etc), but this changes that. It also means you can execute language-specific code within a Cypher procedure (i.e. run Python inside a Cypher statement).
- Polyglot Cypher — use Cypher as the query language in various programs (by implementing Cypher in GraalVM’s Truffle language framework). This would allow you to embed Cypher code in your Python or Javascript program for executing against Neo4j.
Access Neo4j from languages using an official driver
We’ll start with the ability to connect to a Neo4j database from various languages using an official driver. Our example will use the Java driver, but you could use other drivers for Neo4j, as well. We will import the Java driver to programs in Javascript, Python, Ruby, and R, allowing us to connect to the database from those languages. Note: Python and Javascript have their own official drivers, so you can use the driver for the related language. For example purposes, we chose a consistent driver (in this case, the Java driver) to connect from different languages.Setup
First, if you don’t already have some version of it, we will need Neo4j. Since I already have Neo4j Desktop installed, I will use that, but Neo4j Server or Sandbox will work, as well. In Neo4j Desktop, I create a graph, but I’m going to wait to start it until I get the rest of my environment set up. Next, I need GraalVM. This is another JDK (Java Development Kit) install, which is a bundle of tools for developing Java applications. For those already familiar with this, feel free to use whatever way you are most comfortable with handling java versions and JDKs. If you’re new to JDKs, an article I found explains the components of the Java environment. For managing all the options on my machine, I really like using SDKMAN!. It automatically syncs classpaths and seamlessly allows me to change versions and providers with a command or two. The commands to install the GraalVM JDK with SDKMAN! are listed below.#List available Java vendors and versions in SDKMAN! % sdk list java
#Install one for GraalVM (my current version)
% sdk install java 20.3.0.r11-grl
#Switch Java versions
% sdk use java 20.3.0.r11-grl
#(optional) Set it as the default JDK for your system
% sdk default java 20.3.0.r11-grl
#Verify Java version on your system (and results for my environment)
% java -version
openjdk version “11.0.9” 2020–10–20
OpenJDK Runtime Environment GraalVM CE 20.3.0 (build 11.0.9+10-jvmci-20.3-b06)
OpenJDK 64-Bit Server VM GraalVM CE 20.3.0 (build 11.0.9+10-jvmci-20.3-b06, mixed mode, sharing)
Note: when you install a version of Java, it may prompt you to set it as default in the install. However, if it doesn’t or you choose to set it as default later, I included the command to do that. Ok, those are the base requirements to install — GraalVM and Neo4j. There are a couple of other setup needs to run various languages with that. Though you can use standard language environments, I’ve opted for the built-in GraalVM languages, as I assume those have less setup overhead. To install each of the GraalVM-supported languages, we can use the GraalVM Updater (gu) tool. Commands for using gu to install each language are shown below.
#See what’s there already
gu list
#Python
gu install python
#Javascript (included)
#R
gu install r
#Ruby
gu install ruby
Note: gu is included in the base install of GraalVM. And, if you haven’t installed any other languages before you run the gu list command shown first in the code block above, you may notice that a couple of things are already there. That’s because these are built into the GraalVM general install. For the R install, there are a couple other dependencies listed in the documentation that are needed. My Mac already had these installed on my system, but depending on your operating system and version, you might want to verify them. With Ruby, there are a couple of extra dependencies that need to be installed, as well. Most of these were already installed on my Mac, but you can verify these for your operating system and version. After those are complete, the first command in the code block below runs a script to connect openssl and libssl. I also had some issues with the recommendation to use a Ruby manager. It moved the path around where I couldn’t execute Ruby. I ended up uninstalling my Ruby manager and remapping TruffleRuby. In the end, the two commands below should help you see if your environment looks similar to mine. Note that SDKMAN! is in my path for TruffleRuby.
#After installing deps, make the Ruby openssl C extension work with your system libssl)
<path to your GraalVM JDK>/languages/ruby/lib/truffle/post_install_hook.sh
% truffleruby -v
truffleruby 20.3.0, like ruby 2.6.6, GraalVM CE Native [x86_64-darwin]
% which truffleruby
/Users/jenniferreif/.sdkman/candidates/java/current/bin/truffleruby
You can check that all the desired languages are installed by running the gu list command again to see all the languages you now have. Finally, we can go back to our Neo4j Desktop and start the database. Next, we will get our project ready to run!
Connecting to Neo4j from languages
We will need the language driver of our choice for connecting to Neo4j — in this example, with the Neo4j Java driver. I’ve chosen a Maven project, as you can see on the Github project with the Java driver dependency in the pom.xml file. Maven will also pull down the reactive streams dependency with that. For a Gradle version, see Michael Simons’s project. However, if you are not using something like Maven or Gradle for dependencies, you can download each required jar directly from Maven (Java driver v4.0.3 jar, Reactive streams v1.0.3 jar). Let’s look at the pom.xml and review any other items there. Besides for the GraalVM SDK and Java driver dependencies, there is a build configuration that we’ll walk through below.<build>
<plugins>
<plugin>
<artifactId>maven-dependency-plugin</artifactId>
<executions>
<execution>
<phase>prepare-package</phase>
<goals>
<goal>copy-dependencies</goal>
</goals>
<configuration>
<outputDirectory>${project.build.directory}/lib</outputDirectory>
</configuration>
</execution>
</executions>
</plugin>
</plugins>
</build>
This includes the Maven dependency plugin that copies dependencies into an output directory. For more information, I found these articles helpful for understanding the plugin goals, phases, and directory settings. Notice that I’ve tweaked the output directory a bit to drop my three main dependencies (GraalVM SDK, Java driver, and reactive streams jar) into a /lib folder.
You may need to build and/or run a mvn clean package to pull down dependencies before running. This will ensure that the JARs get dropped into the lib folder.
Language programs
Now we get to the true core of connecting to Neo4j with different languages! In the src/main/java folder of the project, we have 4 programs in 4 different languages. Each of them uses the Neo4j Java driver to connect to our running Neo4j database, execute a query, and return the results. The only differences between the programs is the language syntax, so you can choose whichever one you are most comfortable with to review. I will walk through the Python one in this post.import java
#Add Java libraries to GraalVM from Python
java.add_to_classpath(“../../../target/lib/reactive-streams-1.0.3.jar”)
java.add_to_classpath(“../../../target/lib/neo4j-java-driver-4.0.3.jar”)
The first few lines (shown above) import Java so that we can access Java libraries and then add the Java driver and reactive streams dependency jars to our classpath. As an alternative, we could instead specify the classpath jars on the command line when we execute the program, but I prefer concise and clean commands, so I would rather place the jars inside my program code. The path to each of the jars is the output directory I specified in the pom.xml for the Maven build configurations. You may notice that, if you’re in any of the other programs, they don’t require a general import of Java. Also, for Ruby, you may notice that there aren’t statements to add the dependency jars to the classpath. This is because TruffleRuby doesn’t currently support this syntax (hopefully yet), so we must add the jars to the classpath on the command line when we execute. We will see this in a bit. Next, we bring in the required Java classes for connecting to Neo4j and set up our connection details in a driver object.
# This brings in the required classes
graphDatabase = java.type(‘org.neo4j.driver.GraphDatabase’)
authTokens = java.type(‘org.neo4j.driver.AuthTokens’)
config = java.type(‘org.neo4j.driver.Config’)
sessionConfig = java.type(‘org.neo4j.driver.SessionConfig’)
# This is a call to the static factory method named `driver`
driver = graphDatabase.driver(
    ‘bolt://localhost:7687’,
    authTokens.basic(‘neo4j’, ‘Testing123’),
    config.builder()
      .withMaxConnectionPoolSize(1) # Don’t need a bigger pool size for a script
    # .withEncryption() # Uncomment this if you want to connect against https://development.neo4j.dev/product/auradb/
      .build()
)
In the first few lines above, we bring in our database, authentication, and configuration classes for connecting to the database with Java. With each of the Neo4j language drivers, there is a consistent pattern designed for running operations on the database — driver, session, transaction, and query/results. The driver manual discusses these in a bit more detail, but no matter which language program you are looking at, you will notice the same structure across all of them.
The next few lines set up a communication channel with the database by stating the connection string, authentication, and configuration required. Note that you will need to modify your password to be the one you used when you created your Neo4j database. If you are using a Neo4j Sandbox or another remote database instance (remote server installation, Aura, or another cloud deployment), you will also need to modify the connection string (right above the auth).
With our database connection done, we can dive into the work of running operations against the database.
# Python dicts are not (yet?) automatically converted to Java maps, so we need to use Neo4j’s Values for building parameters
values = java.type(‘org.neo4j.driver.Values’)
def findConnections(driver):
  query = “””
    MATCH (:Person {name:$name})-[:ACTED_IN]->(m)<-[:ACTED_IN]-(coActor)
    RETURN DISTINCT coActor
  “””
session = driver.session(sessionConfig.forDatabase(“neo4j”))
records = session.run(query, values.parameters(“name”, “Tom Hanks”)).list()
coActors = [r.get(‘coActor’).get(‘name’).asString() for r in records]
session.close()
return coActors
The first line in the code block above converts the Python dict type to the Neo4j value types — basically translating between data types in the Python language and Neo4j data types. This is Python-specific, so if you look at any of the other language programs, that translation line is not there. The next block of code is a Python method that executes a query and returns the results. It starts by defining our query, looking for actors who acted in the same movie as a specific person (coactors). We want to let users pick who they want to search for, so we put a query parameter of $name in the property of the first Person in the query. Then, we create a session to execute transactions and run the query, passing in a parameter for name with a value of ’Tom Hanks’. For each record in the result list, the next line loops and gets each coactor’s name and ensures it is a string. Since this is our only operation, the session gets closed, and our formatted results (a list of name strings) get returned. Our program contains just a few more lines that wrap up our results and show them to us.
results = findConnections(driver)
for name in results:
  print(name)
driver.close()The first line above calls the findConnections method we defined in the last segment and stores the output of that in a variable called results. Now we want to check that we got the results the way we wanted and to see the list of coactors for Tom Hanks. The next line loops through our results and prints each name to the console. Finally, we close our connection to the database entirely, since our work is complete.
Wrapping up!
No matter which language example you chose to follow in the Github project, the walkthrough of the syntax should look remarkably similar, with only language-specific syntax differing. This is an introductory example of a query and results, but hopefully, this gives enough of a foundation for you and others to expand upon to fill your needs! Feel free to try out other drivers and various language combinations, as well. With this project, we are certainly looking for feedback to understand what users need and are looking for in this space. We’d be happy to hear from you either via Github (liking the project or creating issues/feature requests) or via the Neo4j Community Site (getting help or letting us know what you like/dislike). Happy coding!Resources
- Github project
- GraalVM documentation
- Learn Neo4j: developer guides
- Neo4j Java driver manual
- Ask questions: Neo4j Community Site
- Michael Simons GraalVM/Neo4j blog post
Language Buffet: Using Neo4j with GraalVM was originally published in Neo4j Developer Blog on Medium, where people are continuing the conversation by highlighting and responding to this story.


