How-To: Neo4j ETL Tool
|
The ETL Tool is one of our Neo4j Labs projects. To learn more, visit the Neo4j ETL Tool Labs page. |
Through this guide, you will learn how to take your data from a relational database or table format and import to Neo4j. You will understand how the data model is transformed behind-the-scenes and how to connect different types of data formats for loading.
You should be familiar with Neo4j’s property graph data model and relational databases. It is also helpful to have read the Concepts: Relational to Neo4j guide. We will focus on how to use this tool through the Neo4j Desktop application, so you should also know how to use the basic functionality of Neo4j Desktop.
Beginner
If you haven’t already, download Neo4j and use the provided instructions (shown when downloading) to get a project and database ready to run.
|
This import tool uses a command flag that requires Neo4j 3.4.0 and higher versions. If you are running an older version of Neo4j, you can upgrade the database or use the ETL command line tool. |
Once you have a project and a database instance created, you will need to go to the Graph Applications tab in Neo4j Desktop, copy and paste the https://r.neo4j.com/neo4j-etl-app url for the Neo4j ETL tool in the install box, and click the Install button.


Now you should have access, and you can load the application 2 different ways.
In the Graph applications pane on the left, you can click the icon to the right of the ETL Tool to open the application.
This will not be specific to any project or database, and a database does not have to be running to load the graph app this way.
If you go back to your Projects icon along the left, you can choose the project you want to work within and start the database you want to use.
The grayed out Open button with its dropdown on the left side of the database instance activates once the instance starts.
Clicking the dropdown next to open shows a list of graph apps you can use.
Click on the Neo4j ETL Tool option to load the app.

ETL Tool Steps and Process
Now that the application is all set up, there are only a few steps to import data.
-
Set up a database connection for a relational database.
-
Choose the relational database (from the step above) to import from and the Neo4j database to import to.
-
Verify schema mapping and make adjustments to graph data model.
-
Import the data with a chosen import method.
Pre-Steps: Loading ETL Tool and Choosing a Project
When you first load the ETL Tool, you might be asked to allow some background processes to run.
We will choose Allow here, which continues loading the application and brings up the main screen.

On this screen, a default project should show and the database instances in that project. If you do not have any graph database instances created, you will see an image like the one below. You will need to create a graph^ before the next steps with the ETL tool. The ETL Tool supports local and remote instances (including Neo4j AuraDB).
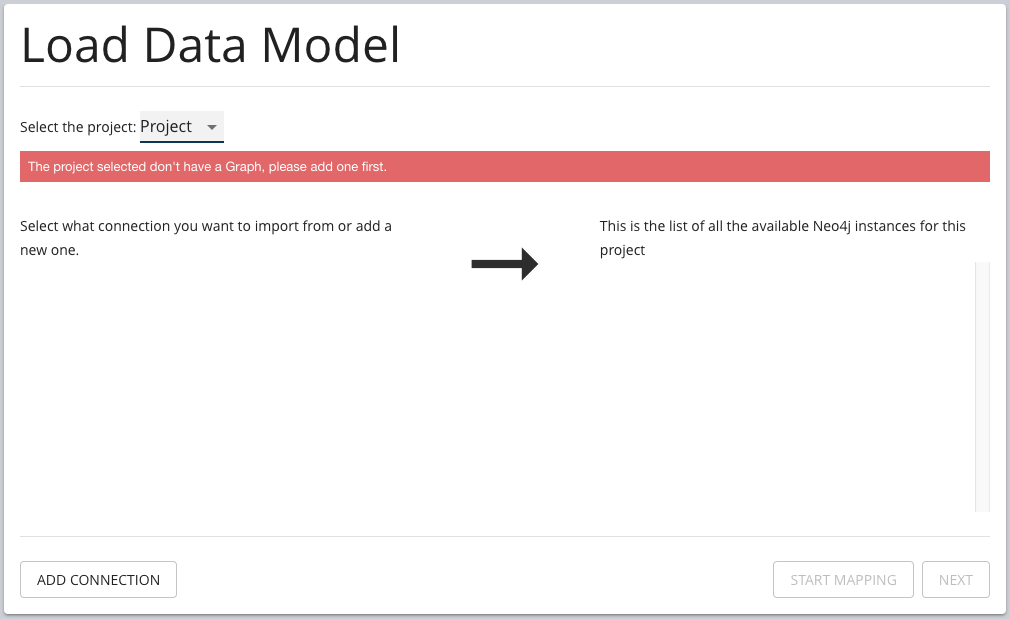
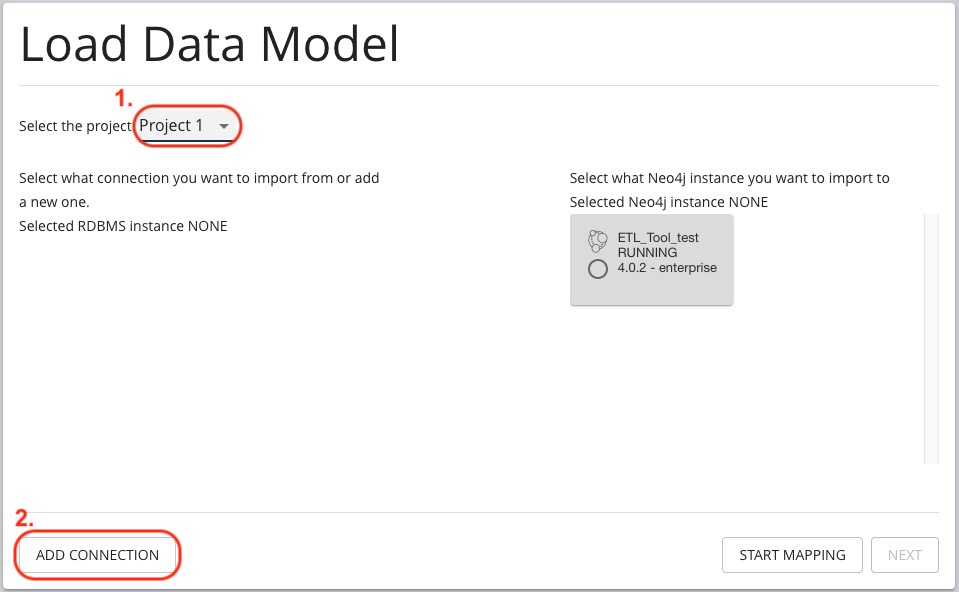
Once you have a database created, you will need to select a project to work within. This determines which Neo4j databases will populate as options for you to import the data in a later step. The screenshot below shows the steps, with the red highlighting and numbering to show where to click and in what order.
|
You can choose which Neo4j database you want to use here, but it is not required. This can also be chosen in a later step. |
Set Up Connection to Relational Database
After choosing a project, you will need to set up a connection to a relational database.
You can do this by clicking the Add Connection button in the lower left of the pane.
|
If you previously set up connections with the ETL tool, these will be remembered and listed. You can always create new connections and edit or remove existing connections. |
When you click to add a new connection, you will see a form to enter the relational database connection details. We recommend first choosing the type of database from the dropdown box in the middle of the page, as that will automatically fill in some of the other fields for you.
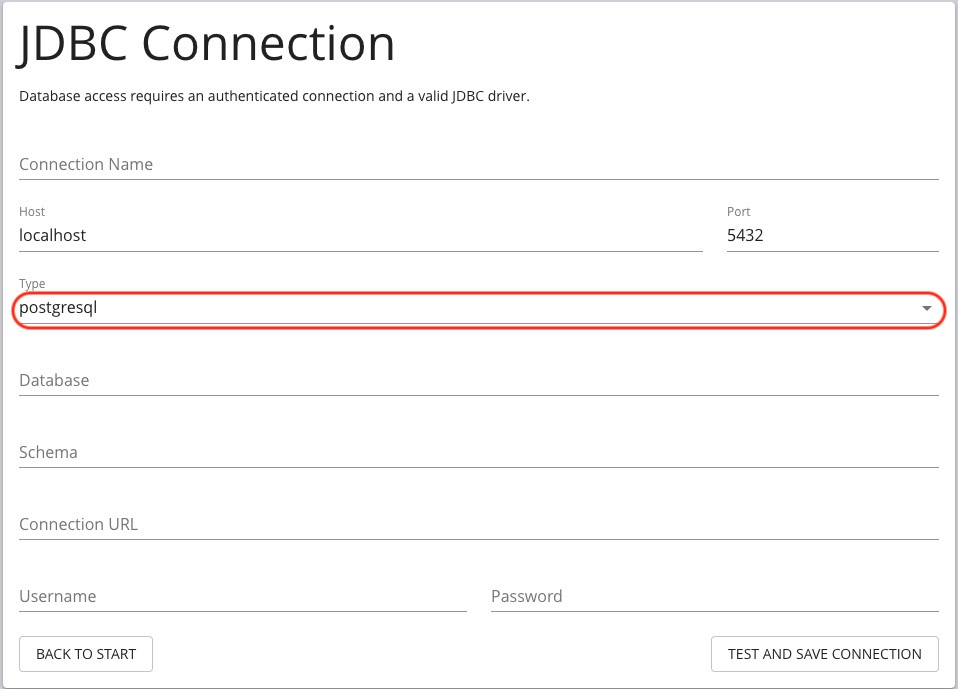
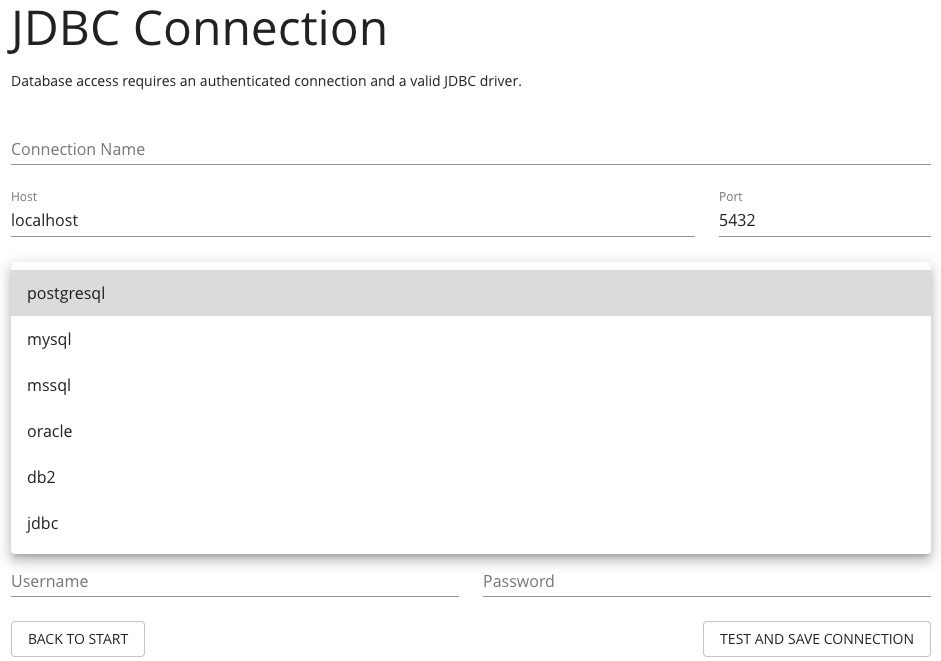
The image below shows the list of relational databases included in the tool.
If you are using a database that is not specified in the dropdown list, you can still connect by choosing the JDBC Driver option and filling in the details.
Both the MySQL and PostgreSQL connections pre-populate many of the configurations for you. For any of the other database options, you will also specify the driver file for that database.
Once you have filled in the form, click the Test and Save Connection button at the bottom.
The results for whether it was successful or not will show in a blue (success) or red (error) message bar at the top of your window.
Choose the 'From' and 'To' Databases for Import
To begin the ETL process, we need to tell the application which relational database we want as the source and which Neo4j database we want as the target. In the screenshot below, you can see the list of relational databases on the left side of the pane, and the Neo4j database options on the right side of the pane.
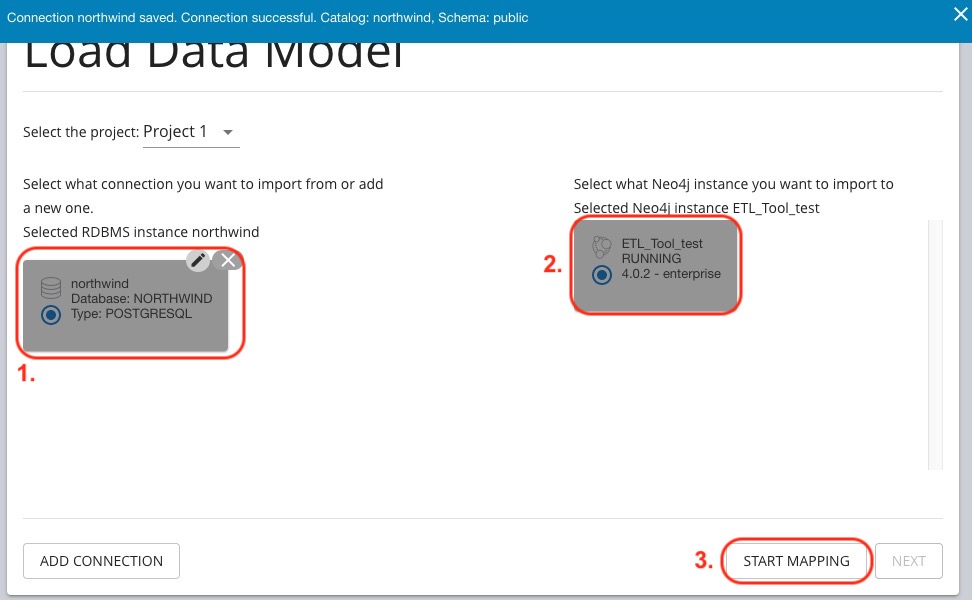
Choose your relational database, then the Neo4j database and click the Start Mapping button in the lower righthand side.
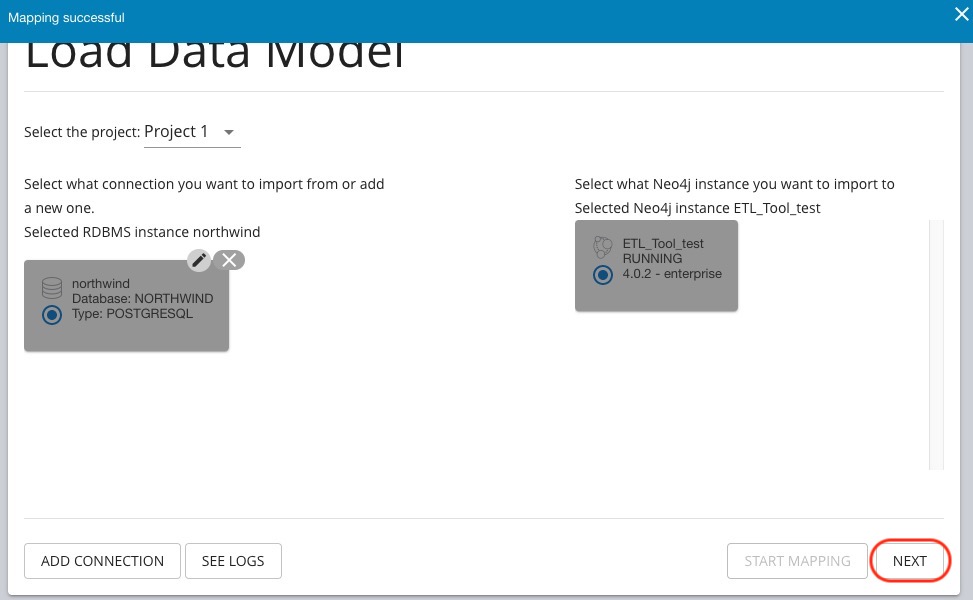
Just as before, a blue message bar will show at the top of your screen if the step was successful or a red one will show if step failed.
In this case, it was successful, so our Start Mapping button inactivates, and the Next button activates to proceed to the next step!
Review data model transformation and make adjustments
This step is where the actual translation of the relational data into graph data happens. There are three rules the tool uses to convert from relational to graph.
-
A table with a foreign key is treated as a join and imported as a node with a relationship

-
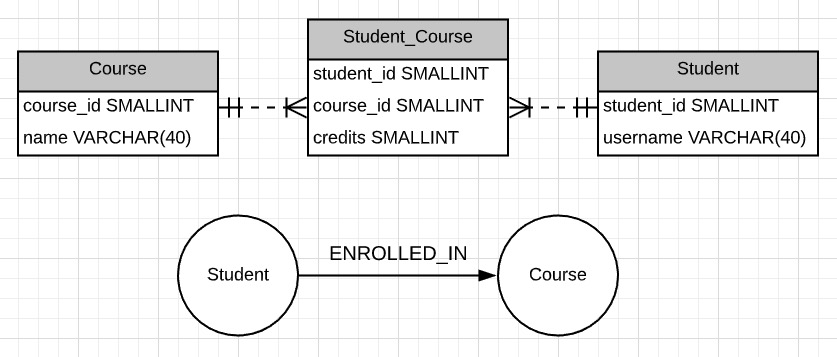
A table with 2 foreign keys is treated as a join table and imported as a relationship
-
A table with >2 foreign keys is treated as n intermediate node and imported as a node with multiple relationships

Those rules create a graph data model like the one below.
|
This example is using the popular Northwind data set. You can download and test this data set with the links further on this page. |
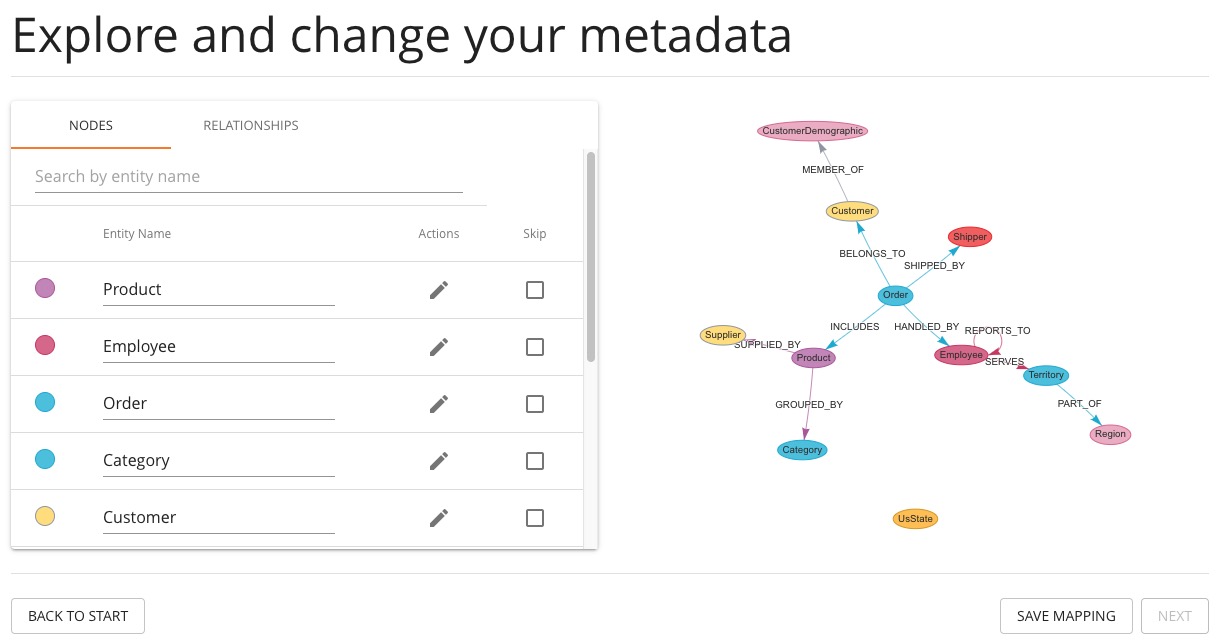
This is where you can edit the mapping to change any of the translations, such as property names, data types, and relationships.
You can use the mouse to zoom in on the model or drag the image to focus on certain areas of the graph. If you do not see a component you are looking for, you can start typing the entity name in the search bar on the left side of the pane. Any matching results will show immediately.
Nodes and relationships are listed in respective tabs on the left side.
To update, simply click the entity in the list.
The tool also allows you to skip any nodes or relationships that you do not want to import to the graph.
In the screenshot below, we have chosen to skip the UsState nodes because there are no relationships, so the data is less valuable to us in graph format.
However, we could still choose to import those nodes and later refactor the graph to create relationships from those nodes to others in the graph.
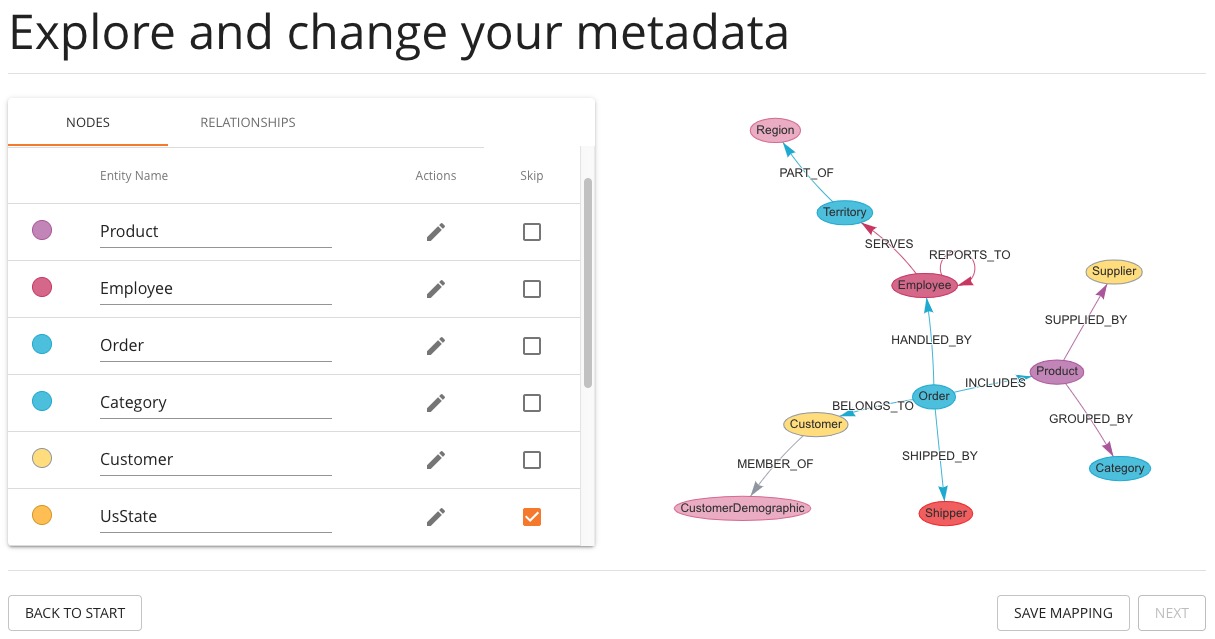
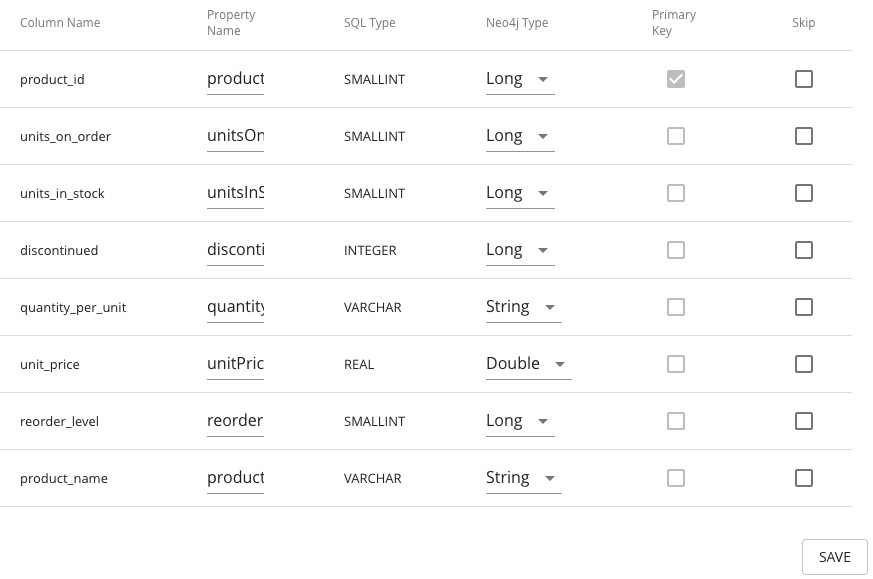
To edit the details of mappings, click on the pencil icon next to entity in the list or double click on the entity in the visualization on the right.
A popup box will list the fields and offer options for any changes.
You can click Save to apply your changes to the graph.
Oftentimes, the relationship types will be defaulted to meaningless names for a graph, so we can update them with more meaningful names for improved data context. The image below shows an example of some changes to relationship types.
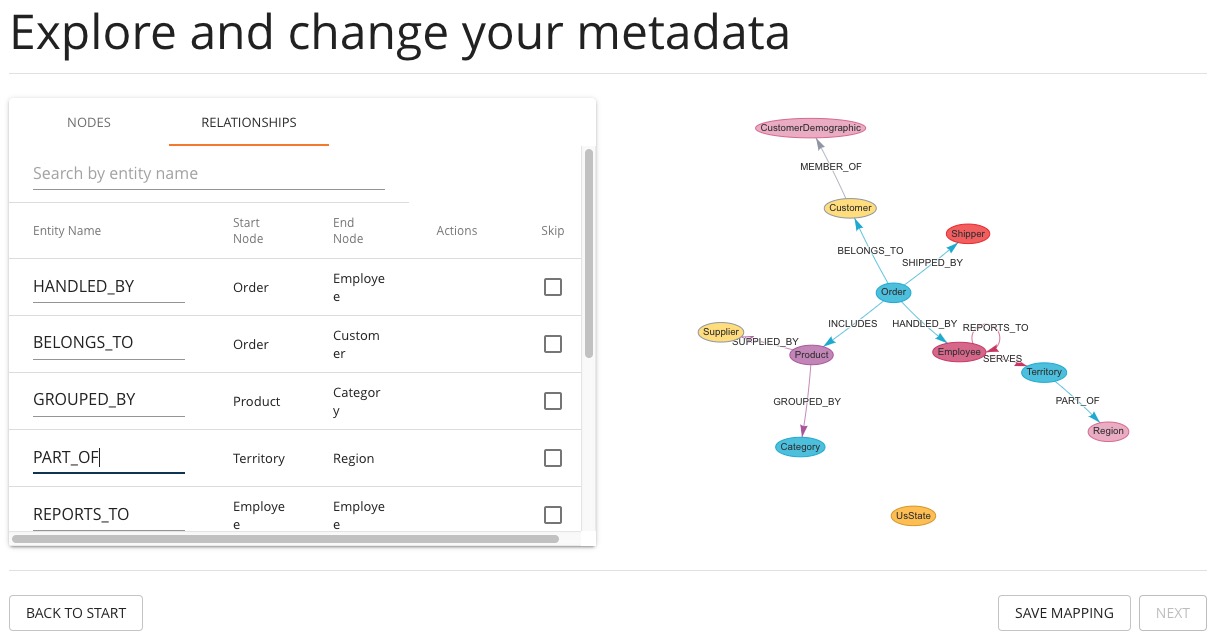
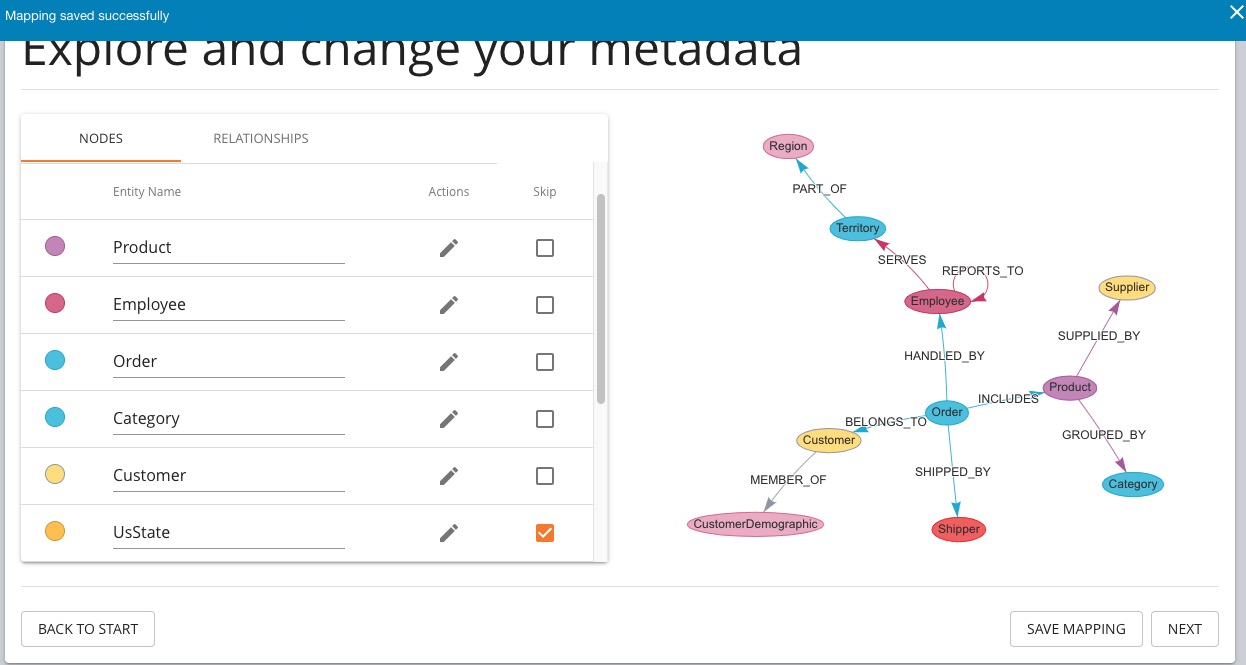
Once you have made any changes here, you can click Save Mapping.
The status of the change will show in a blue (success) or red (error) message bar at the top of your window.
If successful, you can click Next to go to the import step.
Choose an Import Method and Import the Data
There are a couple of different ways that the ETL Tool can import data to Neo4j, depending on the status of your graph database. Each method has certain requirements and advantages, which are listed below.
-
a. If database is running (works for both local and remote instances, including Neo4j AuraDB) -
-
1. Online Direct: runs via BOLT connection for import, turning SQL results into Cypher parameters.
-
2. Online Batch: uses CSV files from mapping stage to import over BOLT connection in batches.
-
-
b. If database is shut down -
-
1. Bulk Import: fast loader for initial load with offline import (running neo4j-admin import tool).
-
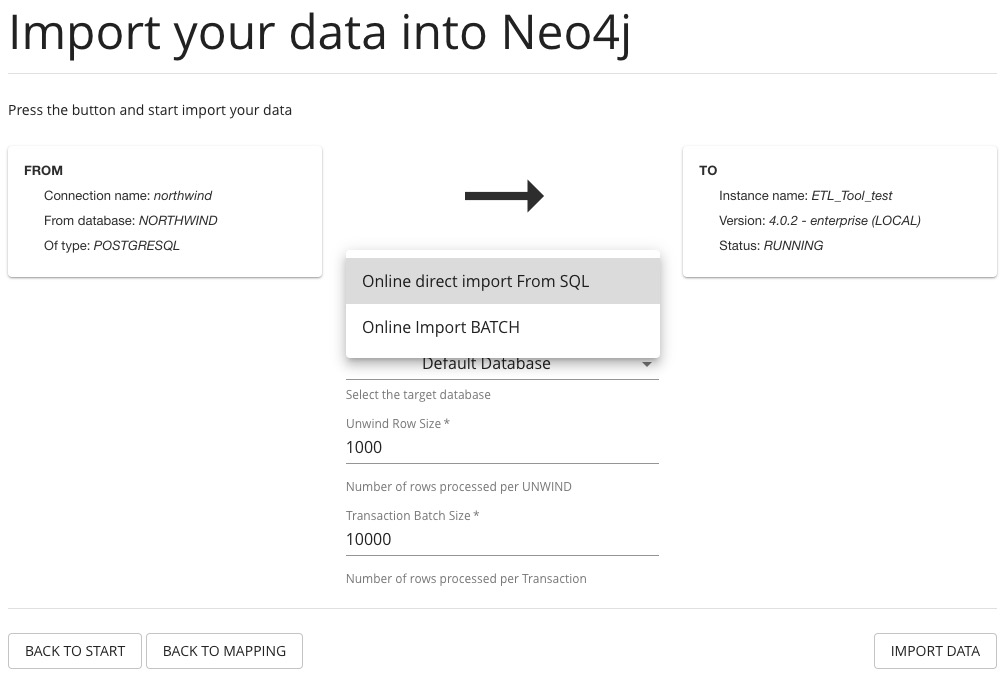
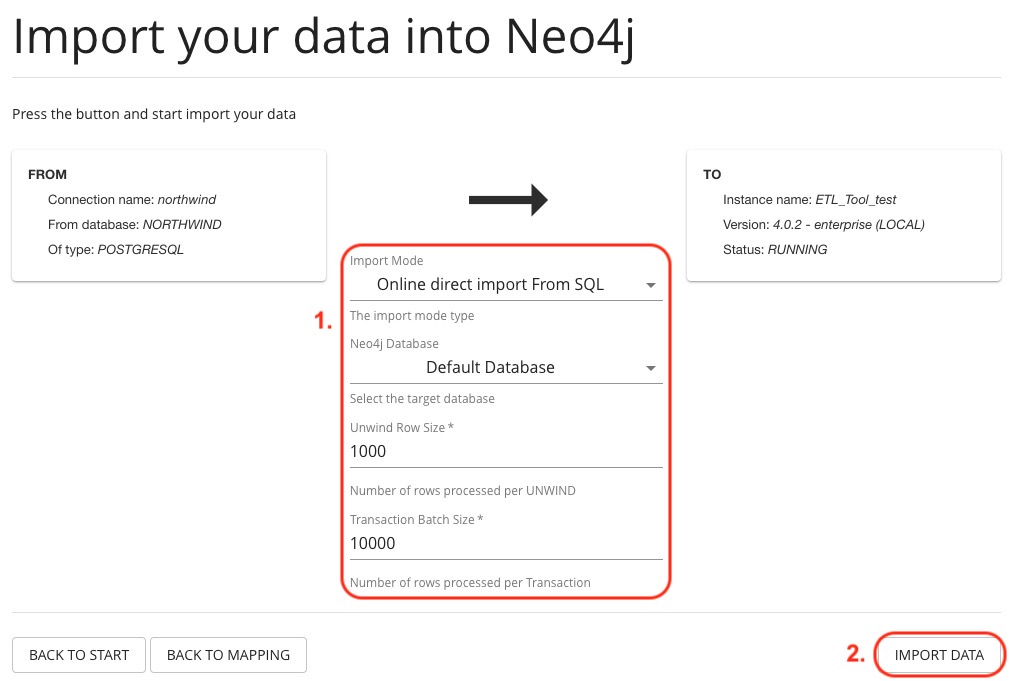
We will show the online vs. offline import methods to see the different options that come with each.
After you choose an import method from the dropdown box, you can choose if you want to import to a specific database (Neo4j v4.0+ only).
Though there is only one import type when the database is shut down, there are a couple more things you can specify.
You can tell the import to go to a specific database (Neo4j v4.0+ only), whether it exists or not.
If that database name does not exist, you can choose to manually create the database after the import (with Cypher command CREATE DATABASE <dbname> on system database) or you can click the checkbox at the bottom to have the ETL Tool create the database for you with the import.
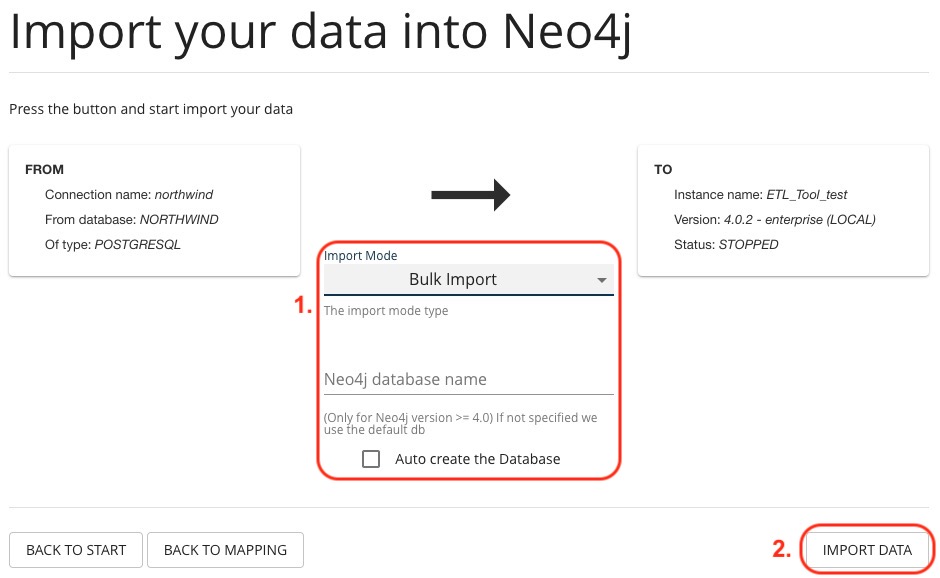
With either method, once you have filled out the form as much as you need or want, click the Import Data button in the lower right corner to start the load.
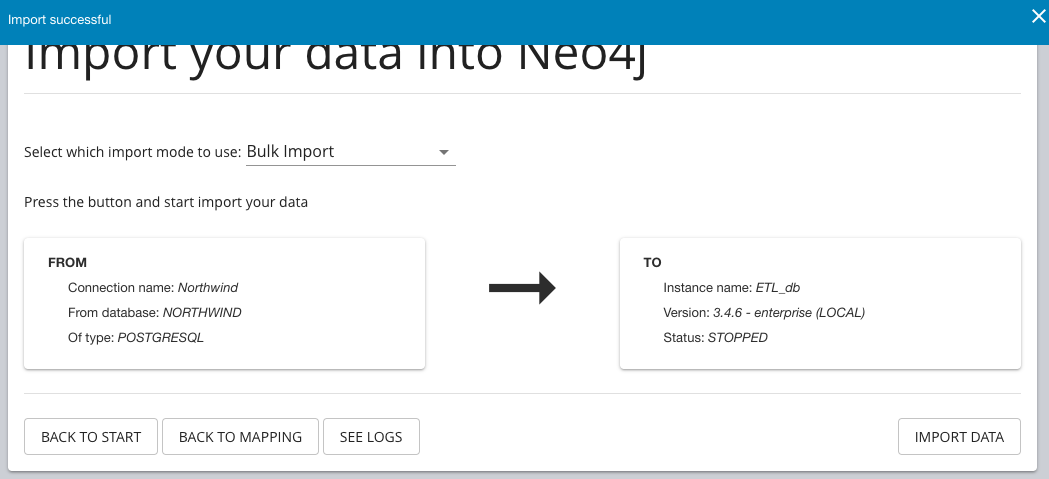
If the import is successful, you will see a screen similar to the one below (this example used the Online Direct import method).
If it fails, you will see a red error message at the top of the screen, and you can troubleshoot the issue with the logs by clicking the See Logs button at the bottom.
|
This import tool uses a command flag that requires Neo4j 3.4.0 and higher versions. If you are running an older version of Neo4j, this step will fail. To continue, you can upgrade the database or use the command line tool. |
Now, you can query the Neo4j database or use Neo4j Browser to verify the data loaded to properly. Your relational data has now been transformed to a graph!
How To Do This Example Yourself and Other ETL Options
If you want to test the ETL Tool, and you do not already have a data set, you can use the Northwind example, as we did here. We have included links to download both PostgreSQL and MySQL, if you don’t already have a relational database in mind.
-
Download db of choice - Postgresql, MySQL, or other option
-
Download JDBC driver (only if not using MySQL or PostgreSQL)
-
Insert data to relational db - PostgreSQL Northwind
-
Install ETL tool on Neo4j Desktop (or download GitHub command line tool), then follow import steps from this page.
There are also other options for ETL. Feel free to check out some partner integrations, the LOAD CSV functionality, and the APOC developer library.
Was this page helpful?